The beauty of girls’ nails attracts men, because this is a direct indicator of the grooming and neatness of the fair sex. But we are always talking about manicure, as a result of which beauties simply do not pay the same due attention to their legs as they do to their hands. Many people do pedicures only on the eve of the summer season. Well, even if this is the case, then knowing all the features of the described procedure is also necessary and important. Often girls do hardware pedicures at home, which does not take much time and effort. How to carry out the procedure yourself?
Start of the procedure
First, you should understand how to use the device, since today there are a huge number of models, each of which requires separate consideration. The average cost of a high-quality device varies from 15 to 30 thousand rubles, which may not be affordable for every beauty. When choosing a more budget option, pay attention to what attachments will come with the device.
 The attachments for the device can be very different, but they can all be divided into three main categories:
- Diamond tips are used to treat the free edge of the nail and rough cuticle. As a rule, such specimens are small in size.
- Large-sized nozzles are used to treat the skin of the feet - removing corns and other small calluses.
- Ceramic specimens are used to treat the nail plate itself and eliminate cracks.
- Silicone nozzles are used to polish the skin of the feet.
Nozzles for the device are selected individually, strictly in accordance with the recommendations of specialists. Often, everything simply depends on the stage of the pedicure.
Hardware pedicure: technology
To carry out the presented cosmetic procedure yourself, you should study all the instructions, which are presented below step by step: 
- At the initial stage, you should soften the skin of the feet, which is preceded by the use of various lotions or creams. After soaking for some time, the feet should be rinsed with running water and wiped dry.
- Now start treating your nails and skin of your feet. To begin with, you should use harder and coarser attachments (cutters with strong abrasiveness), and only then you can move on to soft specimens (cutters with fine abrasiveness for polishing leather). Use the device according to the instructions provided with it - press it gently, at an angle of 35 degrees, without pressing. If there are particularly rough areas, do not try to remove them at once - this can significantly injure the skin. It is better to repeat the procedure in a few days.
- Now they begin to remove the cuticle using a diamond nozzle.
- After cleansing your feet and shaping your nails, you can start polishing the nail plate. Here you should use silicone attachments, which have a soft and even pleasant effect on the nail.
- Wipe your feet with a damp cloth or clean them of dust and debris in any way convenient for you.
- Apply any nourishing or moisturizing cream to your feet and nails. Wait a while until the composition is completely absorbed into the skin.
While the cream is absorbed, you can start cleaning the device - remove dust from it with a special brush. Used attachments should be cleaned in the same way.
This is where the entire hardware pedicure procedure ends. As follows from the above, there is nothing complicated in the procedure itself. The main thing is to study the instructions and get your hands on the processing. If you are new to this issue, then you should treat your feet especially carefully. Start with the roughest areas of the feet first, and only then carefully begin to treat the nails. For clarity, watch the video.
Currently, many beauty salons offer their services. Almost every such organization can give you a manicure and pedicure. This is the treatment of hands and feet, respectively, using caring elements. In addition to removing dead skin, the master pays special attention to the nails. In beauty salons, hardware pedicures are increasingly being performed. Step-by-step instructions with photos will be presented to your attention in the article. You will learn about the features of the procedure and the basic rules.
Many representatives of the fairer sex try to save their time and money by refusing to visit beauty salons. They do pedicures at home. Step-by-step instructions for this processing will also be described below. Another reason for refusing salon services is the fear of infection. After all, through instruments that have not been sterilized by the master, you can get an infection from a previous guest.
Should you do a pedicure at home yourself?
There is no clear opinion on this matter. Some people believe that home treatment of nails and feet is much safer than salon services. Others are sure that you can do the manipulation incorrectly with your own hands. As a result, irreparable consequences will arise.
Whether it is worth treating the legs yourself is a personal matter for everyone. In any case, you need to know the principle of operation. The instructions below will tell you about this. Note that the algorithm for performing salon and home pedicures is very different.
Pedicure at home
What will you need to carry out the manipulation? This is the question that arises first. The simplest and most popular way to process fingers is. To carry it out, you will need tools (scissors, tweezers, files, buffs, etc.), as well as a bowl of liquid. To soak the skin, you can use special salt and nutrient solutions. They are purchased ready-made. If desired, you can use regular soapy water.
In addition to the products described, you will need a cloth, a degreaser and a coating that will be applied to the plate. If desired, you can use moisturizing formulations and nourishing oils for the cuticle and skin. Let's look at how to do a pedicure at home with your own hands. Step-by-step instructions are in front of you.

Softening rough skin
Pour the softening liquid into the bowl. After this, lower your legs into it. Some people prefer to use refillable formulations. They look like varnishes or pencils. These products lubricate the cuticle around the nail plate. Under the influence of the unique composition, the skin softens. After this, you can remove it without much difficulty.
Softening the cuticle with the help of special means requires a strictly specified time. Some formulations require exposure to the skin for 15 minutes, others act after just 5. If you do a pedicure at home with your own hands (an easy way for beginners), you will most likely choose softening with water. This effect on the skin should occur within 20 minutes.
Treatment of cuticles on legs
How to do a pedicure at home with your own hands? The step-by-step instructions involve removing the skin around the nail. To do this, you can use tweezers, thin scissors, special cutting blades for nails and other devices.
Carefully trim away excess skin, being careful not to damage sensitive areas. If you use special compounds to soften the cuticle, some of them can independently corrode the rough areas. All you have to do is wipe the treated skin with a soft cloth. If you accidentally damage your skin while working, use peroxide or alcohol. Be sure to disinfect the wound and stop the bleeding.
Tidy up your nails
Step-by-step pedicure instructions indicate mandatory nail treatment. Carefully give the plates the same shape and length. To do this, use a file, tweezers or scissors. Toenails are always coarser and thicker than those on the upper limbs. This is why they require polishing. Using a hard buff, file off the top layer of your nails. After this, sand the plates with a fine-grained surface.
Applying varnish or any other coating should be done only after the feet have been completely treated. Degrease the plate first. If you use gel formulations, you will need a special lamp.

Particular attention to feet and heels
How to do a pedicure at home with your own hands? The step-by-step instructions indicate that you need to pay special attention to rough areas. These are heels, calluses and corns. To remove the latter, you can use special compounds. They are sold in almost every cosmetic store or pharmacy. Depending on your preferences, you can choose the appropriate tools to clean the specified areas.
Using a metal file or pumice stone, remove plaque and rough skin. This method of work is suitable for those people who regularly carry out preventive measures. When the legs are in disrepair, you will have to try to bring them into proper shape. For this purpose, special blades, scrapers and tweezers are used. Carefully cut off the top rough skin. Try to do all movements very carefully. Upon completion of the manipulation, walk with a soft pumice stone and remove any small particles.

Step-by-step instructions for hardware pedicure
To perform this type of foot treatment, you must have a special device. Many beauty salons use professional machines with attachments of different shapes and hardness. Some of them are designed to cleanse nails, while others treat feet.
Currently, pedicure files that are small in size and run on batteries are becoming very popular. One of these is Scholl, but you can try Aphrodite or Solingen. Step-by-step instructions (how to do a pedicure) are always on the package. Before starting work, carefully study it and comply with all conditions. But what about those devices that do not have an annotation?

Skin softening for hardware pedicure
How to treat feet and nails with a machine? As in a classic pedicure, the skin must first be softened. To do this, use special compositions that are applied to dry skin and removed after a while with napkins.
Some devices involve treating unsoftened skin. In this case, you can skip the described point and immediately proceed to the next one.
Skin care using the device
Take the coarsest nozzle and treat especially problem areas with it. These are heels, dry calluses and corns. After this, use the nozzle to gently go over the entire skin. Remember that when doing a hardware pedicure, you can’t stop at one place. A rotating file can severely damage the skin. That is why all movements must be made carefully, moving slowly in a certain direction.
Once the rough layer of skin has been removed, you need to put on the sanding attachment and complete the pedicure. This type of file can be used to process the inside of the toes and the center of the foot.

What to do with your nails?
How to do a pedicure at home with your own hands? The step-by-step instructions say the following. The nail plate, like the rest of the skin, must be treated using attachments. However, they are smaller in size and have a different shape. Gently file away the cuticle without affecting sensitive areas and delicate skin.
The surface of the nails must be sharpened using a special attachment. After this, polish. Finally, you can apply the coating.

Adhere to the following rules:
- If you perform the manipulation yourself, you should always disinfect the instruments. Even nail files for hardware manicure can be processed. Otherwise, a fungus may develop on them, which is very difficult to remove.
- Do not use strangers When you come to the salon to have a specialist work on your beauty, always make sure that the equipment used is clean.
- Try to file your nails first, then perform softening procedures. Otherwise, the plate may begin to delaminate and crumble.
- Avoid trimming sharp corners of your nails. This can lead to the formation of ingrown toenails. This pathology causes a lot of inconvenience. In some cases, a person simply cannot move normally.
- If you use oil-based compounds, you should always wipe your nails with a degreaser before applying the coating. Otherwise, the varnish and gel simply won’t stick.
- When applying gel substances to your nails, sand the plate first to ensure a stronger adhesion.
- Use moisturizing and nourishing products after a pedicure, do not forget to treat the cuticle. It is worth noting that such compositions should be used not only after the described manipulations. Moisturizing your feet daily will help prevent dry, cracked feet.
- Perform a light pedicure at least once every two months. This will allow you to avoid the occurrence of corns, calluses and rough skin.
Brief summary
You have learned that you may not be able to perform the manipulation the way you want the first time. Read the detailed instructions for treating nails and feet. Take into account all the nuances and features. Take care of your beauty. I wish you success!
Hardware pedicure is a special technique for caring for nails and feet, and to some extent, even a medical procedure. This type of pedicure is performed without the use of water, using a special apparatus with a set of various attachments. This significantly distinguishes between classic and hardware pedicure.
Hardware pedicure step by step:
- To prevent infection, it is necessary to treat your feet and all tools used with a disinfectant.
- To make it easier to remove dead skin cells, apply a special softening gel to your feet and cuticles.
- Treat the area around the nails and on the feet with special attachments of the device. Please note that the set comes with several types of attachments. Some are suitable for eliminating corns and rough areas of skin, others are suitable for treating fingertips and hard-to-reach places between them. Treat the area near the cuticle with a small attachment, and the keratinized particles around the nail with a slightly larger one.
- Remove the remaining gel from the foot with a napkin and treat it with a nozzle designed for this purpose.
- Shape and lengthen your nails using a medium or fine abrasive cutter. Clean the surface of the nail plates with a special brush attachment.
- Use a rubber pad to buff the surface of your nails.
- Rub in the healing cream or mask using massage movements.
- Cover the nail plate with polish
The hardware pedicure procedure is effective, safe, hygienic and has a therapeutic effect. The absence of water in the process reduces the risk of fungal diseases, and if the device is used individually, this risk is completely eliminated. But not everyone can afford it, since many will be put off by the high prices of equipment for home pedicures. In addition, if you do the procedure yourself, low professionalism will force you to repeat the procedure soon. And having done it in the salon, you can forget it for several weeks. So first, try doing this procedure in a salon. Better yet, study the process well, buy a good device, and understand its benefits.
Hardware pedicure was invented in Germany. The Germans meticulously approached the invention of hardware pedicure, which allows women not to feel pain during the procedure.
Hardware pedicure is a popular way of treating the skin of the feet and toes using a special electric tool with various attachments. A variety of attachments for hardware pedicure, which can rotate at an adjustable speed, help prevent injury or damage to the skin.
This type of pedicure does not pose any danger and fully meets all hygiene requirements. During the procedure, the skin does not experience tension and does not receive even the smallest damage. Having experienced this procedure on herself once, any representative of the fair sex will visit a pedicurist regularly.
What awaits the client in the salon during this procedure?
First, the specialist wipes the feet with a certain liquid, then applies a cream, and a special solution to harden the nails on the toes. During a hardware pedicure, the skin of the feet is not steamed, since all the components used act only on dead skin cells, healthy ones remain uninvolved.
At the end of the procedure, the nails are polished using attachments for hardware pedicure. In this case, the cuticle is not touched, but only subjected to alignment. A hardware pedicure ends with adjusting the shape of the nail if desired by the client, as well as applying a cream that moisturizes the skin after the procedure. Moreover, this procedure is popular not only among women. Today we can say that there is a men's hardware pedicure.
The cutter attachments used for hardware pedicure actively fight skin diseases of the feet and nails, such as fungal ones. And the regular procedure itself is prevention and a guarantee that diseases will not reappear.
Diseases that will leave the client after a hardware pedicure:
- Mycoses, onychomycosis. These diseases are caused by a fungus and are very common among people. They are accompanied by such signs as deformation of the nail plates, changes in the natural color of the nails, dry skin, and itching. As a treatment option, doctors suggest removing the nail plate. Something similar can also be done with a hardware pedicure, while pain symptoms are completely absent.
- Hyperkeratosis is a change in the skin, the appearance of a hard stratum corneum. The disease occurs due to high pressure on certain parts of the foot. As a rule, it occurs when the client wears uncomfortable and tight shoes.
- Cracks on the feet. This is facilitated by disturbances in the functioning of internal organs. Classic hardware pedicure promotes high-quality treatment of problem areas.
- Calluses are round in shape and can be seen between the third and fourth toes on the foot. These calluses can be caused by viruses or caused by mechanical actions. Complete cleansing of the skin can be achieved after 3-6 hardware pedicure procedures.
- Plantar warts. As the name suggests, this viral disease manifests itself on the feet. “Human papillomavirus” is a well-known phrase that also means this disease, which has many varieties. Hardware pedicure will easily and simply help you cope with this disease.
- Hyperhidrosis is excessive sweating that requires medical attention.
- Thickening of the nail plates. Normally, the plate has a thickness of 1 mm. Thickening can be caused by several factors: psoriasis, eczema, etc. Previously, only surgery could cope with this problem, but today a hardware pedicurist can easily cope with this problem.
- Ingrown nails. Hardware pedicure can solve this problem in one session.
Advantages and disadvantages of hardware pedicure
To become more fully acquainted with this procedure, let's look at the positive and negative aspects of hardware pedicure.
The undoubted advantages of hardware pedicure:
- Quality and hygiene. The hardware manicure equipment has a high quality standard; all attachments for it are thought out to the smallest detail, which allows you to treat hard-to-reach places, for example, between the fingers.
- Painless. The client may smile if it is ticklish, but will not feel any pain at all. A hardware pedicure machine will take care of this.
- The possibility of infection is almost zero.
- Effective elimination of all kinds of changes described above in the skin of the legs and nail plates.
Disadvantages of hardware pedicure:
- Expensive equipment and consumables. It is necessary to plan regular expenditures on resources for disinfection, sterilization, etc.
- Low professionalism of the craftsmen. Hardware pedicure courses cost several tens of thousands, so masters learn on their own by watching videos on the Internet. Such specialists can not only harm the reputation of your beauty salon, but also force the client to spend even more money on the next procedure. But he’s unlikely to come to you anymore. Thus, hardware pedicure requires professional training.
- In advanced cases, the client will not receive any effect after the first procedure. He will need to be recommended to conduct another 5-7 sessions of hardware pedicure, which will cause dissatisfaction on his part, since even one procedure is not cheap.
Contraindications
The solutions used for hardware pedicure contain chemical components, so this procedure should never be performed during pregnancy, liver and kidney diseases, or severe allergies.
3 myths about hardware pedicure
Myth 1. “The quality of foot treatment using the device is worse than after a classic pedicure.”
An obvious myth. Many people believe that more layers of skin are removed manually using a cutting tool, which contributes to the highest quality processing. A hardware pedicure machine only works on dead skin cells, so it cannot remove more than there is. If the procedure is too thorough, you can achieve an undesirable effect, namely, pain in the foot when walking, and the skin grows even faster.
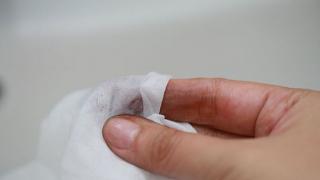
There is a proven method for determining the quality of foot treatment - this is to run a disposable towel over it. It should not leave lint, but glide effortlessly. This effect is achieved only after treatment with cutters for hardware pedicure. The main principle of hardware pedicure, as in medicine: “Do no harm!” This procedure not only fully complies with all hygiene standards, but also helps to achieve a good result in the form of smooth and well-groomed heels.
Myth 2. “The hardware pedicure procedure has a high cost.”
Not true! Of course, as in any business, initial capital will be required. You need to buy cutters, cosmetics and the device itself, but these expenses pay for themselves, and high-quality equipment will last a very long time. There is another very important advantage of hardware pedicure - it is much easier for a specialist to work with this equipment.
Myth 3. “Absolutely any device is suitable for a hardware pedicure”
Not certainly in that way. For the efficient operation of the equipment, the power of the device is of great importance, since it is responsible for the degree of pressing of the cutter to the skin. Recommended power is at least 40 W. This is the value at which the cutter moves easily along the surface of the skin and does not stop when processing the foot. The most optimal cutter mode for hardware pedicure is 25,000-35,000 rpm. If the equipment for hardware pedicure has less power or other characteristics, then the procedure will require more effort and more time.
Which pedicure machine to buy
In beauty salons, a professional uses high-quality equipment for hardware pedicure, which has many attachments and several rotation modes.
Often the set includes cutters for both manicure and pedicure. The functionality of the equipment directly depends on the price. For example, some salons use a hardware pedicure machine with a vacuum cleaner, which eliminates dust that occurs when processing nails. But there is a big drawback of this model: if the vacuum cleaner breaks down, then all the equipment will need to be sent in for repair.
The most convenient tool is the one that has more than 20 attachments. The cost of this device is within 20,000 rubles. You can also find cheaper equipment for hardware pedicure, but with less functionality. You can purchase additional attachments, polishes and a vacuum cleaner.
Which cutters and attachments for hardware manicure to use?
There are many specially designed attachments for hardware pedicure, each of which has a specific effect on the skin and nails.
The following attachments for hardware pedicure are available:
- Ceramic ones are the safest, so they are recommended for beginners to work with in order to gain experience in the art of hardware pedicure. Such attachments are a mixture of abrasive and adhesive, which is baked in an oven. The abrasiveness of ceramic nozzles can be fine, medium, or coarse. They have wide functionality and can be used to perform many skin care activities. For example, coarse-grained attachments for hardware pedicure perfectly remove rough skin on the feet, medium-grained ones process the cuticle, and fine-grained ones polish the skin or nail plate. The disadvantages of these attachments include rapid wear, which means there is a need to replace them frequently.
- Diamond bits are more wear-resistant than ceramic bits. They also serve many functions in treating the skin of the feet. There are sintered and deposited diamond attachments for hardware pedicure. To produce sintered attachments, the adhesive solution is mixed with diamond chips. The deposited nozzles look like a metal tip into which diamond chips are glued. Diamond bits can have different diameters, which determine what kind of work they can do. If you need to give the desired shape to the nail plate, you will need a nozzle with a large diameter, and a smaller diameter nozzle will help to refine the contours of the cuticle. Such an important indicator as rigidity can be assessed by looking at the colored stripe on the rod. The hardest ones will be black and red, the medium hard ones will be blue and green, the soft ones will have a yellow tint. Therefore, when choosing a nozzle during a hardware pedicure procedure, you should be careful.
- Metal ones are made from hard metals. There is a certain notch on the tip. These attachments for hardware pedicure are designed to work with rough skin, for example, to remove layers of dead cells or acrylic, as well as trampled calluses. It is important that these components do not heat up during the process and do not form dust.
- Silicone attachments for hardware pedicure are used for grinding and polishing. When creating them, a silicone tip is mixed with abrasive particles. To find out the degree of abrasiveness, pay attention to the color of the nozzle. Dark (coarse-grained) are hard cutters needed when sanding the skin of the feet, blue are medium hard and work with gel and acrylic coatings, white attachments contribute to effective polishing of nails.
- Natural attachments for hardware pedicure are necessary when working with natural nail plates. They are created using materials such as felt, cotton or suede. Such attachments add excellent shine to your nails. They are shaped like a disk or brush.
Having dealt with the attachments for hardware pedicure, the next step is to focus on caps and cutters. The cap is a nozzle with a rubber tip and special notches, thanks to which it does not slip off. It is also called silicon carbide or sand cap. They look like sandpaper with different abrasiveness, which is very effective in working with keratinized skin. The abrasive can be soft, medium and coarse. The shape of the caps can be cylindrical, pointed or round. They wear out quite quickly and are expensive. When periodically working on equipment for hardware pedicure, it is better to have these caps for future use.
The caps do not need to be disinfected; they are used only on dry skin. When purchasing, you need to select them for specific equipment, as well as analyze the required amount of work.
Cutters for hardware pedicure are equipped with cutting blades or teeth at the end. They are made from steel using abrasives or rubber. Many shapes of cutters are sold: cylinder, rotor, cone, ball. To attach the cutter, you need to find a conical or cylindrical tail.
A pointed or ball-shaped cutter is coated with diamond and is needed to care for nail grooves. The cylindrical cutter is equipped with transverse notches, and the existing flat end effectively combats rough skin, calluses and corns. The rotary cutter is similar in shape to an ellipse, on which longitudinal stripes are applied. Designed to work with callus. To carry out rougher procedures, cutters with a diameter of 16 mm are used, and finer work is carried out with cutters with a diameter of 5 mm and medium abrasiveness.
Attachments for hardware pedicure in the form of a cone are distinguished between large and small. The larger ones work with keratinized skin, calluses, and cracks. Small ones are needed for procedures in hard-to-reach places, for example, to remove ingrown nail plates.
Any type of disc cutter for hardware pedicure, depending on the coating, is used to polish nails.
Any equipment for hardware pedicure initially contains the required number of attachments, thanks to which basic procedures can be carried out. The quality of a hardware pedicure very much depends on the technical characteristics of the device itself. Be sure to pay attention to the weight of the device, as well as how comfortably it lies in your hand. When purchasing copings and burrs, you should know for what procedures you will need them.
- Maintaining hygiene in a nail salon and beauty salon - truths and myths
What to pay special attention to
- Specialist. It is important for a master to have the appropriate education: a basic pedicure course (20 hours) - from 6,500 rubles. Hardware pedicure schools offer courses costing 30 thousand rubles. Also a necessary condition is the presence of a medical book.
- Room. Please note that offices must have at least two foot baths with hot and cold water supply. Choose furniture whose surface you can treat with detergents and disinfectants. Also, furniture should not interfere with light sources or stand on aisles.
- Materials. For a professional hardware pedicure, you will need an antiseptic solution (1100 rubles/l.) and a cuticle softener (3000 rubles/l.).
- Economy. Approximately, the procedure for a classic hardware pedicure costs 1500-2000 rubles. If the service is provided in a beauty salon, then it pays off quite well and quickly. If a separate office operates, then the payback will be within three months.
Hardware pedicure step by step
Step 1. Lubricate the foot with a skin antiseptic and wipe dry.
Step 2. If necessary, remove the excess length of the nail plates.
Step 3. Immediate start of hardware pedicure. Rub the keratolytic, a softener of the skin of the foot, over the foot using a brush. We wait a few minutes until the skin of the foot becomes softer from the product. The keratolytic quickly removes dead skin particles. Softeners mainly contain lactic or grape acids, which are commonly used keratolytics. They are also used for hyperkeratosis, because they act on the skin of the legs as an antioxidant, and they are also good for preventing inflammation.
Step 4. Carrying out the hardware pedicure procedure. We do not soak our feet in the bath beforehand so that the skin does not swell from the water. In this situation, you will have to spend more time and effort on the session. Organize a bath with a water temperature no higher than 36 degrees, then the feet will not have time to steam, the surfaces to be treated will be clean but smooth.
Step 5. To protect your eyes and respiratory organs, use a protective mask.
Step 6. Remove the remaining parts of the skin softener. If we notice hyperkeratosis (strong growths), then we extend the duration of action of the product.
Step 7. We attach the largest disposable cap with an abrasiveness of 60/60 to a round-cylindrical rubber holder and work at a speed of 10 - 12 thousand revolutions with a machine pedicure machine. It is better to use disposable caps, because... they work faster and with greater effect than stone attachments.
Step 8. Polish the skin. We replace the disposable cap with a fine-grained one (100/100) and continue working at 10 - 12 thousand revolutions. The quality of polishing is of great importance. If you do not complete the process and are somewhat careless in performing this step, then after 1 - 2 days the skin will become flabby. We are careful not to cause harm. We will know that we have done everything correctly if we see the skin being pink with a yellowish tint.
Step 9. Remove any remaining softener with a spray bottle of warm water and dry.
Step 10. Continuing to do a hardware pedicure, we work on the fingers and the areas between them. More carefully you need to treat those places where there are many sweat glands, since this is where the most dirt accumulates. We are talking about the areas of skin between the fingers, we distribute the softener there, put a blue ceramic nozzle that looks like a cone, and turn it with a milling cutter at a speed of 5 - 10 thousand revolutions per minute. Next, we select the same attachment, but in a pink or red shade, and process it with a router at the same speed. We moisten the remaining softener with a spray bottle of warm water and wipe it off.
Step 11. Work on the cuticles and ridges around the nails using a cuticle remover. We again take a fine-grained ceramic attachment from the set for hardware pedicure and process the periungual ridges with a milling cutter at a speed of 5 - 10 thousand revolutions.
Step 12. We do not cut the cuticle during the hardware pedicure procedure. In our work we use a diamond cutter in the shape of a small ball. The speed of the router is about 5 - 6 thousand revolutions. Using a cutter from a set for hardware pedicure, we run it along the cuticle without pressing. Be very careful because the skin around the cuticle is very sensitive and you can easily damage your nail. Using a router, do not cut down the cuticle, but make it aesthetically well-groomed. Remove any remaining product using a spray bottle and wipe dry.
Step 13. At the end of the hardware pedicure procedure, we polish the nails. We begin the procedure by rubbing in cuticle oil. Then, using a felt polishing pad, we work on the nails until they shine. The required speed is 5 thousand revolutions. Cuticle oil is very useful. It is known for its antiseptic, softening and healing effects, and can inhibit cuticle growth. A visitor to a hardware pedicure procedure can use cuticle oils at home every day.
Step 14. Finishing the hardware pedicure session, we rub moisturizing cream from the toes to the heel, while at the same time lightly massaging the skin.
Subscribe so you don't miss anything important
If you want the nails on your toes to be beautiful and smooth, and the rough calluses on your feet and especially on your heels to disappear forever, like a bad dream, then be sure to read the information about hardware pedicure. It’s not always possible to properly process your toenails at home with the help of available manicure tools and make the skin on your feet soft and smooth. Of course, you can seek professional services at a beauty salon, but many women have to travel a long time to get to the salon, and they don’t really want to spend extra money.
Fortunately, it is now possible to order an inexpensive, high-quality machine (mill) for hardware pedicure and special attachments (mills, burs) for it through an online store. Using this machine, you can quickly and thoroughly polish the surface of the nail plate and grind any area of skin on the feet (including hard-to-reach side ridges with rough skin near the nails). A hardware pedicure will help you quickly get rid of calluses, corns, and microcracks. By installing special cutters on a milling machine, you can very subtly adjust the shape of gel-extended toenails. In this material you will find video lessons with step-by-step training in hardware pedicure, as well as photos of modern toenail design.

- in the photo: machine (milling machine) for hardware pedicure
Unlike a therapeutic pedicure, a hardware pedicure is not intended to eliminate such serious problems as ingrown toenails affected by foot fungus, onychomycosis of the nail plate, and hyperkeratosis. Therapeutic pedicure and complex treatment of any of these diseases are prescribed by a podiatrist.
♦ ADVANTAGES OF HARDWARE PEDICURE
the opportunity to organize high-quality care for the skin of your feet and toenails at home;
A very simple, intuitive technique for grinding nail plates and rough skin on the feet with a special machine (for independent practice, just watch carefully several video lessons with step-by-step training);
A wide selection of different cutters for hardware pedicure. For comprehensive home care for different areas of the skin of the foot and nails using a simple machine, you can purchase a set with cutters that will serve you for a very long time;
This is a very pleasant, pain-free procedure that spares the structure of the nail plates and does not violate the integrity of the skin (only the keratinized layer of dead epithelial cells is removed).
♦ WHAT YOU NEED TO PREPARE FOR A HARDWARE PEDICURE
▪ machine (milling machine). Choose a device with a power of at least 40 watts so that the cutter moves over the surface of the nail or skin easily and smoothly. By the way, modern milling cutters can be used not only for pedicures, but also for manicures - just buy several cutters and burs for processing fingernails;
▪ a set of cutters, burs and attachments. To polish rough skin on the feet and side bolsters, to eliminate calluses and corns, to treat the surface of nail plates, to correct the shape of extended nails, you will need a set of 8-12 different cutters and burs;
▪ keratolytic. A product for softening the nail plate and skin is sold in the form of a special liquid, gel or cream;
▪ septic tank for disinfection surfaces of the skin and toenails. There are very good septic tanks in the form of gels that help prevent fungal infection during the procedure;
▪ remover to remove cuticle.
▪ Foot treatment products after the procedure. Use medicinal ointments with a wound-healing effect, antifungal creams, and moisturizing gels.
♦ WHAT ATTACHMENTS AND CUTTERS ARE USED FOR HARDWARE PEDICURE
Silicon carbide cutters.
Particularly effective for treating very rough, dry skin with old calluses and corns
Ceramic cutters.
They gently polish the keratinized skin, eliminating small cracks on the heels without damaging the skin. Excellent for treating the side ridges next to the nails, gently removing hardened old skin
Diamond cutters.
Large-sized attachments perfectly polish rough skin, and medium and small-sized attachments are used for polishing toenail plates and for correcting gel-extended nails. There are also needle-shaped diamond burs for cuticle correction.
Silicone tips.
Polish the nail plate quickly and efficiently. An excellent replacement for files and buffs for polishing toenails.

- click on the photo and expand the cutters, burs, attachments for the machine
♦ STEP-BY-STEP PERFORMANCE OF HARDWARE PEDICURE
It is enough to perform the procedure once every 20 days
❶ make a hygienic foot bath (no more than 5 minutes). The water temperature is approximately 35 degrees. No need to steam your feet! Dry your nails with a towel;
❷ treat your feet with a disinfectant and then wipe them thoroughly with a disposable towel;
❸ using a wide brush, apply a keratolytic agent to the feet to soften and exfoliate dead skin cells. After 10 minutes, wipe your feet with a clean towel;
❹ install a coarse cutter (abrasiveness approximately 60/60) in the machine holder and process the foot evenly, setting the cutter speed to 10–12 thousand revolutions. Process until the skin becomes soft. If there are old corns on the heels, then we additionally treat them with a coarse cutter;
❺ the next stage is polishing the foot with a fine cutter (100/100) at the same rpm (10–12 thousand) of the router. Try to polish the skin of your foot very carefully until a healthy pink color appears. But do not overdo it, so as not to injure the “living” epidermis;
❻ Now we treat the skin of the toes and the delicate skin between the toes. First, we apply a keratolytic agent to the toes, install a medium-grained ceramic cutter in the form of a truncated cone into the machine, and grind the skin at a speed of 5 thousand revolutions (especially carefully between the toes). Then we change the attachment - install a fine-grained cutter and polish the skin at the same speed. After this, remove the remaining keratolytic agent with warm water;
❼ treat the cuticle and periungual ridges with a special remover. After 3-4 minutes, remove the cuticle using a thin bur with a ball at the end. We set the speed of the machine to 5 thousand revolutions. Do not press with the bur, but gently move it from side to side, pushing away the dead skin of the cuticle. Then remove any remaining cuticle with a remover.
Using a ceramic finely abrasive nozzle (in the form of a cone), we grind the periungual ridges at a speed of 5 thousand revolutions;
❽ now we will polish the nails, make their surface even and smooth. Before polishing, treat the skin around the nail with disinfecting cuticle oil. We install a felt polishing attachment in the machine and evenly process each nail at a speed of 5 thousand revolutions until their surface becomes smooth and shiny;
❾ All that remains is to treat the skin of the feet and nails with special moisturizing and nourishing products. Massage your feet (which have a large number of reflexogenic zones).
♦ SEASON NEWS. FASHIONABLE PEDICURE PERFORMED WITH GEL POLISH

- click on the photo and expand interesting ideas, fashion trends in modern design for pedicure
In the summer, we often wear open shoes and our toenails should not only be well-groomed, but also have a pedicure, which harmoniously combines with a modern summer manicure. For example, shellac on nails lasts a very long time and looks flawless for several weeks. You can paint your nails with gel polish and apply interesting designs or patterns on the colored layer, securing them with a topcoat.
- in the photo: design ideas for pedicure (shellac gel polish)
In spring, different shades of green, as well as a palette of pastel colors, will be relevant for decorating nails. Both a single-color pedicure and