It is not always possible to find in a store exactly the item that you think will fit perfectly into your wardrobe and emphasize your individual taste. And sometimes even a simple thing costs much more than its “real” cost, which completely discourages purchasing it. Then cutting and sewing skills come to the rescue, which will allow you to easily and quickly sew a beautiful blouse or skirt. Let's learn how to sew a blouse, having a minimum of relevant skills and experience behind you.
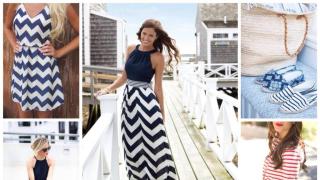
Photos of types of blouses
Depending on the design features, blouses are divided into 4 types:
With set-in sleeves;

"Raglan".

With one-piece sleeve.

Without sleeves.

At the same time, the named classification is not the only one, because there are many options for sewing them: neck cuts, collars, cut-off yokes, decor and much more. The blouse can be romantic, office, casual or any other style, have an A-shaped, fitted silhouette, be asymmetrical or have a variety of trims. Therefore, it is worth determining for yourself what exactly you would like to see in the end - a summer blouse for every day in the style a la "Carmen" or an option for the office - a strict American one.
Blouse patterns by types of sleeves
Items with set-in sleeves are especially appreciated among women who prefer convenience and simplicity. Pattern of such a blouse:

Raglan sleeves are characterized by seams running from the armpits to the neck. American armhole is the second popular name for this cut of women's blouses, tops and dresses. American pattern:

A blouse with a one-piece sleeve looks very laconic, gives a feeling of lightness and can visually expand the shoulder line, so this option is well suited for women with wide hips and narrow shoulders. Pattern for such an item of clothing with a chest dart and a one-piece sleeve:

A sleeveless blouse is best suited for summer: such a chiffon item in a woman’s wardrobe will be indispensable in the summer heat.

All patterns provided can be downloaded for free and printed on a suitable sheet of tracing paper to make it easier to transfer directly onto the fabric.
Step-by-step description: how to sew a short-sleeved blouse
We offer the simplest option for sewing a blouse with a short one-piece sleeve in a T-shot silhouette. It is with this model that you can start sewing things for yourself. By choosing the right material, you can get a product for any season.

Another simple master class on sewing a blouse with short sleeves and a dropped shoulder can be seen in the following video.
Master class: how to sew a blouse with your own hands
Is it possible to sew a simple cut blouse without using patterns? You can, and now we’ll look at how to sew a new thing in just 1-2 hours. To do this, it is better to purchase a flowing blouse fabric (chiffon, staple or another of your choice) measuring 60x150 cm. It is better to choose a more interesting color, since the style of the product itself is very simple. The sewing principle is as follows:

The result is such an interesting thing for the warm season:

Many novice dressmakers have noticed that even with strict adherence to all the parameters of the pattern and step-by-step master classes, the product is not always the right size. To avoid such mistakes, you should know some tricks:
- learning to sew is worth using simple fabrics: wool, poplin, linen;
- You need to sew the product only after trying it on: this step makes it possible to adjust the parameters of the parts and adjust them to your figure;
- take any pattern as an idea, and always draw the diagrams yourself, calculating the parameters of the parts based on the characteristics of your figure;
- Before cutting, treat any fabric with a hot iron under steam - the material will shrink a little;
- We must not forget about the margin for freedom of movement - there are allowances for this;
- Before sewing any parts, their seams must be ironed again with steam - without this manipulation, the item will look sloppy after sewing.
2016-12-23 Maria Novikova
How to sew the simplest blouse for beginners? How to sew a blouse at home with your own hands? How much fabric do you need for a blouse and what fabric should it be made from? This and much more is always of first interest before sewing a fashionable blouse. In my master class I will tell you how to sew a summer blouse quickly and easily. The style of the blouse is loose-fitting without a collar with a placket in front.
A simple DIY rustic blouse that is sure to brighten up your wardrobe. We look at the photo and sew the blouse ourselves.
Model selection
This time I decided to sew a blouse or a vest in a rustic style from staple fabric with a floral pattern. Why rustic style? Nowadays it has become common to wear clothes in ethnic style, eco style and rustic style. All these styles readily took root in everyday wear, i.e. in casual style. You can find out more about rustic and other styles in articles and.
What material is best to make a blouse from?
But that’s not the only reason why I was attracted to such a simple style. To sew clothes in a rustic style, natural fabrics such as cotton, linen, wool, and silk are used. They help maintain healthy skin and give a feeling of comfort to the whole body. I have already written about the advantages of natural fabrics in an article.
What to wear with a rustic blouse?
With the right selection of things, you can learn how to create different looks: business, casual, and in some cases evening.
For example:
- Pairing a rustic blouse with jeans for a casual style;
- to create a business style: blouse +, trousers, jacket;
- evening style: blouse + skirt/pants + ;
- to create an ethno style you can use a blouse and suitable accessories;
- for those who like experimenting, you can try mixing different styles. Then it will be possible to get yours;
Another main advantage is the versatility of a rustic blouse in terms of size and age. This blouse will look great on both thin girls and those with curvy figures. In addition, it can be worn by both young girls and mature women.
The role of rustic style in the world around us
My experience confirms that after using the blouse I became much closer to nature. I felt like an integral part of it. I felt a strong connection to my homeland and my nation. If you believe that the right clothes, namely clothes made from natural fabrics, change consciousness, this means a way out of many problems.
The very simplicity and ease of the rustic style throws aside the desire to look expensive and glamorous. The desire to live large and spend resources on expensive clothes, thereby proving one’s worth.
The most unfortunate thing is that fashion is changeable and requires replenishment of the wardrobe every year. Throwing old clothes into a landfill causes global pollution of nature, especially due to synthetic materials. Just imagine, every year the consumer boom for clothing is growing rapidly, thanks to low prices for cheap, low-quality items.
By using natural fabrics in production, there is a chance to keep the planet clean and healthy. After all, our health and the health of our future depends on it. Natural materials decompose easily and do not harm the earth like synthetic materials do.
If at this point you are thinking about my words, find smarter ways to get rid of old things. For example, alter clothes - do it or donate it to charity. But it is best to buy or sew clothes as needed. Only when it is really necessary, and not “just once.”
How much fabric do you need for a blouse?
To sew a blouse you will need:
- Fabric (in my case it’s a staple) – product length + sleeve length + 30.0 cm.
- Glue () – 20.0 cm.
- Threads in the color of the fabric – 1 pc. for sewing, 3 pcs. for overlock
- Buttons – 3 pcs.
- Finishing braid – 30.0 cm (depending on the depth of the fastener)
- Sewing supplies
Cut out blouses
One day, while sorting through my piles of fabrics and unfinished items, I came across a dress. She pulled him out of captivity and carefully placed him in a visible place. I thought and thought about sewing it for me? Just the day before I finished sewing myself classic trousers link, the idea arose by itself.
Cutting a loose ruffled blouse with your own hands for beginners is not at all difficult. You can take a pattern 1-2 sizes larger (the size depends on the degree of freedom of the blouse) with sleeves and a chest dart. Or make changes to your pattern by adding extra freedom in the chest, waist, hips and sleeves. If you're having trouble altering your pattern, take a look here.
Sewing a blouse
Before moving on to sewing, I first tried on the dress to confirm the length of the blouse and make some changes. After that I started work. If you don’t know where to start trying on, you will find answers to questions in the article.
Processing chest darts
First I sewed the bust darts and ironed them to the top.


How to sew a blouse with a yoke on the back
Now you can move on to cutting out the yoke on the back. The yoke has a curly shape, so during fitting, its position is marked on the back. Then fold the back in half and align the intended line.
From the resulting line, an allowance width of 1.5 cm is laid upward and cut along the new line. The cut off upper part of the back will serve as a template.
On the back, place a counter or bow fold (during the fitting, I did not take the excess into the side seams and armhole, so I made a fold) and stitch it to the width of the allowance.
If you find unfamiliar words, then contact and.
Modeling a blouse with a yoke
Using the template, cut out 2 pieces of the yoke from the fabric. Add an allowance of 1.5 cm along the bottom edge and another 1.5 cm (the missing amount on the template that was left when cutting out the yoke). As a result, you need to add an allowance of 3.0 cm along the bottom edge of the yoke. If you do not take into account the increase of 1.5 cm, the back will be shorter.
Connecting the yoke to the product
Take one piece of the yoke and attach it to the back with the right sides facing inward, align the cuts and baste the yoke.


Then take the second piece of the yoke, align the front side of the yoke with the back of the back, align the cuts and baste.
Sew the yoke parts to the back.

Press the seam with an iron.
This way the allowances should be inside between the yokes.
On the front side, place a finishing stitch 0.1 - 0.2 cm from the seam.

Processing side seams
Basic blouse
Lay the blouse out on a flat surface, aligning the side seams and the yoke seams. Pin them together with tailor's pins. For ease of installation, pin around the armhole and neckline. Draw the armhole using the reference marks after fitting. Add an allowance of 1.5 cm, cut off the excess.

Align the neck depth with the reference points on the shelf and back (if any).
Cut off the excess under No. 1. Now set aside a facing width of 3.5 - 4.0 cm from the neck line and decorate it with a smooth line. From this line up, set aside an allowance of 0.7 - 1.0 cm. Cut out the resulting parts - they will serve as templates for facing No. 2.


How to cut a neck facing
Transfer the resulting templates onto paper.

Using paper templates, cut out the facing parts: 2 back facing parts (with folds), 2 front facing parts with cuts. Add allowances of 0.7 - 1.0 cm.

Glue with adhesive fabric 1 part of the back facing and 1 part of the front facing, consisting of 2 symmetrical parts.
How to sew a front placket on a blouse
To process the fastener you will need 2 strips. The length of the straps = the length of the fastener + 1.5 cm, the width of the 1st strap (3.5 - 4.0 cm) + 1.0 cm multiplied by 2. It turns out 1 strap in a cut of 9.0 - 10.0 cm. Before processing the fastener, adhesive fabric is glued to half of both strips.
After that, loops are sewn on the right bar.
Before processing the fastener with strips, mark a frame in the center of the shelf with a width of 3.5 - 4.0 cm. It is drawn in the same way as a frame for a welt pocket. Then the frame is cut along the center line, not reaching the end of the frame by 1.5 cm. Next, the strips are basted along the intended lines; the cuts may not coincide due to the difference in allowances.

You will find how to process a pocket into a frame with a zipper in the article.
Sew the strips not reaching 1.5 cm to the end of the frame.
At the end, cut the frame into corners not reaching 0.1 - 0.2 cm from the lines.

On the wrong side, fasten the corner of the frame together with the slats on the machine.
Overlock the edges with an overlocker.
On the front side, place a finishing stitch along the frame.

Or decorate a blouse:
How to finish the neck of a blouse without a collar
To do this, you will need pre-glued neck facings.

We baste the facings to the front and back.

We grind it on a machine.
We cut the allowances to 0.5 cm.

Iron the seam allowances towards the facing.
Then we join the shoulder seams together with the facing. We sew the cut and iron it onto the back. This is one way! You can also pre-join the facing parts, finish the shoulder seams and only then stitch the facing around the entire circumference of the neckline. The facing seams should match the shoulder seams.


On the reverse side, cuts are placed on the curves, and on the front side, an edging is sewn in.

The cut of the bottom facing is folded and sewn to the product.

A finishing stitch is laid along the upper facing, while simultaneously securing the folded cut of the lower facing. Carefully iron the facing, trying not to move the iron from side to side. This will lead to deformation of the facing.


Sew a loop on the facing and sew on the buttons.

Sleeve processing
Stitch, overcast and press the seams on the sleeves.

Hosing of sleeves
According to the model, the bottom of the sleeves is designed with a slight bevel. To do this, measure 5.0 cm from the bottom of the sleeves along the top seams and draw a line. Trim off the excess.

To finish the bottom of the sleeves you will need bias tape made from the same fabric. Therefore, on a suitable piece of fabric we find an angle of 45 degrees and cut out 2 strips 3.5 cm wide and 20.0 - 25.0 cm long.
Then we put stitches for assembly along the hem and the bottom of the sleeves.
How to finish the bottom of a sleeve with an edge stitch
Connect the binding on the bias so that it is closed, and press the seam. Gather the bottom of the sleeve according to the circumference of the trim.

Place the trim at the bottom of the sleeve with the right side facing the back of the sleeve, aligning the edges and seams. Sew the binding to the sleeve.

Then go around the seam with tape, fold the cut and stitch again 0.1 - 0.2 cm from the fold.

 Process the bottom of the second sleeve in a similar way.
Connecting sleeves to the product

Finishing the bottom of a blouse with a Moscow seam
Processing cuts
To process the bottom, you first need to process the side cuts. I processed the incisions with a Moscow suture. Why? If you process the cuts in the traditional way, i.e. with open cuts, then when worn, the allowances will bend to the front side. And sometimes they are even visible along with the stitching, especially in light fabrics. Therefore, in order to get the job done cleanly, I decided to process them with a Moscow seam.
First you need to cut off the allowances along the cuts to 0.5 cm and process them with a Moscow seam.

Sewing a loose blouse with your own hands in a rustic style is not difficult. It is enough to have experience working with a sewing machine. Many of you, after reading my article, will decide that sewing a blouse is easy and quick for me. But I can say right away that a few years ago, sewing a collarless blouse with straps was difficult for me. Why?
There just wasn't enough detailed information on the topic. I had to learn from my mistakes and draw conclusions. Now I am happy to share my many years of experience on how to sew a beautiful blouse with my own hands with you. I hope my master class on how to sew a summer blouse will bring you a lot of benefit.
P.S. Don't forget to leave your comment below!
And also your questions and wishes.
Subscribe to blog news to receive the latest articles.
All the best! Peace, light and good mood to you!
Sincerely yours, Maria Novikova.
Stop being a gray mouse, join the ranks of the fashionable and stylish! Don't know how? I will help you!
Right now, place an order for a personal pattern or consultation on sewing and cutting clothes. Including consultation on the choice of fabric, style and personal image.
My . I'm on Twitter. Watch on Youtube.
I would be grateful if you use the buttons:
Hello, my dear blog readers)). I haven’t written complex articles for a long time, and in my opinion, today is just like that. We'll consider making a blouse pattern, in fact, if you look at it, sewing blouses and shirts has a lot of common principles, you just need to understand them once. And if you create a blouse pattern for yourself once, then you can then slightly adjust it and sew a huge variety of models of blouses, shirts and tunics.
It was exactly the same principle when we created the pattern for the base of the dress, so that we could then sew ourselves any model with a perfect fit on your figure.
Today we will consider construction and modeling a blouse like this, with a stand-up collar that turns into a bow:
This model is built on a pattern without darts; loose models, such as men's shirts, etc., are cut out on its basis.

I will now describe the construction of the pattern step by step, your task is to substitute your measurements.
I immediately give the increases that I will add to my measurements, the increases are the same for everyone.
Increases:
Pb=2.5 cm (if we tuck in the blouse) and 3.5 cm (if the blouse is worn over a skirt)
Shoulder extension = 0.5cm
T 1 T 11 - lowering the waistline along the front = 0.5 cm
Item Length = Hips
Fabric for a blouse. How to decide?
Thin cotton, cambric, poplin, chiffon are suitable for this blouse.
Fabric for finishing: satin, satin.
Building a base - a grid
The grid is a designation of the location of the main horizontal lines in the drawing - the lines of the chest, waist, hips, the width of the grid = the circumference of your body (more precisely, the upper body).
For the drawing we take graph paper. Place point A in the upper left corner.
- AT down = Dts + 1 = 38 + 1 = 39
- AG down = Vprz + Pspr = 20 + 3 = 23
- TB down = Dlb = 20
- TT’ right = 1.5 (this is a constant value, set aside for the model to fit on the back), draw a straight line through points A and T’. We put points G', B'.
- G'G1 right set aside the width of the grid = Cr3 + Pg = 45.5 + 5 = 50.5
- G'G4 to the right - side seam = G'G1 divided by 2 = 25.25
- Armhole width = 0.25 times (Cr3 + Pg) + 1 = 0.25 times (45.5 + 5) + 1 = 13.6. From point G4 to the right and left we set aside half the width of the armhole (half of 13.6) = 6.8 cm
Building the back
- AA2 to the right = 0.33 times Ssh + Pshgs = (0.33 times 18) + 1 = 7
- A2A21 down = 0.33 times AA2 + Pvts = 0.33 times 7 + 0.2 = 2.53
- A2 to the right is set aside 9. This is a constant value for everyone. We put point 9
- From point 9 we put 2 cm down (this is also a constant value). We tilt the shoulder.
- A2P1 down the slope to the right = Шп + shoulder lengthening = 13 + 0.5 = 13.5. Point P1 should extend beyond the armhole line by at least 0.5 cm. If the shoulder width is small (like mine = 11), then add the missing length to the shoulder width.
- We build an armhole: 1) Point P3 = G2P, divide by 3 + 2 cm (constant value) up; 2) Bisector from point G2 = 0.2 multiplied by G2G3 + 0.5 cm (constant value) = 0.2 multiplied by 13.6 + 0.5 = 3.2. We draw a line for the back armhole through these points.
Construction of the front
- T1T11 down = 0.5 cm = B1B11 down
- Т11А11 up = Road accident - 1 = 44.5 - 1 = 43.5
- A11A3 to the left = AA2 (take the distance from the back drawing) = 7
- A11A4 down = AA2 + 1 = 8
- From point A3 to the left 9 cm. From point 9 we put 3 cm down. We draw a straight line through points A3 and 3 - the slope of the shoulder.
- A3P5 is set aside according to the slope of the shoulder = A2P1
- Front armhole: 1) Point P4 = draw a perpendicular to the straight line from point G3;) Find point P6. = G3P4 divided by 3. point P6 is on the lower 1/3.; 3) Bisector from the angle = 0.2 times Г2Г3 = 3.2 cm
Width at hip line
- G'G4 = B'B21 is placed on the horizontal line of the hips
- We calculate the lack of width along the hip line: (Sb + Pb) - G'G1 (grid width) = (48 + 2.5) - 49 = 1.5 cm - this is the lack of width along the hips. This means you need to add width, otherwise the blouse will be too small at the hips. We divide this difference by 2 (in my case it is 0.75 cm) and set aside 0.75 cm from points B21 to the right and B2 to the left. We put points B"2 and B"21.
- connect point G4 to B»21
- We then connect point G4 to B»2.
- We draw a bottom line along the back perpendicular to the tap line (AB’)
- We equalize the side sections of the blouse: G4B"21 = G4B"2
- We draw a bottom line along the front of the blouse, but since point B11 is 0.5 cm below the level, we draw a bottom line under the pattern.
This concludes the basic construction of the blouse. Next we will do modeling of a given model, but other blouse models can also be built on this basis.
Modeling a blouse
Now we will analyze the main points of changing the drawing in order to get exactly the same model as in the photo.
Stitched button placket
We cut off half the desired width of the strip from the product drawing parallel to the front center line. My desired width of the strip is 3 cm.
- B11B’11 left = 1.5 cm
- through point B’11 we draw a vertical upward
- set point A41
Next to the drawing we draw a bar 3 cm wide and length = B’11A41
IMPORTANT! if the bar is stitched, then the loops on it can only be vertical, if the bar is one-piece, then the loops can also be horizontal
We place the location of the loops on the bar:
The first loop is 1.5 cm below the top cut (this is standard). Then we determine the number of buttons, determine the distance between the loops and mark the upper edges of the loops.
In this case, the distance between the last loop and the bottom line should be greater than the distance between the loops.
Loop length = button diameter +3 mm
Stand collar with ties
We mark on the drawing the control point for sewing the collar into the neckline: from point A41 we put 2 cm to the left. We set a control point.
To determine the length of the collar, measure the length of the neck.
Collar length = (Back neck length + Front neck length to reference point + 50 cm for ties) multiplied by 2 = (7.8 + 9.5 + 50) multiplied by 2 = 140
The collar width is as desired. I took 6 cm.
The collar has a 9 cm extension at the ends. We expand the collar to the desired width at the ends.
The collar is a straight strip of fabric, cut along a transverse thread; we do not glue it with double tape.
TURNINGS
We decorate the facing of the blouse on the details of the front and back in the neck area. The width of the facings is 4 cm.
Reducing the shoulder length
It is necessary to reduce the length of the shoulder along the front and back to the measurement Shp + 1 cm = minimum lengthening of the shoulder so that the sleeve visually looks in place. Cut off excess to points P3 and P6. In the drawing this area is shaded on the shoulders.
Layout on fabric:
Flap pockets
Modeling valves. Front decor.
- On the front part, mark the level of stitching of the valve - 4 cm above the armhole level. From point G1 we set aside 4 cm upward and draw a horizontal line.
- From the plank line on this horizontal line we put 5 cm to the left. This is the beginning of the valve.
- Valve length 9 cm.
- Valve width 5 cm.
Curly corners.
The flap should not reach the armhole line at least 3 cm.
We cut out 4 parts so that the inside of the valve is not visible from the front side; we need to make the inner half of the valve a little smaller. We do this through allowances. On the outer part of the flap the allowance is 1.3 cm, and on the inner part - 1 cm; when sewn and turned right side out, the inner part will not be visible and will be more beautiful.
Read about creating a sleeve pattern at the link. I’ll write about the stages of sewing a blouse a little later)).
Sew with me) and inspiration to you))))!


You can download a blouse pattern for a girl for free in the desired size using the following links:
* As a result of payment, a file with a pattern is automatically sent to your specified email. If the file has not arrived, you need to check whether you entered the correct postal address when paying. In any case, if you do not receive the pattern, you do not need to pay again, just contact the address immediately [email protected]
**You can offer your payment option in the site feedback
Patterns are given without seam allowances.
Allowances: add 1.5 cm to the seams and along all cuts, 1-2 cm to the hem.
Uncover:
1. shelf-2 children
2. back - 1 child. With fold
3. sleeve - 2 children
4. folded collar - 2 parts
5. Collar stand with fold - 2 parts
6. cuff-2 children
7. mold-2 children
8. shelf strip - 2 children
Duplication with gasket:
Front panel - both parts completely, 1 collar and 1 collar stand
Sewing:
- Back, shelf, shelf strip.
Sew darts on the back. Iron the depths to the line of the middle of the back. Duplicate the shelf strips with an adhesive pad and iron them exactly in half along the entire length. When cutting the details of the mold, pay attention to the direction of the grain thread. Process the details of the mold using a rolled seam on an overlocker or a Moscow seam, and iron. Pin the finished mold to the shelves. Unfold the shelf strip and pin it face to face to the shelf. Stitch. Don’t forget that the bottom of the bar should coincide with the length of the shelf. Iron the seam ON the side of the bar. We process the second long side of the strip with an overlocker, bend it along the ironed middle to the wrong side, pin it and sew it. We do the same on the second shelf. At this stage, it is possible to additionally stitch the strips on the front side. Sew side and shoulder seams. Overcook the seam allowances and iron them ON the back.
- Collar.
Sew backed and non-backed collars face to face. The duplicated collar will be the lower one, and the non-duplicated collar will be the upper one. We cut off the allowances of the duplicated collar close to the line (not reaching the line 1-3 mm). We cut the allowances of the upper non-duplicated collar at the curves of the collar. We turn the collar onto the face and carefully straighten it with our fingers. We iron it so that the upper unduplicated part has a slight “overlap” onto the lower collar. This is necessary so that during operation the upper collar does not pull up the lower collar. Our collar is ready at this stage. Place the finished collar between the two collar posts, pin and stitch. Don't forget that the duplicated collar stand should be on the side of the duplicated collar! You need to combine the parts starting from the middle, then you will get a strictly symmetrical part in the end. We cut off the allowances of the duplicated collar stand close to the stitching, the rest is notched at the curves, turned onto the face, and ironed. We pin the unduplicated collar stand face to face to the product. You need to start from the middle. The mark on the collar stand should line up with the shoulder seam on the garment. We grind. We iron the seam of the connection ON the collar stand. We fold the duplicated collar stand, pin it and sew it to the product.
- Sleeves.
Place soft folds on each sleeve according to the markings. Sew the sleeve seams. Because This model has cuffs without buttons, so we do not duplicate the cuffs. I suggest cutting them out of butter knitwear. Fold the cuffs in half, face inward, and sew a short edge using an overlocker. Turn it inside out and fold this ring in half. We sew the cuff face to face to the bottom of the sleeve, process the cut with an overlocker and iron it onto the sleeve. We sew off the head of the sleeve at the distance of the allowance with a line with the longest stitch length. We combine the middle of the sleeve with the shoulder seam on the blouse, we combine the side marks of the sleeve with the marks on the front and back. Carefully pull the ends of the thread - this will immediately show how much you need to gather the sleeve so that it fits into the armhole. Carefully straighten, pin and sew the sleeve into the armhole. We remove the tightening thread and process the sections of the sleeve and front taken together with an overlocker.
Consider the sequence: sewing blouses for girls 5-6 years.
We send patterns for free. We will also send you pattern this blouse comes in 5 different sizes.
To sew a blouse, I used embroidered towel made of fine linen fabric.
Uncover.
Pattern I used 122 size. Location patterns visible in the photo. In this blouse, the main decoration - embroidery - will be on the sleeves.

We cut out the front and back from the middle towel. If there is not enough fabric to cut the front and back from a towel, you can cut the back from white fabric that matches the structure. We leave 1 cm for seam allowances. We make the front and back parts with a fold. We also cut out the trim for the neckline, 52 cm long and 4 cm wide, taking into account allowances; facing of the front cut 13 cm long and 3 cm wide, including allowances; 2 cuffs 17 cm long and 4 cm wide with allowances; 2 bindings for edging sleeve cuts 15 cm long and 3 cm wide, including allowances.

Sewing.
We make the front cut. We apply the facing (front to front) to the place where the cut is planned along the line of the middle of the front. We turn the edges of both longitudinal sections of the facing towards the center and iron them. We pin the facing. The folded edges of the facing lie at the top, as can be seen in the photo.

We lay a straight line around the cut markings, as close as possible, literally close to the markings, while catching the folded edges of the facing.

This is the view from the back side:

Now we make a cut along the seams.

We turn the facing to the wrong side, iron the edges and sew at a distance of 5 mm. We turn the lower end of the facing and attach it with a transverse stitch.

View from both sides

We make cuts on the sleeves. We process the cuts with binding.

Fold the sewn binding right side to right side and make a diagonal stitch at the top of the end of the cut.

Iron on one side. The cuts have been processed.

Stitch the side seams of the blouse, leaving the side slits open.

We also sew seams on the sleeves.

We gather the lower sections of the sleeves to the size of the cuffs. To do this, we make a machine stitch with the largest step at a distance of 0.7 cm from the edge and tighten the thread.

Sew the cuffs to the bottom edge of the sleeve. To do this, apply the cuff to the bottom of the sleeve, front side to front; We make a stitch, also taking the turned-down short sections of the cuff.

To make a fastener on the cuff, we sew 2 thin rolls, 4 cm long, for an air loop. Turn the cuffs up. 
Fold the cuffs in half with the wrong side inward, turn in the inner edge of the cuff, and attach the cuff to the sleeve. We make an air loop in one of the short sections of the cuff, and stitch the other section. After fitting, we will sew buttons there.

The sleeves are ready, you can sew them in.

We sew the sleeves into the armholes. Iron it.

Let's start processing the neck. At a distance of 0.7 cm from the edge of the neckline, machine stitch with the largest stitches. Tightening the thread, gather the neckline by 8 cm, the sleeves by 11 cm, and the back by 12 cm.

Preparing the edging tape; We apply it to the cut of the neckline, right side to front, turn the short sections of the binding to the wrong side and attach.

We prepare two colored laces for ties. We turn away the binding, bend it in half with the wrong side inward, and fold the inner longitudinal section of the binding. We put the ends of the ties inside the front parts of the edging tape. We attach the binding to the neck.

We iron the hem allowance for the bottom of the blouse and the side slits to the wrong side, then turn it under and adjust it at a distance of 0.5 mm from the edge. Smooth it out.

Sewing blouses for girls completed. You see how easy it is to sew such a blouse. A few hours of creativity and the blouse for the little fashionista is ready.

If you like the idea of sewing a blouse, we will send blouse pattern for free.