here is the description:
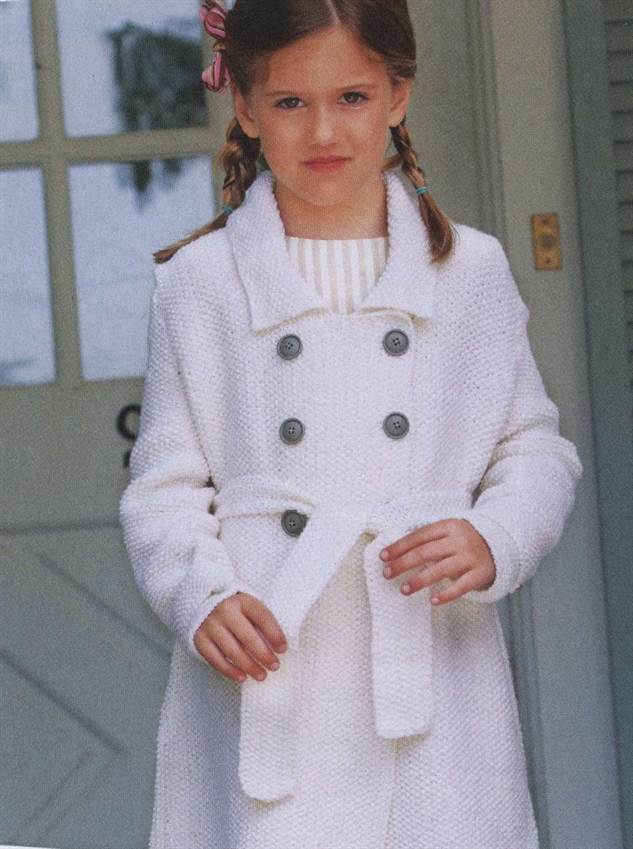
Every mother wants to dress her child so that he looks like a little doll, especially for girls. Let's knit a chic white coat for your baby (1.5-2 years old), size 86-92 cm.
To make it we will need:
White yarn (80% wool, 20% polyamide; 200m/100g); white fleece for lining – cut 1.45 m. x1 m.; large buttons – 4 pcs.; a little chocolate-colored velvet ribbon; hook No. 3, knitting needles No. 2; knitting needles No. 3.
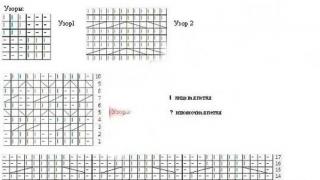
1. Elastic band: alternate in order 2 LP, 2 IP. From the wrong side we knit according to the pattern.
2. “Garter stitch”: We knit all rows with facial loops.
3. Checkerboard pattern: perform according to Figure 1.
4. We perform the “rice” pattern as follows: rows 1 and 3, as well as all subsequent odd rows: 1LP, 1IP – alternate. For purl rows (even rows), we knit all knit stitches with purl stitches, and all purl stitches with knit stitches.
5. We knit the “braid” pattern according to Figure 2.
6. We carry out the “braid” and “medallion” patterns according to Figures 3 and 4, respectively.
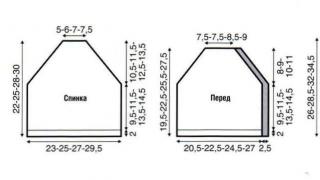
For the back: cast on 2.5 knitting needles for 98 stitches, that is, 2 edge stitches and 96 warp stitches. Next we knit 11 rows with an elastic band. Then we switch to needles No. 3 and knit 4 rows in garter stitch. After that, 9 rows with a “checkerboard” pattern - we get three squares in height. Next we knit as follows: 3 rows – garter stitch, 12 rows – “rice”, 4 rows – garter stitch. Then we knit 7 rows - stockinette stitch, while making additions in the last purl row. Next, we perform the “braid” pattern in three repeats. At the same time, in the last purl row we make decreases - for this we knit every 4th and 5th loop purl together. Next we knit 4 repeats with a braided pattern and move on to the medallion patterns. After we started performing “medallions,” we need to decrease for the armholes: 1 time * 4 loops, 4 times * 2 loops in every second row (that is, 12 loops in total). Next we knit two repeats, 2 repeats with “medallions”, knit four rows in garter stitch, then knit “rice”. Next, after 16 cm from the beginning of closing the loops, it is necessary to close the middle 18 loops, and in the subsequent front row we close 8 loops on each side, respectively. Already 18 cm from the beginning of closing the loops, we close the remaining 20 loops of the right and left shoulders, respectively. The back is ready. By the way, the trapezoidal shape is obtained solely due to the drawings; no reductions on the sides are necessary.
Right front of the coat: Cast on 60 stitches on knitting needles No. 2.5 (that is: 48 stitches + 10 placket + 2 edge stitches). We perform all the necessary patterns on 48 loops, and on the outermost 10 we always knit the bar in garter stitch.
For 48 loops + 2 edge loops we knit 11 rows with an elastic band. Then we switch to needles No. 3 and knit 4 rows in garter stitch. Then we knit 9 rows with a chessboard (it turns out three squares in height). Then we proceed as follows: 3 rows – garter stitch, 12 rows – “rice”, 4 rows – garter stitch. Then we knit 7 rows of stockinette stitch and in the last purl we make an increase in this way - we pull out the crossed purl between the loops after every 4th loop. Next we knit a braid pattern in 3 repeats. In the last purl row we make decreases - we knit the 4th and 5th loops together with a purl loop. Next we knit a “braid” - 4 repeats, move on to the “medallions”. After that. how we started the “medallions” pattern - we begin decreasing for the armholes - 1 time * 4 loops, 4 times * 2 loops in every second row (12 loops in total). We knit 2 repeats of “medallions”, then we perform 4 rows in garter stitch, then we knit in “rice”.
Next, after 13 cm from the beginning of closing the loops, we close for the neck of the coat, starting from the left in every second row - 10 loops of the bar, then 1 time * 4 loops, 2 times * 3 loops, 4 times 2 loops. Then, 12 cm after the beginning of closing the loops, it is necessary to close the remaining 20 shoulder loops. The right shelf is ready, we knit the left one in the same way, symmetrically.
Coat sleeve: cast on 44 stitches on knitting needles No. 2.5, that is, 42 sts. + 2 edges. We knit 17 rows with an elastic band, switch to needles No. 3 in the last purl row and make additions - pull out the crossed purl between the loops after every fourth loop. Next we knit a braid pattern, 2 repeats. After that, “braid” 2 rapports and move on to “medallions”. In this case, after the elastic band, we make additions on the sides, one loop in every fifth row.
Further after that. As we began to perform “medallions”, we need to make additions on the sides - respectively, 1 loop on the sides in every third row. Thus, having knitted one repeat of “medallions” (74 loops are obtained), we begin the formation of a round sleeve roll. To do this, we proceed as follows: in every second row we perform decreases on the sides - 1 time * 5 loops, 3 times * 4 loops, 4 times * 3 loops, 4 times * 2 loops, 1 time * 5 loops, then close off the remaining 10 loops.
We knit the second sleeve by analogy.
For the hood: cast on 44 stitches on knitting needles No. 3 (32 + 10 placket + 2 edge stitches). In this case, we perform the patterns on 32 loops, and 10 loops of the strap - all the time in garter stitch. For 32 loops + 2 edge stitches, we knit 12 rows with “rice”, at the same time we perform increases on the left in every second row - 1 time * 3 loops, 3 times * 1 loop. Next we knit 12 rows with “checkerboard”, 2 times with garter stitch, and then continue with “rice” - 8 rows. Then we move on to the “medallions” pattern - we knit 2 repeats. Next, we knit 8 rows with “rice”, and on the next eight rows we make symmetrical decreases in every second row on the left - 3 times * 1 loop, 1 time * 3 loops. Next we make the symmetrical detail of the hood. We knit 16 rows with a “rice” pattern. At the same time, we simultaneously make increases on the left in every second row - 1 time * 3 loops, 3 times * 1 loop. Next we knit two repeats using a medallion pattern. Then we continue with the “rice” pattern for 8 rows, 2 rows of garter stitch, “checkerboard” - 12 rows. Next we knit 6 rows of the “rice” pattern and on the next six rows we make symmetrical decreases in every second row - 3 times * 1 loop, 1 time * 3 loops.
Lining. Before you start, you need to wash all knitted parts of the coat in the wool mode, at a temperature of 30 degrees. Dry everything on a towel on a flat surface and steam with an iron. Next, we place all our parts on a sheet of paper and carefully trace them, while taking into account the bends of the lining. The lining should be shorter than the entire product by the width of the elastic band. We sew together all the lining parts and sew them to the coat, starting from the middle of the fold of the hood.
We make pockets and loops.
We cast on 28 loops. We knit 2 repeats and 5 rows with a “braid” pattern – stockinette stitch. In this way we make two parts (pockets).
For the loops, we crochet 24 loops and tie them with a single crochet. We will need 8 such parts. We sew the ends of the four parts together with white thread to create a loop. We thread the remaining strips through the button and sew the ends together.
Assembly: we make all the seams of the knitted parts. We decorate the pockets with bows made of velvet ribbon. Next you need to carefully baste the fleece lining. We sew eyelets and buttons to the straps, and sew a velvet ribbon bow to the hood.
Everything is stylish, comfortable, and, most importantly, a warm coat in elegant white color is ready for your fashionista.
I will knit for my daughter at 4
here is a link to online on Osinka, conducted by fomok
http://club.osinka.ru/topic-50342?p=12712561#12712561
there are also publications here
Size: 1.5-2 years, 86-92 cm.
You will need: 450 g YarnArt Charisma spinner (200 m/100g) 80% wool, 20% acrylic; white fleece 1.45 m*1 m; 4 buttons with holes for buttonholes, 45 cm chocolate-colored velvet ribbon, knitting needles 2.5 and 3, hook 3.
Rubber
Row 1 - *K2, P2. * repeat from * to *. In even rows according to the pattern.
Garter stitch
Knit all rows with facial loops.
Knit chess pattern according to pattern 1
Rice pattern
Rows 1, 3 and the next odd rows – *k1, purl 1 *repeat from * to *. Rows 2, 4 and the next even rows - knit all knits with purls, and purls with knits.
Knit braid pattern according to pattern 2
Knit the “braid” and “medallions” patterns according to Figures 3 and 4, respectively.
Back
Cast on 98 (96 +2 edge) stitches on 2.5 knitting needles and knit 11 rows with an elastic band. Next, switch to needles No. 3 and knit 4 rows in garter stitch. Then knit 9 rows with a checkerboard pattern (it should be 3 squares in height). After this, 3 rows of garter stitch, 12 rows of rice, 4 rows of garter stitch. Then we knit 7 rows in stockinette stitch and in the last purl row we make increases - we pull out a crossed purl between the loops after every fourth loop. We knit 3 repeats with a braid pattern. In the last purl row we make decreases - we knit the 4th and 5th loops together purlwise. Then we knit 4 repeats with a braid and move on to the “medallions” pattern. After we have started the “medallions” pattern, we make decreases for the armholes - 1 time * 4 loops, 4 times * 2 loops in every second row (12 loops in total) Having knitted 2 repeat “medallions”, we knit 4 rows of garter stitch, then we knit “ rice". After 16 cm from the beginning of closing the loops, we close the middle 18 loops, in the next front row we close 8 loops on each side. After 18 cm from the beginning of closing the loops, we close the remaining 20 loops of the left shoulder and 20 stitches of the right shoulder.
The trapezoid is obtained ONLY due to the drawing, no reductions on the sides are required.
Right shelf
Cast on 60 (48 +10 per placket + 2 edge) stitches on needles No. 2.5. Knit all patterns on 48 loops, and on the outermost 10 loops on the left, knit a garter stitch placket all the time.
For 48 loops + 2 edge stitches: Rib knit 11 rows. Next, switch to needles No. 3 and knit 4 rows in garter stitch. Then knit 9 rows with a checkerboard pattern (you should get 3 squares in height). After this, 3 rows of garter stitch, 12 rows of rice, 4 rows of garter stitch. Then we knit 7 rows with stockinette stitch and in the last purl row we make increases - we pull out the shifted purl between the loops after every fourth loop. We knit 3 repeats with a braid pattern. In the last purl row we make decreases - we knit the 4th and 5th loops together purlwise. Then we knit 4 repeats with a braid and move on to the “medallions” pattern. After we started the “medallions” pattern, we make decreases for the armholes - 1 time * 4 loops, 4 times * 2 loops in every second row (12 loops in total). Having knitted 2 repeats of “medallions”, we knit 4 rows of garter stitch, then we knit “rice”.
After 13 cm from the beginning of closing the loops, we close the neckline on the left in every second row - 10 bar loops, then 1 time * 4 loops, 2 times * 3 loops, 4 times 2 loops. After 18 cm from the beginning of closing the loops, we close the remaining 20 shoulder loops.
We knit the left front symmetrically.
Sleeve
Cast on 44 (42 +2 edge) stitches on needles No. 2.5. Knit with an elastic band for 17 rows. Next, switch to the knitting needles and make increases in the purl row - we pull out the crossed purl between the loops after every fourth loop. We knit 2 repeats with a braid pattern. Then we knit 2 repeats with a braid and move on to the “medallions” pattern. At the same time, after the elastic we make increases on the sides - 1 loop on each side in every 5th row.
After we have started the “medallions” pattern, we make the following increases on the sides - 1 loop on each side in every 3rd row. Having knitted 1 repeat “medallions” (we get 4 loops), we begin to form a round sleeve cap. To do this, in every second row we make decreases on the sides - 1 time * 5 loops, 3 times * 4 loops 4 times * 3 loops, 4 times * 2 loops, 1 time * 5 loops, and then cast off the remaining 10 loops.
Knit the second sleeve in the same way
Hood
Cast on 3 44 (32 placket stitches + 2 edge) stitches on knitting needles. Knit all patterns on 32 loops, and on the outermost 10 loops on the right, knit a garter stitch placket all the time.
For 32 loops + 2 edge stitches: Knit with a “rice” pattern for 12 rads. At the same time, increase on the left in every second row - 1 time * 3 loops, 3 times * 1 loop. Then knit 12 rows with a checkerboard pattern, 2 rows of garter stitch and continue with a rice pattern for 8 rows. Next, we move on to the “medallions” pattern - we knit 2 repeats. Knit 8 rads with a “rice” pattern and on the next 8 rows make symmetrical decreases in every second row on the left - 3 times * 1 loop, 1 time * 3 loops. Next we knit a symmetrical part of the hood. We knit 16 rows with a “rice” pattern. At the same time, increase on the left in every second row - 1 time * 3 loops, 3 times * 1 loop. Then knit with a “medallions” pattern - knit 2 repeats. Continue with the “rice” pattern for 8 rows, 2 rows of garter stitch, and the “checkerboard” pattern for 12 rows. Knit 6 rows with a “rice” pattern and on the next 6 rows make symmetrical decreases in every second row - 3 times * 1 loop, 1 time * 3 loops.
Lining
Wash all knitted parts of the coat on the wool cycle at 30 degrees, then dry everything on a towel, steam the sleeves and the bottom of the back and buttocks. Next, place the knitted parts on a sheet of paper and carefully trace them. At the same time, take into account the folds of the lining at the bottom of the back, shelves and sleeves and on the sides. The lining parts are shorter than the knitted parts by the width of the elastic and trim. Then we cut out the fleece parts, sew along the shoulders, the sides of the back with the buttocks, sew in the sleeves, sew the hood and sew it along the neck line. It is advisable to first fasten the middle of the hood to the middle of the back.
Pockets and loops
Cast on 23 loops. Knit 2 repeats and 5 rows of stockinette stitch with a braid pattern. Knit 2 parts.
For the loops, crochet 24 loops and tie them with single crochets. Knit 8 pieces. For 4 parts, sew 2 ends with white thread, leaving a loop. Thread the remaining 4 strips through the button, and then sew the 2 ends together.
Assembly
We sew all the knitted parts of the coat along the shoulders, the sides of the back with shelves, we sew in the sleeves, we sew the hood and sew it along the neckline. It is advisable to first fasten the middle of the hood to the middle of the back. We decorate the pockets with bows made of velvet ribbon. Sew pockets to shelves. Then connect the seams of the shoulders of the knitted part and the lining and sew them together. Repeat the same with the side seams, the middle seam of the hood and the neckline. Next, carefully baste the lining along the edges. Sew loops to the strips. Wrap the placket on the hood and sew it to the hood with white thread. Sew a velvet ribbon bow onto the hood. 

Every mother tries to make sure that her child receives the best. But often the selection in a clothing store does not live up to expectations. It’s not for nothing that they say that all the best things are those in which you put your soul, and a knitted coat is no exception. Moreover, you can always combine a useful activity with a pleasant one - discover the wonderful world of knitting and create a warm and stylish thing for your little princess.
Before we move on to knitting, let's decide on the dimensions of the future model. Using the diagram below, take the necessary measurements:

Our coat sizes are as follows:
- Waist: 56/60/64/68/72 cm
- Product length: 36/40/44/48/52 cm
- Sleeve length: 21/24/26/28/32 cm
The knitted coat is designed for children 1-2-3-4-6 years old. Thus, we assign an index to each age group, which will be used further in the description of the model:
1 year - 1); 2 years - 2); 3 years - 3); 4 years - 4); 6 years - 5).
Don’t be afraid to start knitting a coat for a 1-2-3 year old girl, because it’s not difficult at all, and most importantly, the joy of your little princess is the best reward for your efforts.
Let's move on to the double-breasted coat model itself. Below is a pattern of the product with the corresponding dimensions. If you are just getting acquainted with the art of knitting, you can draw this diagram in full size and, as you work, check the correctness of following the knitting instructions.

Necessary materials
- circle. knitting needles No. 3, No. 3.5, No. 4
- stocking needles No. 3,5 and No. 4
- auxiliary knitting needles
- stitching needle
- wool yarn (100m - 50g): 1) 200g; 2) 250 gr; 3) 250 gr; 4) 300 gr; 5) 350 gr)
- 8 small buttons
Knitting density
- When knitting in stockinette stitch on needles No. 4: 20 loops = 10 cm
- When knitting with pearl stitch on knitting needles No. 3.5: 21 loops = 10 cm
Patterns to be used
- Facial surface: faces. The side is knitted in a knit stitch, the reverse side is knitted in a purl stitch.

- Pearl pattern: 1 rub. (facial) - faces; 2 r. - alternate knitting *k1, p1*, continue until the end of the row. 3 r. - persons, 4 r. - similar to row 2. Repeat 1 and 2 r.

Making decorative elements
- Fold H (9 loops): to perform this element you will need 2 auxiliary knitting needles. First, transfer 3 sts to one auxiliary needle, 3 sts to another auxiliary needle. Position these 2 knitting needles so that the knitting needle in your left hand is on top, then the second auxiliary knitting needle, and the first knitting needle is on the bottom. *Next you need to knit 1 stitch from 3 knitting needles together*. Perform action *-* 2 p. As a result, 6 points will be closed.
- Fold V (9 loops): Start making this part by slipping 3 stitches onto a separate needle, then transfer 2 stitches to the second auxiliary needle. The location of the knitting needles in this case will be as follows: the knitting needle in the left hand should be at the bottom, above it is the second auxiliary knitting needle, and at the very top is the first auxiliary knitting needle. *Knit 1 stitch from all 3 needles together*. Repeat *-* 2 r. In this case, 6 points will be closed.
- Buttonholes: knit loops on the right shelf of the product according to the pattern: 3 p., bind off 2 p., knit 1) 7; 2) 8; 3) 8; 4) 8; 5) 9 p., close 2 p. again, finish the row. In the new row, cast on new loops in place of previously closed loops. Knit a new pair of loops at a distance of 1) 11; 2) 12; 3) 14; 4) 15; 5) 17 cm from the bottom. The next pair of loops is near the bottom edge of the raglan. The top pair of loops - after 1) 10; 2) 12; 3) 14; 4) 15; 5) 16 connected rows of raglan bevel.
Knitted coat for girls: progress of work
To the circle. knitting needles No. 3.5 dial 1) 151; 2) 161; 3) 169; 4) 177; 5) 185 p. Complete 4 p. straight and reverse rows of faces.p. Change the needles to number 4 and start knitting in stockinette stitch. Please note that the front edges of the coat are knitted in a pearl pattern:
- 1 rub. (front side): faces.
- 2 rows: 1 knit stitch, *1 purl stitch, 1 knit stitch* x 2. Continue knitting until there are 7 stitches on the knitting needles. Again *1 knit stitch, 1 purl stitch. * x 2, 1 persons. P.
Repeat rows 1 and 2.
On both sides of the first loop, make marks on the sides so that on the back there is 1) 61; 2) 65; 3) 69; 4) 73; 5) 77 p., and on the shelves 1) 44; 2) 47; 3) 49; 4) 51; 5) 53 p.
As soon as 1) 7 is connected; 2) 9; 3) 10; 4) 9; 5) 10 cm near the marks, close the loops in the following order: before the mark, remove 1 stitch without knitting, knit the next stitch as usual and pull the removed stitch through it, knit a loop with the knit mark. p, 2 p. together persons. x 2. In this case, close 4 stitches. Continue closing loops every 1) 6; 2) 6; 3) 7; 4) 9; 5) 10 cm. In total x3 - 1) 139; 2) 149; 3) 157; 4) 165; 5) 173 p.
Please note that loops must be formed on the right shelf.
After 1) 22; 2) 24; 3) 27; 4) 30; 5) 33 cm from the bottom edge on the front side of the back, make folds: knit until the middle 19 stitches remain in the middle of the back, make a V fold, 1 knit stitch, knit an H fold. The remaining loops are knitted according to the pattern.
The work should remain 1) 127; 2) 137; 3) 145; 4) 153; 5) 161 p.
In the new row, close for the armhole near the marks of 7 p. Remaining 1) 113; 2) 123; 3) 131; 4) 139; 5) move 147 sts onto a knitting pin, put the work aside for now.
Cast on with regular knitting needles No. 3.5 1) 42; 2) 42; 3) 44; 4) 44; 5) 46 sts. The first 3 cm are knitted with a 1x1 elastic band (knit 1, purl 1). Change knitting needles to number 4 and start knitting faces. satin stitch After 1) 6; 2) 6; 3) 4; 4) 6; 5) 4 cm cast on an additional 2 stitches along the bottom of the sleeve. Continue adding loops every 1) 3; 2) 3; 3) 4; 4) 3; 5) 4 cm until the needles are 1) 52; 2) 54; 3) 56; 4) 58; 5) 60 p.
On 1) 21; 2) 24; 3) 26; 4) 28; 5) 32 cm of work 7p. close at the bottom of the sleeve. All others 1) 45; 2) 47; 3) 49; 4) 51; 5) 53 sts. Remove a separate knitting needle and put the work aside for a while.
Knit the second sleeve in a similar way.
Slip all loops onto the circle. knitting needles No. 3.5. Place the sleeve loops in accordance with the closed armhole loops = 1) 203; 2) 217; 3) 229; 4) 241; 5) 253 p. Knit further using a pearl pattern. After 2 rows, place marks around the 1st stitch at all connecting points. As you work, knit the loops with the mark according to the pattern: on the front side - knit stitch, on the reverse side - purl stitch.
Close the loops on both sides of the marks according to the diagram: remove without knitting 1 stitch. before the mark, 1 p. and draw through the knitted p., perform a knit stitch with a loop with the mark, 2 knit stitches. together. In this case, 8 loops are closed. Repeat closing the loops every 2 r.
After completing 1) 13; 2) 15; 3) 17; 4) 18; 5) 19 rows with stitches closed, start decreasing for neckline. To do this, close 1) 14 along the edges of the shelves; 2) 15; 3) 15; 4) 15; 5) 16 p. Make decreases for bevels every 2 p. x2, not forgetting to close off 4 stitches at the beginning of each row.
Collar
Along the edge of the formed neck of the coat, dial into a circle. knitting needles, with the exception of the outer loops of the shelves: 1) 7; 2) 8; 3) 8; 4) 8; 5) 9 sts. On the back along the edge of the neckline you need to cast on 2-4 sts. Total amount of loops: 1) 71; 2) 71; 3) 73; 4) 73; 5) 77 p. Knit with 1x1 rib. After 3 cm, return to knitting needles No. 3.5 and resume knitting for another 4 cm. Close off the loops remaining on the knitting needle.
End of work
Finish the seams of the armpits. Dial 7p. on knitting needles No. 3.5 and knit 10 cm with a 1x1 elastic band. Close the loops. Secure the placket to the back fold and add buttons to the ends. Symmetrically to the loops of the right shelf, place the buttons on the left shelf.
This pattern makes very beautiful and cozy children's knitted coats for girls. Delight your little princess with a new item made with your own hands.
Video on the topic of the article
On the Internet you can find a great many articles about a knitted coat that is ideal for a girl, made with knitting needles. However, many of them are aimed at an audience of experienced needlewomen, which means that it is quite difficult for beginners to understand the diagram and description of what’s what. For those who cannot yet confidently call themselves a master of knitting needles and crochet, it is necessary to select simple patterns and simple patterns. In this case, our article will be an excellent assistant for your “manual” creativity.
We knit a coat for a girl with knitting needles with diagrams and descriptions
It is very easy to master knitting for small children; coats for girls will be the first correct step in this. This thing is ridiculously simple to knit, but looks quite stylish. Even a craftswoman who has barely started knitting can handle it without difficulty. The main pattern is garter stitch.
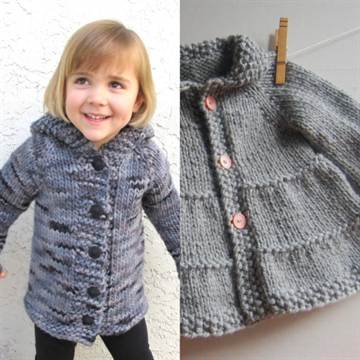
The coat is quite versatile, as it may well suit both newborns and older children. You just need to choose the right size. The description of the work is presented for knitting things for a child aged 1 year.
The following measurements were used:
- Chest 61 cm;
- From the shoulder 28 cm;
- Sleeve, including roll-up cuff, 19 cm.
For the coat you will need 100% wool yarn (about 8 skeins, 50g/104m), knitting needles No. 3.5 and No. 4, several buttons.
As for the density of work: 48 rows of 22 loops - 10 cm using needles of the fourth number. We start knitting from the back.
1) Back. Cast on 67 stitches on 4mm needles. Approximately 16 cm is knitted with knit stitches only, the final row is made of purl stitches. To complete the armholes, you need to close 4 loops at the beginning of the next two rows, a total of 67 loops will remain 59. Next, we knit according to the pattern until the length of the work is approximately 21 cm, finishing with a purl row. The shoulder bevel is performed as follows: close 15 loops at the beginning of the next. 2 rows, then the remaining 29.
2) Pockets. To prevent our coat from looking like an ordinary linen bag, we will decorate it with pockets. To do this, 16 stitches are cast on number four knitting needles, which are knitted face down for up to 34 rows. Then this part of the work is put aside and patiently waits in the wings.
3) Left shelf. In order to knit the left front, you need to perform 33 rows of 48 loops using knitting needles No. 4. After this, a pocket is placed. The next row is knitted according to the pattern: 3 "face", 16 loops before the edge close. Next we continue to process the pocket. We knit 29 knit stitches, perform the same loops along the pocket, finish with 3 knit stitches. After this, the work continues with the “garter stitch” pattern for the next 16 cm, the last row is performed with purl stitches.
Making an armhole: cast off 4 stitches at the beginning of the “first” (after purl) row, and in the next row – 44 stitches. You should continue straight until the length of the fabric reaches 28 cm. We do shoulder bevels, starting from closing 11 loops to the end of the row; then we knit 1 “front” row and set aside the rest of 29 loops.
4) Right shelf. 33 rows of 48 stitches using 4mm knitting needles. We place the pocket, knit 29 stitches face down, and close the last 16 stitches. The next row consists entirely of knit stitches: first 3, then working the pocket and knitting to the edge. We continue garter stitch up to 9 cm from the beginning, finishing with a purl row.
5) Button holes. Knit 3 stitches facewise, yarn over, combine 2 loops and knit stitches, knit 19, knit stitch again, yarn over and knit stitches to the edge. Next again, garter stitch approximately 16 cm, finish with the front row. To make an armhole, cast off the first 4 stitches in the first row, and 44 stitches in the next row, counting from the beginning. Then about 17 cm and purl row. Again, the diagram for the button “window” (it is performed in the same way as the first one). Next we knit 28 cm to the armhole. We perform a shoulder bevel by casting off 15 initial stitches and knitting the remaining (29) stitches. There is no need to cut the thread, just put the work aside.
6) Hood. But first you need to make a shoulder seam. To do this, take the right shelf, knit 29 stitches face down, cast on a new 34. We do the same with the left shelf. We got 102 loops, which we knit until we get 24 cm of fabric. Purl the last row, bind off the stitches.
7) Sleeve. Cast on 35 stitches using 4-number knitting needles and knit 17 rows of a “shawl” pattern. Knitting needles No. 4 are replaced with No. 3.5. Another 16 facial rows are made, and 4 mm knitting needles are taken again. Add 1 stitch on both sides of the next row, and then 8 each until the number of stitches is 53. Then 24 cm in garter stitch, purl row. The last row is marked with markers or pins and another 8 are knitted (for the cuff). The hinges are closed.
8) Assembly. The hood is folded in half and the top seam is sewn. Using the edge of a set of loops, we attach this part to the back, or rather, to its neck. The middle of the edge of the loop closure is aligned with the shoulder seam, the sleeves are sewn into the armholes. The end of the row after the closed loops is connected to the edge of the closed armhole loops. Then finishing work, namely: processing the side seam and sleeves, pocket burlap, attaching buttons.
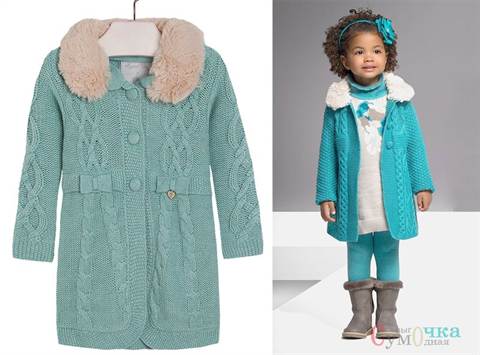
For many knitters, autumn becomes a truly magical time of year, because during this period you can finally wear pre-knitted cardigans. Those mother craftswomen who managed to knit a coat for a girl with knitting needles are especially happy. Diagrams and descriptions, photos of models and a drawing of a universal pattern - all this can be found in this article.
What is the specificity of a knitted coat?
Externally, a coat and a cardigan may be very similar, but it’s not for nothing that they have completely different names. Unlike making a long sweater or cardigan, knitters use much thicker yarn and try to get the tightest knitting possible when knitting a coat for a girl. Schemes and descriptions of the most common patterns (“rice”, shawl, stocking) are given in the following paragraphs.

As a rule, a coat is worn on top of other clothes: a sweater, a T-shirt, a dress. Therefore, such a wardrobe item should be a little larger and looser than a cardigan. Here it is necessary to provide not only wider details of the back and shelves, but also deep armholes and a neckline. If the armholes are small, it will be very uncomfortable for the child to move, especially to raise his arms.
Do you need a lining?
For many knitters, the question of the need for hemming is extremely pressing.

Opinions were divided almost equally, which gives each of us the right to make this decision independently. Of course, the lining is intended to make a knitted coat for a girl warmer and denser.

Schemes and descriptions of even the most continuous patterns will not help to obtain a knitting of such density.

A children's product with padding poly lining turns out especially great. You can walk in such a coat even on winter days (of course, if there is no snow and the sun is shining). However, if the craftswoman cannot cope with cutting and sewing, she may well leave the product as is: a simple knitted coat for a girl. Diagrams and descriptions of the most popular patterns consist of knit and purl stitches, so the entire work can be completed in just a few days.
It is worth adding that an excellent lining for knitted items is made from fleece; like knitwear, it is a little springy and has a fleecy structure. The cut parts can even be sewn by hand, it will not be visible.

Hand knitting. Knitted coat for a girl: diagram, description
The photo below shows a universal knitted coat model. The pattern can hardly be called original, but the plus is that it is quite simple to make. The product will suit many things and accessories, and will appeal to both girls and boys.

It will take from 450 to 750 grams of yarn to knit a coat for a girl. Schemes and descriptions (4-5 years, 5-6 years, 7-8 years, 9-10 years, 11-12 years, 13-14 years) provide the opportunity to make a product of any size.

Knitting needles can be used straight or circular. Their number must strictly correspond to the yarn used; you can even take tools a little thinner than indicated on the material label. This technique allows you to get a tighter knitting, but it is not suitable for those who are prone to tightening loops.
Patterns should be drawn to life size and cut out so that parts can be attached to them.
The preparatory stage should also include knitting a control sample. This is necessary in order to get the correct calculations and know the number of loops that form the first rows of the back, fronts and sleeves.
Manufacturing of main parts
Based on the control sample and the pattern, you need to cast on loops for knitting the back. It is advisable to complete the first 3-5 rows (all loops in all rows are knitted) so that the fabric does not curl. Then you need to go to (there is a front and back side).
The drawing shows knitting for a girl. The diagrams and descriptions can be simplified and the product can be connected smoothly.
When the fabric is knitted to the level of the armholes, you need to cut 3-7 loops on both sides (depending on the size). Then on each side in each front row, cut 1 loop 3 times.
- The average 7-12 loops are transferred to a thread or a knitting pin.
- Then each shoulder is knitted separately. In each front row, cut one loop 3 times (from the neck side).
- They keep the canvas straight.
- Gather the shoulder loops onto the thread and leave until the shelves are ready. Having aligned the loops of their shoulder parts, the craftswoman sews the parts
- The second shoulder is done in the same way.
The fronts are knitted almost the same way as half of the back:
- Cast on loops taking into account the width of the bar (5-10 loops) and perform several rows of garter stitch.
- They switch to stocking stitch, but knit the placket in garter stitch. When working on the left front, you need to remember about the button holes.
- They are tied to the armholes and rounded necklines are formed.
- They make the neck.
Knitting sleeves and hood
The sleeve cuff is made evenly in garter stitch, then switches to stocking stitch and raises the fabric to the level of the armholes. In this case, 3-5 loops are added evenly on each side (approximately after 5-8 cm).
Okat is knitted as follows:
- In each front row, cut 1 loop 3-5 times.
- Sew open loops to the front and back armholes
Using this method of joining parts is the only way to avoid the appearance of rough and unsightly seams.
The previously set aside loops are transferred to circular knitting needles and the remaining loops are picked up along the neckline. This is the first row of the hood. It is knitted in stocking stitch, but the placket continues to be garter stitch.
At a height of 20-25 cm, the fabric is folded in half and the open loops are sewn.
Then the pockets are knitted, decorated with tassels and sewn in the right places.
Alternative options
If desired, you can use other patterns to knit a coat for a girl.

Schemes and description of the “checkerboard” ornament: 
To form a further pattern, repeat the sequence from the 2nd point. The finished coat can be decorated in any way you like: appliqués, embroidery, labels and stripes would be appropriate here.