Along the creeks, where from the heat and light
The reeds are dizzy,
Water lilies bloom every summer.
They are called overpowering grass.
E. Stewart
I have always liked these plants, but I saw the craft and wanted my own embodiment.
The first flower took about an hour, and then things went faster.
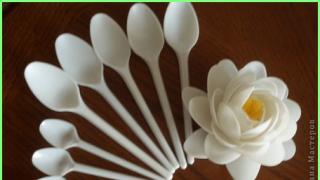
Disposable spoons of different sizes became the material for work. For one flower it took me 6 small spoons and 30 large ones. 
I cut out the stamens from the yellow egg cells, twisted them a little with a knife, and from the bottom of a disposable plate - the bottom of the flower. 
Spoon handles can be easily cut with kitchen scissors. 
We assemble the first row from six small spoons using a hot glue gun. In fact, a water lily has 8 petals in one row, arranged crosswise. I tried to do it correctly, but then the flower turns out very open and flat - I liked the other option, which is what I present. 
Next... Five rows are assembled from large spoons, the petals are laid alternately, the sixth petal is placed behind the first, so the first petal needs to be coated with glue on only one side. We fold from left to right, then glue the first petal only with the right side. 
With each row, it is necessary to change the angle of the petals so that the flower “opens” and at the end of the row, place it on a flat surface, checking whether it turns out crooked.
And the last step: glue the bottom to close the hole in the center of the flower. We twist the stamens and insert them on top. They do not need to be secured, they will take up the entire provided volume and will not fall out. 
Here is the result... This product can be used in a variety of ways. 
For the water lily, a sheet of green plastic paper folder was made, the veins were pressed on it, the water lily and transparent beads were glued - droplets of water. 
People often use disposable tableware. This mainly happens during trips to nature. In fact, you can create amazing compositions from it. Expensive paintings that make your home look like a museum are no longer relevant. Nowadays, hand-made things, that is, things made with one’s own hands, are very popular. Be sure that crafts made from spoons will not leave any of your guests indifferent. We offer you various ways to make a water lily from plastic spoons with your own hands step by step and many other applications.
kitchen wall
In the first method we will decorate the kitchen wall. Such decor would look most appropriate in this room, but other rooms can also be considered.
You will need:
- Disposable spoons.
- Paint – To paint plastic craft spoons, it is best to use acrylic paint.
- Super glue.
- To base a painting made from disposable spoons with your own hands, you will need a wooden board.
- Brush.
- A small jar of water.
Everything is quite simple and done quickly. Your actions:
- First, paint the spoon halves (the top part).
Important! To create a gradient effect, blot the edges with a cloth.
- Once the acrylic is dry, glue the dishes onto the wooden tablet in a checkerboard pattern, creating several rows.
This simple craft can add a touch of originality to the interior of your kitchen.
Vase
In any house where a woman lives, there should be a vase, and preferably more than one. And if you don’t like the right model in the store, why not make such an item exactly as you see it, from scrap materials?
Let's start making crafts from disposable spoons:
- Cut off the bottom of two hundred spoons - only the top should remain.
- Paint them, and while the paint is drying, start preparing the tin can. Rinse and dry it thoroughly.
- Glue the spoons to the tin can.
The decorative vase is ready!
Important! The top of the jar can be wrapped with satin ribbon or beads.
Watch
A wall clock in the shape of a sun will look very beautiful and impressive.
To create them you will need:
- Three hundred pieces of plastic spoons.
- Hot glue gun.
- Styrofoam.
- Scissors.
- Watch.
- Screwdriver and bolts.
- Knife (preferably stationery).
How to proceed:
- Cut out a foam circle in the shape of a clock.
- The middle needs to be marked so you know where to attach the clock. Make special holes for changing batteries, winding watches, etc.
- The bottom of the spoons should be cut off to leave just the cups and painted orange or yellow.
- Paste the clock in a circle, leaving no empty spaces.
Water lily
This is a simple option for making a picture from disposable spoons with your own hands. The manufacturing process is quite simple, so even preschool children can handle it - feel free to involve them in the creative process!
Tools and materials:
- Plastic spoons in white and blue. If blue ones are hard to find, you can paint white ones with acrylic paint.
- Green plastic bottle.
- Disposable white plates.
- Needle and thread.
- Scissors.
- Candle.
- Superglue or glue gun.
- Decor of your choice (Lace, satin ribbons, rhinestones, sparkles, etc.)

Master Class:
- The first plate needs to be turned over and pasted around the central circle with spoons - their lower part should be at the edges of the center.
- Glue a loop in the center and turn the plate over.
- The base is ready. Now let's start creating the decor. The white lace ribbon needs to be sewn along the edge with a running stitch, gathered into a ring and connected into a ring according to the size of your plate.
- We divide the blue spoons into two parts - handles and cups separately.
- On the flat surface of the green bottle we draw leaves and cut them out. We cut out wavy leaves along the top and wavy part.
- The next step is to arrange the decor on the plate. First we glue the lace, then we place the leaves in a circle. Between them, and also in the middle, we glue cups from blue spoons.
That's all, your DIY plastic spoon water lily is ready! All that remains is to cut out tubes from yellow corrugated paper, give them the appearance of stamens and glue them in the center. You can hang the panel on the wall, or you can add decorations of your choice.
DIY dress made from plastic spoons
In fact, the list of things that can be made from plastic spoons is incredibly long. For example, would you think that they could be used to make a dress for a child? You can, now we’ll tell you how:
- The first thing you need to do is be patient. The work may take more than a day, but the result is worth it, believe me.
- Sew flowers from plastic spoons to the blouse. You need to arrange the cups from them in two rows.
Important! Choose colors at your discretion. Place a beautiful bead or button in the center of each such flower - it will serve as a stamen.
- We cut the glasses in half horizontally and glue them to the front of the skirt, maintaining the same spacing to create an overlap.
- We trim the back of the skirt with plates.
- We make a basque from spoons.
The water lily is a beautiful and delicate flower, and a hand-made lily from plastic spoons will serve as a wonderful decoration for your apartment. This interior detail will add a cozy atmosphere to the house. In addition, this unusual flower will be a good gift for loved ones.


The process of making a water lily from plastic spoons with your own hands can be traced using the example of a master class with step-by-step photographs. In order to make such a lily, you will need about three packages of disposable plastic spoons, a plastic bottle, a glue gun and sticks for it (or Moment waterproof glue), a yellow binder, green waterproof paint, a brush, and scissors.

Take scissors and cut the sticks into the plastic spoons.


After that, glue the third finished spoon without a leg to the previous ones. The work must be done so that the third spoon is inside. The photo shows the view from above.

In this way we glue the spoon between the already glued spoons. We continue to work, descending one by one into the lower tier of the flower.

When gluing the spoons, do not forget to form a certain opening of the lily petals.
Note! It is necessary to ensure that the bottom of the flower is well glued.
This is the kind of water lily you get at this stage. It is quite large and voluminous.

For the next process we will need a folder. Cut a strip of width 5 cm.

We make parallel small cuts, not reaching the edge of the strip.

Now you need to twist the resulting fringe as shown in the photo.

Coat the uncut part with glue.

We insert this part into the center of the water lily, pressing it well inward.

Now take a plastic bottle and draw a leaf on it. Then cut it out.

Paint paint the resulting leaf with waterproof green paint.
To make water lilies we will need:
* Green plastic bottle.
* Plastic bottle, transparent or yellow.
* Disposable spoons.
*Acrylic art paint.
* Thermal gun.
* Scissors.
Method for making water lilies from spoons:
Let's start manufacturing, we will make petals for water lilies. We take disposable white spoons, small and large (you can use spoons of the same size). I used small spoons in the middle and then larger ones. You can, of course, use spoons of the same size, whatever you like. Cut off the handle of the spoons and then trim the edges. We take scissors and at the base where the handle was on both sides we cut off all the excess. We should get even edges.

We connect them with a heat gun, first I connected two spoons together, and then added a third spoon. Sometimes people ask if they can use such and such glue. I will say this, it is better and faster to connect with a hot-melt gun; there is no other glue yet!!!

The first row is ready, we proceed in the same way, glue the second row with a gun. Here you can already use larger disposable spoons. In the second row we should have five petals. It is better to make water lilies different in size; this one can be left unchanged or another row of petals can be added.

Now we will make the middle for our water lily, for this we will need a plastic bottle of transparent or yellow color... We cut a rectangular strip from the plastic bottle, mine was approximately 12 cm by 2.5 cm.. The sizes may be different, it all depends on what kind of the size of the water lily you get and what size spoons you use. Then we cut the strip into stripes (makhrushechki) but do not cut to the end of the edge. We roll our workpiece into a roll so that the petals look outward. When you do this, pay attention to where the plastic strip folds. When we roll it up, we periodically apply a little glue and at the end we also secure it with a pressure gun. If you used a transparent plastic bottle like me, then paint the finished middle with yellow acrylic art paint. These are the middles I got.

If desired, we glue 1-2 more rows of spoons and the blanks for making water lilies are ready. That's it, you can start assembling the flower.

Now we insert the finished center into the water lily and glue it to the heat gun. It is better to do it when the paint has dried so that it does not stain our white water lilies. I was in a hurry, so my water lilies got a little dirty and I had to scrub them off later)))

Now we need to make leaves for our water lilies, for this we take a green bottle, if you don’t have a green one, then take a transparent one, because it will be easier to paint. But I think finding a green bottle is not a problem. We cut out leaves from it for our water lilies. First you need to make a template of leaves, then apply it to the bottle and cut it out.

It is not necessary to make round leaves; you can make them oval, as in the photo.

Glue the finished leaves to the water lilies using a heat gun. Well, that’s all, the water lilies from disposable spoons are ready, he admires his work. These water lilies will look very beautiful in a pond or on a playground.

I hope that you found my master class understandable and interesting. You can also watch the video for this master class.
And you can see many interesting crafts made from plastic bottles. Bye everyone, bye and see you again.
Copyright © Attention!. Copying text and photographs can only be used with permission from the site administration and by indicating an active link to the site. 2019 All rights reserved.
Elena Sinitsina
Hello, friends!
New Year's Eve just ended holidays: New Year, Christmas, Old New Year. But the holiday of mothers - the eighth of March - is just around the corner. And everyone will prepare gifts for their beloved mothers.
And today I decided to introduce you Master Class"Water lily from spoons"For this we will need the simplest materials that everyone has, and this craft will not take much time, but it will turn out very beautifully, suitable even for a gift.
All we need: plastic spoons (large and small, yellow corrugated paper, green cardboard, scissors, glue gun (or titanium glue).

First, we cut out the base for our cardboard water lilies,in the form of a leaf. After this we need to prepare the petals themselves water lilies. To do this I cut off the handle from spoons.


Then I begin to glue the petals one by one to the leaf. water lilies.

I made the first row from four large spoons, gluing them together.


And after that they are very small, two rows of four pieces.

In the middle I cut out stamens from corrugated paper for water lilies.

And glued them into the middle of the flower.

Well, everything is ready! All that remains is to admire this beauty.
Publications on the topic:
In July, as part of the exhibition “Features of the National Spoon”, representatives of the Museum of Urban Planning and Life on the basis of our kindergarten.
Goal: To arouse in children the desire to make a beautiful and useful craft, to consolidate the ability to work with scissors, To foster love and respect.
Master class photo frame Sometimes you want not just a photo frame, but something original. I offer you the creativity of my children, who are very...
Goal: Raising a creatively active personality. The desire to bring goodness, love and joy to people. Objectives: - teach techniques for working with plastic.
This beautiful, graceful flower is the real queen of the pond. You can decorate a postcard for friends with such a voluminous flower or simply make one.
To make a voluminous water lily you will need - 6 green napkins; - 12 napkins each of orange, yellow, pink; - threads.
In October 2015, I had an open lesson with families of students on the topic “Spoon in the tradition of the Russian family. Purpose of the lesson: to vaccinate.