Friends, today I suggest you crochet simple footwear. This is a completely elementary pattern that even a beginner in knitting can handle. But, despite the simplicity of execution and unpretentious appearance, such knitted footwear is very comfortable to wear, i.e. the thing turns out to be practical. And this is exactly what I personally value most in knitted (and not only knitted) things...
Therefore, now I will give you a detailed description of how to crochet simple footprints without lyrical indents for various decorations, because say the basic model, and when you knit the product, you will give free rein to your imagination yourself, okay?
To knit this pattern we will use the following techniques:
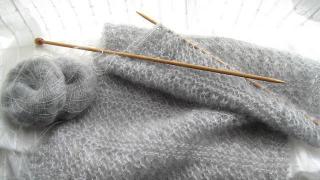
Materials:
- Yarn "Svetlana"
- Hook No. 3
We crochet simple footprints
We start knitting with a sliding loop.
We knit into a loop:
Row 3 - 3 VP for lifting, 1 dc in the loop from which the lifting loops were knitted, 1 dc, then, *increase (2 dc from one loop), 1 dc *, ** repeat until the end of the row. Let's finish the row with SS.
Row 4 - 3 VP for lifting, 2 dc in the loop from which the lifting loops were knitted, 2 dc, *increase, 2 dc*, ** repeat until the end of the row. SS at the end of the row.
Row 5 - 3VP for lifting, 3DC in the loop from which the lifting loops were knitted, 3DC, *increase, 3DC*, ** repeat until the end of the row. SS into the third loop of the lift.  Now we will knit with a straight fabric without increases in the circle, starting each row with lifting loops and ending with a connecting post. How many rows to knit? – measure along your leg, you need to tie it almost to the instep.
I got 11 rows without increases.  If you look at the photo of these rows, you will notice a seam... and although it is quite neat, if it gets on the top of the product, it will spoil its appearance (unless, of course, it is covered with some decorative detail).
But, since I didn’t plan to decorate these simple marks, I cut the working thread and attach it to the other side of the circle, just opposite this very seam. You will get a seam on the foot...  Next you need to knit a certain number of rows, but without closing them in a circle. You can leave 1-3 loops unknitted between the beginning and end of the fabric. How to find out the number of rows that need to be knitted here? Yes, exactly the same... Trying on the footprints on the leg))).
Friends, if you decide to knit according to my measurements, then keep in mind that my foot is not small at all... shoe size is 39-40...
I got 11 rows again  Then, without cutting the working thread, we turn the part inside out, fold it in half and connect the edges with connecting posts using the internal half-loops
  I really like this method of joining parts because the end result is a soft and even seam.
  Now we turn the footprint right side out and tie the hole with two rows of connecting posts.
  Attention! Here you need to be careful not to pull the edge of the product... Firstly, do not tighten the loops, and secondly, make three loops per lying post.
And this method of binding is wonderful... I use it everywhere... For example, to process sleeves and necklines or to give a finished look... and in other products too...
The first trail is ready... 
All that remains is to knit a pair for him in exactly the same way...
It will take you very little time to knit...
So we connected simple crochet traces... Now use your imagination and decorate the product to your liking. You can knit and sew them to the tracks, or you can decorate the product
I won’t decorate them with anything, since I already like these simple marks.
Crochet footprints it can be done in different ways. These ballerina-style shoes fit well on the foot, while being comfortable and warm.
To knit crochet footprints We will be one piece, starting from the toes to the heel, and finally the back seam is made on the heel.
To knit leopards you will need medium thickness yarn, hook number 3.5. Make thin threads in two or three folds. You can knit footwear from threads of the same color or highlight the toes with a different color.
Knitting footwear starts from the top of the toe. Cast on a chain of 10 chain stitches. Next, knit along the cast-on chain, starting from the second loop from the hook, connecting st., st. b/n, then 5 half stitches, from the last loop of the chain knit 5 half stitches. Continue knitting a row along the underside of the starting chain: 5 half sts., 1 tbsp. b/n, 1 connection art.


Turn knitting , second row knit in the opposite direction. The tracks are knitted with a ribbed pattern, which is obtained by knitting the stitches in the second half-loops of the previous row. The near half-loops remain free, forming relief lines along the canvas.
At the beginning of the row, make 1 chain stitch. lifting, then knit 2 joints, 1 tbsp. b/n, 5 half-stitches, on a rounding of three loops, knit 2 half-stitches, then in reverse order 5 half-stitches, 1 tbsp. b/n, 2 connections


Third row: turn the work, do 1 air.p. lifting, knit 3 connecting stitches, also inserting the hook behind the far half-loops, 1 tbsp. b/n, 6 half-stitches. At the rounding, evenly add 3 half-stitches. To do this, make 2 stitches from one loop, after 1 stitch. On the second side, knit in reverse order 6 half sts., 1 tbsp. b/n, 3 connections


Fourth row start like the third: 1 air.p. lift, 3 connections tbsp., 1 tbsp. b/n, half-columns on the side, at the rounding evenly add 3 half-columns, knitting 2 columns from one loop three times, alternating them with the usual 2 columns. On the second side, knit half-columns, on the last four loops 1 tbsp. s/n, 3 connections.


Having knitted 6-8 rows, the width of the toe across should be equal to the width of the foot. Then continue to knit the trail in rows using only half-columns without additions. At the beginning of the row, do 2 chain stitches. lifting for knitting half-columns. For a ribbed pattern, when knitting stitches, insert the hook behind the second half-loops away from you.


Having knitted the third row of half-columns, continue it, cast on a chain of air loops to knit a strap. The chain should be long enough to fit around the ankle in a figure eight. You can knit slips with a short strap with a clasp on the side or without a strap at all.

Crochet. For beginners, this scheme would be ideal. I would like to note that even traces knitted in the same way can differ in individuality and uniqueness. This can be achieved by using a variety of decorative techniques and improving some details. Let's figure out how crocheting footwear for beginners differs from models designed for more experienced craftswomen.
The easiest option
In order to crochet comfortable and beautiful footwear, you will need one skein of yarn and a hook. Well, of course, you can’t do without imagination, inspiration and perseverance. All this will help you easily and quickly create clothes for your legs. Well, let's crochet the footprints? For beginners, an easier option has not yet been invented.
Beginning of work
As usual, crochet starts with a chain of chain stitches. In our case, their number will be six. We connect the chain into a circle and tie it with or without it. If you want your slips to be hard and dense, like slippers, then knit with single crochets, but if, on the contrary, you prefer a softer and looser option, then with double crochets.
So, we have a small ring. Next you need to continue knitting in the round. The main thing is to make sure that your knitting does not bend or take the shape of a cup. To do this, from time to time you need to knit two stitches in one loop. If you are for an adult, then you need to knit an even flat circle until its diameter reaches five centimeters. After this, we continue knitting without additions, and your trace will gradually begin to take the desired shape. At first, you may find it difficult to crochet these tracks. For beginners, the main thing is to understand the principle and scheme, and everything else will definitely work out. So, let's continue knitting.
During the work process it is necessary to do fittings. This circular knitting continues until we reach the place where it is necessary to make a slit for the leg. For adult sizes you usually need to knit from 10 to 13 cm.
The final stage
Now the knitting technique will change a little. We will not knit in circles, but in knit and purl rows. We knit three air loops for lifting (this is if you chose double crochets) and begin to perform double crochets in the opposite circular direction. There is no need to close the circle; only 2-3 loops remain unknitted (this is quite enough). We unfold the trace and knit in the opposite direction, and so on until the required length of the trace is obtained. It's quite easy to find out by trying it on.

Now all that remains is to connect the rear edges of the trace. This can be done with the same crochet hook or using a thread and a needle. The track is almost ready, all that remains is to modify and decorate it a little. The second track is knitted similarly to the first. Crocheted footprints (the simplest option was described for beginners) do not distinguish between right and left, which is why they are easier to perform than other methods.
Finishing and decor
Along the upper edge of the trail you need to tie it with single crochets. In principle, this is enough. But if you want to get a more elegant option, then after two rows of single crochets, you can knit a row using the picot or shell technique. If you use yarn of a different color for these purposes, then this option will look even better.
Another method of decoration involves decorating the footprints using the same as in the photo. Agree that such crocheted footwear for beginning needlewomen can even serve as a gift.

Another decor idea. Thread a satin ribbon through the top of the finished slipper and tie a beautiful bow. The appearance will immediately change. Instead of a satin ribbon, you can use a knitted cord with pompoms attached to the ends. Children really like this decoration option. You can also decorate the surface of the track with beads or sequins. There are a lot of options, let your imagination suggest something unusual and new.
An improved pattern of the classic crochet trail
The photo shows an example of a slipper knitted according to the same pattern as described above. But there are some additions and changes. These are more original and stylish crocheted footwear. For beginners, their knitting patterns, or rather the additions made, will be outlined below.
Knitting begins in the same way as in the first case, but after 4-5 cm of regular knitting, an openwork pattern is made. You can knit it completely over the entire surface of the trail, or you can (for a longer service life) do the lower part with double crochets or single crochets. They are thicker, which means you will wear these slippers for a longer period.
Next, having finished knitting the track according to the previous pattern, we move on to the fasteners. It's done like this. We knit a chain of 15 chain stitches, attach it to the top of the trail, knit single crochets and again 15 chain stitches. Next, we continue knitting with front and back rows until we reach the desired width of the fastener. To make it fit tightly around the leg, you can sew adhesive tape or a button to it.

It would seem that the scheme is the same, but small changes and additions make a significant contribution. And as a result, we get tracks that are completely different from previous versions.
Cute colorful footprints consist from crocheted squares according to the classic granny square knitting pattern. Knitted footwear very comfortable, they can be worn instead of slippers.
To knit leopards, you can use leftover yarn of various colors, hook No. 2.5 or No. 3.
Knitting pattern for a granny square very simple, and sewing a trail from knitted squares is not difficult.

For one track, you need to knit 8 squares - 4 ordinary “granny” squares according to the pattern and knit 4 squares with one rounded corner. The width of the knitted square should be 9 cm to obtain footprints for foot size 39.

The square consists of 6 rows knitted in groups of 3 double stitches on the sides, and in the corners 2 groups of 3 double stitches are knitted, separated by one chain stitch. For the seventh and final row of the square, knit st. b/n, tying the square in a circle.
Knit squares in any chosen color option. Change the color of the yarn each row, cutting the working thread at the end of each row and introducing a thread of a different color at the beginning of the next row.
To knit a square with one rounded corner, in the 6th row, in any one corner, knit instead of two groups of six stitches. s/n only three columns. In the 7th row also tie a square st. b/n.

Having knitted eight squares, start assembling the trail. To do this, connect the squares in a certain sequence, crocheting a row of connecting posts along their sides.

Sequence of connecting squares is as follows: fold two squares with rounded corners together - this is the toe of the shoe. Diagonally, the second pair of squares with rounded corners together is the heel. Two squares between the toe and heel create the side part of the footprint and two squares between the side part and the heel create the cuff.

Start connecting the squares from the toe. Fold the two squares with the wrong sides inward, connect the rounded corners and, inserting the hook into the outer half loops of the two squares, knit a seam from the connecting posts along their sides.


Having sewn the toe, attach the squares of the side part, also folding them with the wrong side inward, and making a seam along the front side.
After sewing the heel, place the rounded corners on the top of the heel.

The slippers are excellent house shoes; unlike the usual slippers, they do not fall off and fit snugly on the foot. Finding shoes that fit perfectly in size in the store is almost impossible. The best option is to knit this cute wardrobe item yourself. So if you need a master class in order to make knitted footrests step by step, read our article!
Knitting is not a difficult task, but the result largely depends from the correct choice of threads. It depends on personal preferences and the time of year.
- Thin cotton threads are suitable for summer holidays or apartments with heated floors;
- Wool yarn will keep you warm on the coldest day. Cozy woolen footwear will become a helper during a cold and will always help keep your feet warm. But when knitting, it is worth significantly reducing the number of loops based on the thickness of the thread;
- Many people are now against synthetic yarn, but this is not entirely justified. Modern materials are endowed with almost all the properties of natural ones. For allergy sufferers, using wool is simply impossible, but synthetics make it possible to knit the same warm and cozy house shoes.
When choosing threads, be sure to check if you have a suitable hook. The required number is always written on the marking of the skein or skein. If you want to knit tighter or, on the contrary, looser, change the hook, respectively, to a smaller or larger number.
Start from the toe
Footprints can be knitted in several ways, Let's look at knitting from the toe:
While knitting, you can try on, the main thing is not to lose a loop and not lose count. You can stop knitting a toe at any time. If you want a short toe that covers the foot a little further than the toes, knit the appropriate size and proceed to knitting the foot.
To tie the foot of the sled, we do not knit each new row to the end, turn the product and go in the opposite direction. For a snug fit to the leg, at the heel level, we begin to add one column at the end of each row until we get traces of the desired size.
If you knit all the rows, the heel will turn out to be a corner. To avoid this, we divide the loops into 3 parts, knit the outer ones as usual, and jump over the loop in the central one. This reduction will allow the heel to be rounded.
At the end of the work, we connect the sides with half-columns. We tie the resulting circle with single crochets. You can use a contrasting thread, or threads of a different tone. If desired, we make the edging openwork. The tracks are ready!
Knitting from the foot
 Another option for knitting footwear - start from the foot. This method has its advantages - the footwear is obtained without a single seam, which will ensure maximum wearing comfort. We select the number of loops in the base chain based on the size of the foot. Inexperienced knitters will have to experiment with this. Another way to choose the size is to reduce the number of rows, but then the work may not be entirely successful.
Before you start knitting, carefully study the pattern and description. It may seem complicated, but only at first glance. For beginners, it is recommended to highlight the rows in different colors. This way you can clearly see where each row begins and ends, especially at the toe. We knit the loops shown in the diagram together with the last row of the trail. The lace is a regular chain of air loops.
Decoration
Every girl wants to look tender and sweet. You can decorate your homemade footprints with flowers, bows, and ribbons. Decorations can be used ready-made or made independently. Consider the description of knitting a simple flower.
- We make an amigurumi ring, knit 5 single crochets into it, and tighten the ring. We knit the connecting loop, closing the circle.
- If you want the color of the petals and the core to be different, change the thread to a different color.
- We insert the hook into the first column of the bottom row and make 2 lifting loops. Insert the hook into the same loop and knit a double crochet, then another double crochet in the same loop.
- From the last double crochet we knit 2 chain stitches and insert the hook back into the same base stitch.
This produces one petal; a petal is knitted from each loop of the base in accordance with the description above. The flowers turn out cute and beautiful. A small bouquet will be a wonderful decoration for home decorations.
Home tracks, knitted with your own hands, will be an excellent addition to your home wardrobe. Cute and cozy, they are increasingly winning the love of women around the world.