Crochet baby blankets are sometimes not so difficult to knit, as it is difficult to choose a good pattern and plot of a blanket, so that it is exactly a child's thing that the child will love for many years, and at the same time the blanket should be warm, soft, and suitable for the interior of the children's room ... In today's selection you will find the best ideas for original baby blankets that you can crochet!
The easiest way (and, by the way, probably the fastest) to knit an interesting blanket for a baby is to take an unusual yarn, for example, Pompom yarn. It is perfect even for crumbs, because this yarn is soft and warm.
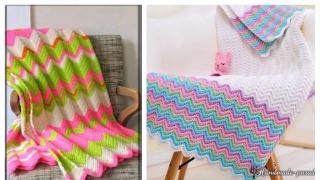
The next most popular way is to choose an unusual pattern 🙂 The “zigzag” pattern is excellent for a large canvas, plus it allows you to “play” with color.

A very cool way to knit a blanket from motifs is to present each monochromatic motif in the form of a “pixel”, and make some simple drawing out of such “pixels”. The plan of the future blanket can be made literally on a notebook sheet, count the number of squares of each color, and connect the motives in accordance with this scheme.
![]()
blankets with a "pixel" pattern of monochromatic square motifs
Another rather simple but cute way to decorate a blanket and give it personality is with appliqués. It can be some plot pieces, like animals, boats, hearts, flowers, etc., or just bright pompons.

If you have time to "get confused", you can choose a very non-standard solution - a canvas made of strips formed by rings, sequentially knitted with a "chain". Due to the fact that the rings can vary in color, it will turn out very bright and unusual.

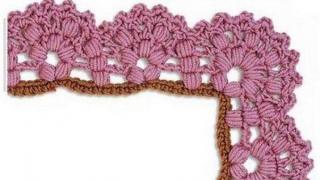
To create colored rows, you can do it even easier - knit a blanket with a tulip pattern, which, by the way, is suitable both for large canvases and for decorating the edge on a plain girl's blouse, for example.

There are other ways of knitting a pattern in rows, for example, such "convex" patterns (I would call them 3D). Tying them is rather dreary, but the result is simply amazing, and the choice is large - bees, butterflies, roses, as well as, for example, formed during work - are beautiful not only in their appearance, but also in that they never fall off like sewn-on elements ...

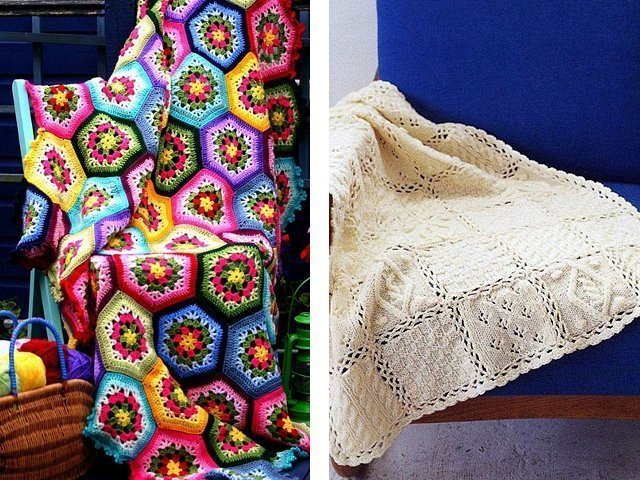
If you knit a blanket for a girl, then in your arsenal there are hundreds of thousands of patterns with flowers and flowers!

Any symmetrical flower motif based on a square or polygon is suitable as a motif. If the motive itself is simple, then the correctly selected colors will "draw" the flowers, and the convex flowers will look like in a clearing!


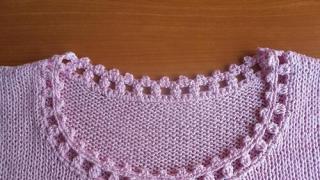
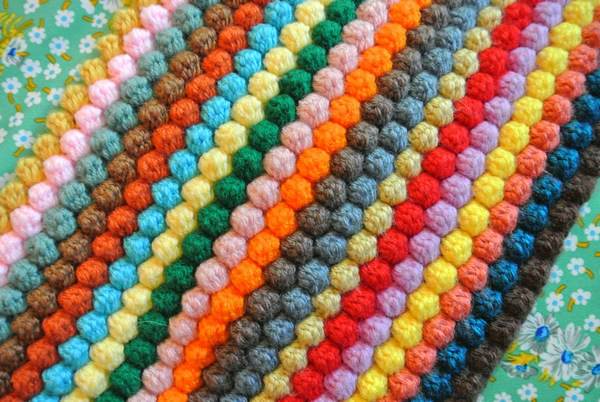
The bulges can be not only from flowers, but simply "bumps" look very cool, and besides, due to such a pattern, the plaid will be thicker and warmer.

bright plaid with a "knobby" pattern
By the way, if you impose multi-colored motifs with bumps, you can simulate Lego pieces, boys will especially like this blanket 🙂 In general, experiment with motives, connection order and plot. A blanket knitted from completely different non-repeating square motifs can become not only a warm accessory, but also a developing rug, the kid will study such a blanket with great interest!

Blankets with geometric patterns do not always seem too childish, however, oddly enough, they capture the attention of even the smallest crumbs, due to contrasting colors.

Each blanket has its own "trick". You can show all the beauty with your “face”, or you can decorate a plain blanket and at the same time insulate it with an interesting lining from the inside.

Probably the cutest baby blankets are blankets with animals. And there are also many ways. However, nevertheless, most of them are crocheting a blanket from motifs, but the variants of these motifs are millen))). For example, bunny motives 🙂

The most popular motives are bears, owlets and bunnies, but in fact, the list does not end there - you can knit piglets, and foxes, and frogs, and raccoons and hippos))) it is also enough to knit snowmen, for example, for a New Year's plaid ...

And some more blankets with animalistic motives:

Animals on motives can also be knitted in a jacquard fashion. Well, besides animals, you can imitate natural scenes simply by combining motives of certain colors. In this way, you can imitate a honeycomb, turtle shell, fish scales, etc.

For the bravest, you can knit a blanket in the form of one huge motive with a jacquard pattern)))

Good luck in knitting, and a lot of new warm, cozy, bright, beautiful and unusual blankets for your kids! 🙂
Each mother tries to protect her child from all sorts of worries and hardships. As the child grows up, it becomes more difficult to do this. And when he is small, then he is ready to take all the affection and care of himself. For a sound sleep, your baby needs a blanket. Only after warming up, he relaxes and falls asleep calmly. A wonderful blanket can be a replacement for a blanket, which any mother who loves her child dearly can knit.
Crochet baby blanket
A do-it-yourself children's blanket, even using the most expensive threads, will be much cheaper than a purchased product. For knitting you can use a crochet hook or knitting needles... It depends on the pattern you choose. The safest way is to knit a product for which there is a step-by-step description and a diagram.
Functions of a knitted baby blanket

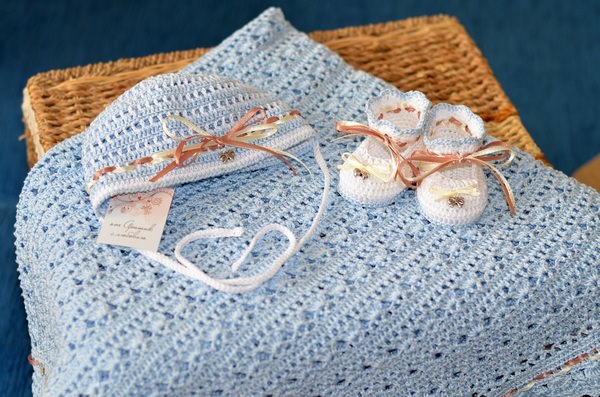
If a child appears in the house, a blanket is one of the main things that should be. A white blanket, pink or blue, will definitely be needed when the child is taken from the hospital. In the future, you can use it, or you can knit a product of a larger size, because the child is growing.

Depending on the season, different threads are used for knitting it, whether it be a crochet hook or knitting needles. Patterns are also chosen depending on the thickness of the threads and the season for which the bedspread is being prepared.

It's good when in the arsenal of children's things there are two blankets - one for the house, and the other for the street. It is useful both for a crib in an apartment and for a stroller on the street. In cool weather, it is simply irreplaceable. It is desirable to knit products from threads of different thicknesses using a motif. Then the blankets can be used in different weather.
Advantages of a knitted product
A product that you can knit for a child with your own hands is much warmer than the purchased analogue. The same can be said for the plaid. Watch baby crochet blankets video.

Knitting is considered simple and calming activity... Over time, when the drawing is already familiar, the work moves faster. Difficulties arise when you need to knit complex patterns. If you need a simple knitting pattern, then you can do the work only with single crochets, or with one crochet. A bedspread knitted with such a simple pattern can be decorated with crocheted toys, various animals, for example, bears or other children's decor.
Below are the diagrams and descriptions for the products. The main thing in them is that you can knit any product of the length and width that you need.
Crochet a simple baby blanket
For knitting, an alternation of double crochet and air loops is used. The finished canvas looks like a mesh through which threads of different colors can be threaded. The result is a beautiful and elegant product.

You can also try knit a similar product, but complicate the process a little. For this, colored threads are not threaded into the net, but are knitted. So let's get started. The first row of the mesh is knitted with the main thread, for the second row, colored yarn is used and you need to knit a row with single crochets. Where the threads are connected, the ends do not need to be cut, but on the contrary, leave them longer, so that later it will turn out to tie a brush. In this sequence, the entire blanket is knitted, up to a certain length.

The option using two colors is good because the product can be knitted from the rest of the yarn. The tassels on the product can be made in either one color or colored.
The finished product turns out to be very beautiful, and its density directly depends on the thickness of the threads.
Knitting in a circle
Such a product has the shape of a square, since knits in a circle from the middle... It can be of different sizes, depending on the age of the child and your preferences. For a baby blanket, you can use both single-color threads and multi-colored ones. The finished product, knitted from threads with a gradient effect, looks beautiful. You can independently choose bright threads for such a product, there is only one motive.

The heart is knitted from the middle, in a circle.

The work begins with five air loops connected in a circle. The second row is knitted with double crochets, and two air loops are knitted in future corners. The next row is simple columns above each loop, and in the corners they must be knitted from two air loops of the previous row - three.

The next row is more difficult than the previous ones. For lifting, three air loops are recruited, then three double crochets are knitted from three columns and connected together. Next, two chain loops and the same combination. For corner decoration: two air loops, three double crochets, connected together from one column of the previous row, three air loops and again three double crochets from one loop connected together.

Such a blanket can be knitted from thick threads and put on the floor so that the baby is comfortable playing on the floor.

Openwork
Such a product can be knitted as a gift for a newborn. You need to choose high-quality and soft threads for knitting for children. Start of work - a chain of air loops, in the amount of one hundred and ninety-six.

The finished product is tied with single crochets, and the next two rows with crochets, not forgetting to make five columns in one loop in the corners.
According to the scheme, the product is knitted to the desired length.
- row: all loops are air.
- row: five air loops are knitted, and in a single crochet they are fixed in the fourth.
- row: nine double crochets in one resulting cell, and a single crochet, in the next cell, in the middle.
- row: over nine double crochets, seven double crochets are knitted, between which you need to knit an air loop.
- row: three air loops and a single crochet - this is how you need to knit over seven double crochets. The pattern should be repeated five times over the seven columns of the previous row.
- row: like the second.
You can decorate the finished blanket with an airy ribbon. For her, you need to knit such a row: three single crochet, three air loops, through three loops the base, etc. The roundings are knitted according to the second scheme.

Into the finished product threading the ribbon- the new thing turned out. Every mother loves the happy smile on the face of the child when he sleeps under such a blanket.
Crochet blanket size 125x125
The description corresponds to the finished product, the dimensions of which are 125x125 cm. Only one hundred squares are required, knitted from yarns of different colors. The total weight of the yarn must be at least 1.5 kg. But all these indicators will depend on the thickness of the threads, the motif can be of different sizes.

Such a product can be tied, decorated with a ribbon or separately tied daisies (if the blanket is intended for a girl).
Getting Started.
- Tie one square for the sample. Measure its dimensions, calculate how many squares are needed for a rug of this size. Start making.
- Using different colors of yarn of the same thickness, knit the required number of squares.
- Connect them together with a needle or crochet to make a solid canvas. You can take a contrasting thread if you are sure that the seam will be beautiful.
Conclusion
Some knitting patterns considered in more detail will help you make a unique product for your baby. Choose the one that works best for you and get creative. Create comfort and warmth for your baby. Adopted from the hospital at discharge to take the baby in a white blanket. The decoration can be a pink or blue ribbon, for a girl and for a boy.
Today in our master class - a charming crochet blanket for beginner craftswomen. This soft and cozy bedspread is easy to knit. And for those needlewomen who are just taking their first steps in this type of needlework, we have prepared a knitting pattern and a step-by-step description with a photo to facilitate the work.
Tools and materials Time: 48 hours Difficulty: 4/10
- crochet hook 6.0 mm;
- about 1490-1500 meters of worsted yarn in several colors;
- darning needle to hide the ends;
- scissors.
A warm crochet blanket and a cup of delicious tea are the best remedy for any stress! Pamper your household with a simple and beautiful rug, knitted with your own hands! Do not hesitate, they will appreciate your work at its true worth!
For this workshop, we used cotton yarn in white, red, brick, turquoise, light green, purple and gray shades. In general, everything that we had at home was in the leftovers. You, in turn, can use any thread that you have in your stash and those shades that you like!

Abbreviations:
- vp - air loop;
- CCH - double crochet;
- conn. st - connecting column;
- RLS - single crochet;
- p.p. - lifting loop;
- () - indicates the number of loops;
- * - indicates the number of rapports / repetitions.
Finished blanket size: approx. 100 x 112 cm.
Notes:
- All stitches will work through both buttonholes unless otherwise noted.
- The dimensions of the finished blanket are approximate. They will not be accurate. The final size will vary depending on how tight or loose you are crocheting.

Step-by-step description with photo
So let's get to work. In this blanket, the simple pattern is more than offset by the bright colors of the threads.
Step 1: tie the base
Start: 130 air loops.
Row 1: 2 CCHs in 4th loop from hook, * skip 2 loops, 3 CCHs in next loop **. Repeat from * to ** to the end of the round. Turn. (129)
Row 2: 3 vp, * 3 CCH between the following groups of 3-CCH from the previous row **. Repeat from * to ** to the end of the row, 1 CCH per pp, turn. (129)
Row 3: 3 VP, 2 CCH in the space between the 1st CCH and the 3rd CCH of the group from the previous row, * 3 CCH in the space between adjacent 3-CCH groups from the previous row **. Repeat from * to ** to the end of the row, 3 CCHs in the space between the last 3-CCH groups and pp, turn (129)
Row 4-71: repeat Rows 2-3.
Row 72: repeat Row 2.
For this bedspread, we knitted 6 rows in one color, 3 rows in white and continued to weave a colored pattern, alternating different colors and white in between. However, you can choose the colors and thread alternations you want. Since we knitted this crochet blanket for beginners for ourselves, we applied all the colors that we had at home in stock.
Step 2: add trim
Combine white yarn with comp. Art. in the last loop of row 72.

The master class is over. Agree, this crochet blanket is ideal for beginner craftswomen! We hope you are happy with the results of your labors. And if you have any questions or suggestions - write to us below in the comments. We wish you good luck!
Experienced knitters are able to create real masterpieces using crochet and yarn, but even for beginners it will not be difficult to crochet a plush blanket. Despite the fact that this product is quite large in size, the manufacturing process is very simple and interesting. Armed with diagrams and all the necessary materials, you can safely start knitting, as a result of which you will be able to create your own masterpiece.
Experienced knitters are able to create true masterpieces with crochet and yarn
A detailed description and simple diagrams will help even beginners to cope with knitting. A plaid knitted with squares of different sizes will surpass all expectations, it will become not only a salvation on cold evenings, but also an original decoration.
What is necessary:
- 6 skeins of yarn of different colors;
- hook number 4.5.
We knit according to the scheme:
- Cast on 8 loops and close them in a ring by connecting the first and last of them.
- Tie the resulting ring with single crochet columns and connect the first loop with the last.
- Start the second row with three air stitches, then make a couple of single crochet stitches, a pair of air loops, three single crochet columns, two air loops. Repeat the last two steps twice more.
- Before joining the starting buttonhole with the last one, attach a different color of yarn.
- Start the next row with three chain stitches and two double crochets in the columns of the previous row, make a couple of columns for air stitches and four air stitches.
- After that, knit a couple of double crochet columns in air loops and three in the columns of the bottom line, continue according to the pattern to the end of the row.
- Perform the next row by analogy with the previous one, increasing only the number of columns in the corners.
- Tie the finished square with columns without a crochet.
- By the same principle, increasing the number of rows and columns in the corners, tie the required number of squares.
- All details are well ironed and sewn into a single whole.
At the final stage, it is necessary to tie the finished product with single crochet columns.
Crochet plaid (video)
How to knit a cute baby blanket: instructions for beginners
The baby blanket with funny bears will certainly please the kid. Such a blanket is suitable for both a girl and a boy. Despite the huge number of motifs used in the knitting process, creating an amazing piece, measuring 115 x 115 cm, will be simple and exciting.
What is necessary:
- yarn of different colors;
- hook number 3;
- satin ribbon.
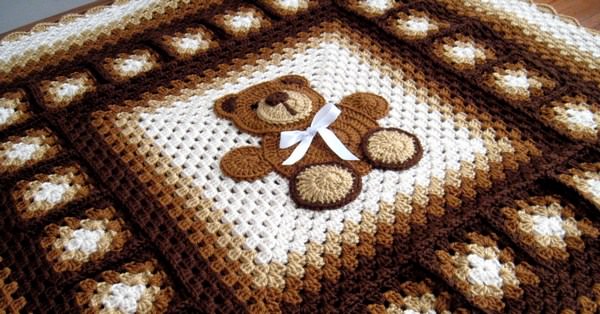
Children's plaid with funny bears will certainly please the kid
Progress:
- Tie nine motifs, which will be located in the center (four with a circular pattern and five with a pattern in the form of a bear).
- Performing alternating colors and small motives.
- Knit 64 small motifs.
- Connect all the parts together and crochet the product around the perimeter.
- Sew along the edge of the tape.
First motive:
- Cast on 24 stitches and knit a basic row in single crochet columns.
- Make an additional buttonhole and additionally knit a single crochet into the first stitch of the previous row.
- In the second stitch, make a double crochet.
- Knit the entire row by alternating columns with and without a crochet.
- On the next line, knit an air loop again and knit the entire row in single crochet columns.
- Repeat these two rows to the very end.
Second motive:
- Cast on 31 stitches.
- In the eighth loop, knit a double crochet and cast on a couple of air loops, then make another double crochet, forming an arch.
- Cast on three stitches, skip four warp stitches and knit arch again.
- According to this principle, continue knitting until there are only three loops in the row.
- Cast on a couple of loops and crochet into the very last of the loops.
- Start the second line with three air stitches and make five single crochets on two of them, forming a kind of shell.
- Thus, knit the entire row.
- Start the third line with five lifting stitches, making an arch in the center shell stitch. Finish the entire row with this pattern.
- Start the row with three air loops, knit a shell and repeat this pattern until the entire line is completed.
- Repeat the scheme of the second and third row until the end of the work.
Third motive:
- Cast on four stitches and close them in a circle.
- In the first line, make five air stitches, then knit three columns with crochets in the center of the ring and additionally cast on a couple of loops. Repeat these steps twice.
- Knit a couple more columns in a circle and connect with a column to the third stitch. Repeat the steps one more time.
- In the next row, knit a half-column of six air stitches into the arch, knit three more half-columns into the same arch.
- Skip three stitches, knit three half-columns and cast on a couple of loops.
- In the next arch, using a pair of additional loops, knit three half-columns.
- Repeat the pattern a couple more times, then dial an additional stitch, skip three columns and knit a pair of half columns in the same arch that was knitted at the very beginning of this line.
- Close the row and continue knitting according to this pattern, alternating the colors of the yarn.
Fourth motive:
- Make a chain of 26 stitches, then, starting with the fourth of them, knit double crochets.
- Additionally, cast on three stitches and knit the line by analogy with the previous one.
- So fulfill the whole motive.
Fifth motive:
- Cast on 33 stitches and complete the baseline with double crochets.
- Start the next line with three additional loops, knit one column to the back wall, and the other to the front.
- Perform the pattern according to the given pattern.
Sixth motive:
- Start with a set of 24 stitches.
- Knit a couple of lines with double crochets.
- Only on the third line, make three air stitches, and then follow this pattern to the end: three columns with a crochet and pulling the thread from the wrong side.
- From the fourth to the eighth line, knit by a set of three additional stitches, and with double crochets.
- Knit the ninth row in the same way as the third, and all the rest according to the fourth pattern.
Seventh motive:
- Make a chain of 26 loops and tie all the loops of the base in columns.
- Add three air stitches and knit with regular stitches to the end of the line.
- Continue knitting in this pattern, alternating the colors of the thread.
Important! The height of each piece should be 11 cm.
Crochet blanket for a newborn for discharge: master class
An openwork blanket is ideal for a newly born baby. After leaving the hospital, such a product can be put in a stroller during evening walks, covered with a light blanket for the baby in the crib. For children, such a blanket will be simply irreplaceable.
What is necessary:
- 300 g of white yarn;
- hook number 3.5.
An openwork blanket is ideal for a newly born baby.
Progress:
- Based on the diagram, knit 25 identical parts.
- In the knitting process, connect all the elements with each other.
- The finished product must be tied along the edge in three rows in this order: five columns in one stitch of the base, a pair of air loops and a skip of two loops, one column and a pair of air loops, again a skip of two stitches. The coverlet is ready.
How to knit a blanket
Crocheted rugs and duvets look perfect, original and at the same time come out very warm. If desired, they can be additionally decorated with patterns of small flowers and even large flowers. A small volumetric ornament and a flower meadow look incredibly beautiful. But even without such details, the product looks amazing.
What is necessary:
- 800 g of yarn;
- hook number 10.
Crochet throws and comforters look perfect
Progress:
- Make a chain with 122 stitches.
- Knit one line with single crochet
- In the next row, all the columns have already been done with crochets, knitting three air loops in each column of the previous row.
- Perform the next row in the same way.
- Alternate the scheme of the second and third lines until the end of the work.
The very last of all the rows must be knitted in single crochet columns.
Choosing a yarn for a blanket
The size and density of the future product depends on the yarn. Soft, medium weight threads are ideal. It will be easy to knit with them even for beginner knitters.
When choosing, you should also consider the following nuances:
- for a small children's blanket, only three skeins of yarn are enough, and for a larger product, you need to purchase at least six;
- it is advisable to take the threads "in reserve", since it is difficult even for experienced needlewomen to calculate the required amount;
- when buying, you need to carefully consider the articles on all skeins. If they are different, then the color of the yarn will be slightly different.

The size and density of the future product depends on the yarn.
What should be the size of the blanket
Before starting the process of making a blanket or rug, you need to decide on its size. It will depend directly on who it is intended for and for what purpose it will be used. The main types of products should be as follows.
Some craftswomen prefer to knit large products only by crocheting, since the peculiarity of this method allows you to achieve beautiful openwork patterns on blankets, and delicate, almost jewelry work, is very much to the liking of lovers of creating beautiful things from details.
Crocheted blankets will perfectly warm adults and the smallest children, the main thing is to choose the right yarn. Another important function of blankets is to decorate the home and create the right mood. All this directly depends on the shape and method of crocheting, which we will understand in detail in this article.
Crochet plaid with diagrams and descriptions
There are a lot of varieties of crocheted blankets, as well as the styles of knitting these warming blankets. Even the simplest patterns look interesting on blankets, and are sure to be associated with the stepfather's house, warmth and care.
But you will not surprise experienced needlewomen with simple patterns, interesting openwork motifs have been invented for them, patchwork-style blankets of incredible complexity and beauty, thin and delicate blankets for newborns, over which it is so interesting to pore over. In this type of needlework, there is work for any interest and request. But let's start learning from the basics - the simplest patterns and patterns for crocheting blankets.
Master class for beginners
In any business, you need to start somewhere in order to learn. And to learn how to crochet a blanket - a master class for beginners is perfect. Such a plaid, completely made in the style of "grandmother's square", will delight both adults and children. Let's see how it is knitted using the example of step-by-step instructions.
Popular articles:
Instruments:
- Yarn (in this case, bright green, yellow and brown);
- Hook;
- Needle.
Abbreviations for knitting pattern:
- VP - air loop;
- Sc - single crochet;
- CLO - double crochet;
- SS - connecting post.
Workflow with step-by-step photos:
You need to start knitting with the main color of the blanket. We close six loops in a ring, then make three VPs and knit two more CCHs into a ring. We make two VPs (photo 1). After that, we crochet three CCHs in a ring and make two VP. We repeat two more times, as a result of which a square is knitted (photo 2).

After that, we make three VPs (this is the first CCH) and in the corner in the arch we will perform three CCHs, two VPs and again three CCHs (photo 1). This is what we will knit into the remaining arches. We finish the last one with two CCH and SS (remember that the first column at the very beginning was knitted in the form of three VP) (photo 2).

We knit a new row of the square and make three VPs from the arch in which we have the hook. We knit two CCHs in it. Next, we move on to the corner. And in it we knit everything that was knitted in the previous row: three CCHs, two VPs and three CCHs (photo 1). In the next arch, we just knit three CCHs. And so in a circle (photo 2).

In the corners, you will always need to knit the same thing. And in the arches that are on the sides of the square, we always knit just three CCHs. As a result it turns out the so-called grandmother's square... We knit several rows for the desired size of the blanket. And, completing the grandmother's square, we will change the color of the thread to yellow (photo 1). We will tie two rows in yellow. And one more row in green. And then we will make the binding of the edges. In one arch we will knit seven CCHs, in the other one RLS. And so we alternate the strapping throughout the blanket (photo 2). Finish tying in green. We will make three VPs and knit one sc in each loop (photo 3).

Plaid decoration
To decorate this simple, but no doubt cute plaid, you can crochet a small decorative element, for example, a butterfly. This is how it can be created:
- We knit five VPs and close them in a ring. Next, we knit three VPs and another CCH. We make two VPs. And two more CLOs. In total, we need to knit this way eight times. That is, we get sixteen CCHs.
- We pass to the arch from the VP. SS We knit three VPs and here we perform two SSNs. We carry out three VPs and under the same chain we knit three CCHs. So we knit under all the arches from the VP.
- Now we will attach the brown yarn. We knit six CCHs under the VP chain. We do one VP and here we perform six more CCHs. Skip the bottom three CCHs and knit RLS.
- And in the next chain we knit all the same that we knitted before.
- We tie our butterfly with yellow yarn. We knit one sc in the six underlying loops and one sc under the VP. We make a picot of three VPs. And so we tie the whole butterfly.
- Fold it in half and fix it with a brown VP chain. Now it can be sewn to one of the corners of the finished blanket.

How to knit a baby blanket with a simple pattern
Very often people resort to knitting just to create a crocheted children's blanket with an original pattern for their baby. Many people try to crochet a blanket with a pattern and color that will not look like any other blankets. And this is a completely feasible task, because making a crochet blanket, as a result, you will definitely get an interesting and beautiful product, even if it is made with the most simple pattern - for example, with embossed columns.

Instruments:
- 8 skeins of 50 g each of semi-wool or bulky white synthetic yarn (A);
- 8 skeins of 50 g each of semi-wool or bulky blue synthetic yarn (B);
- hook number 3.5.
Density of knitting: 20 loops x 11 rows = 10 x 10 cm (embossed columns).
Size: 75 x 100 cm.
Main pattern
The embossed column is crocheted like this: we make a yarn over, insert the hook (from front to back) under the column (leg) of the previous row, pull out the loop, grab the thread and pull it through the first 2 loops on the hook. Grab the thread again and pull it through the remaining 2 loops.
Work progress and knitting pattern

With white yarn we knit an initial chain of 145 VP.
Base row: 1 CCH in 3 VP from the hook, 1 CCH in each VP to the end, 144 loops are knitted. 1st row: 2 VP for lifting, * relief. Art. around the loop of the previous row, CCH in CCH of the previous row, repeat from * to the last loop, 1 relief. Art. around the loop of the previous row.
We turn the work.
Next, we knit 7 rows according to the scheme. Cut the thread (A). With thread (B) we knit 8 rows according to the pattern. Cut the thread (B). Then knit 8 rows with thread (A). Repeat sewing strips until you have knitted 96 cm.
Strapping
Use thread of color (B) to tie the edge of the finished product.
1st-4th rows(seamy side): 1 VP, RLS to the end of the row. In the corners of the finished product, knit 3 sc in sc in the previous row.
Then knit 1 row with a "crustacean step" (RLS is knitted from left to right, not right to left) around the entire outer edge of the product.
Finish knitting PBN (half-crochet without crochet) in the 1st RLS. Secure the thread.
Soft yarn for a newborn
A very important job is to crochet a blanket for a newborn. A warm blanket for a baby should be gentle, warming and always beautiful. The airiness and delicacy of the yarn for a newborn will give the product a special look that will be remembered by young parents for a lifetime, because they will remember the baby during discharge from the hospital in this blanket, created by caring hands. This blanket is suitable for both a girl and a boy. It can be used both at home and for walking with a stroller.

Instruments:
- 325 g of white yarn for knitting baby clothes;
- hook number 3.5.
Knitting density: one motif = 4.1 x 3.8 cm (fancy pattern in the central part).
Work progress and knitting pattern
central part
knitted as follows: a chain of 171 loops is typed and 73 rows are performed with a fantasy pattern in accordance with the diagram and explanations for the accompanying symbols. 
Strapping
At the end of the 73rd row, without cutting off the thread, tie 6 circle. rows of shells (2 CCH (double crochet), 3 VP (air loops), 2 CCH), performing additions in each corner, as shown in the diagram. Replace the last 2 VPs of the 1st and 2nd circle. rows of 1 PSN (half-column with a crochet), knitted in the 3rd of 3 VP, replacing the 1st CCH. Close 3rd - 6th circle. rows 1 SS (connecting column) in the 3rd VP from the beginning, and move forward, knitting extra. SS on the arch of the 1st shell.
After that, knit 4 circle. a row of arches of 6 loops without additions and decreases, 1 circle. a row of simple shells (1 CCH, 5 VP, 1 CCH), separated by arches of 5 loops. Run 13 CCH fans in each simple shell. Replace the last 3 VPs of the 7th - 9th circle. rows of 1 PRS, knitted on the 1st PRS, and 4 last VP of the 10th circle. row - 1 C2H, close the 11th and 12th circle. rows like 3rd circle. row, and perform another SS in the 1st arch at the end of the 11th circle. row. Finish 1 lap. next to the "rachiy step" pattern, as stated in the explanation, close 1 SS in the 1st RLS and cut off the thread.

Openwork of motives
Lovers of beautiful designer items will like an openwork blanket made of crochet motifs, which is fun and interesting to work on. The result is a very beautiful product that will decorate a sofa in the living room or a bed in the bedroom, while warming and giving warmth on cold evenings. For example, you can knit a plaid from large floral motifs, which then need to be combined into a single whole.

Instruments:
- Novita Isoveli yarn (75% wool, 25% polyamide, 65m / 50g) - 2300g yellow-green (334) or Novita Napco yarn (50% cotton, 50% acrylic, 104m / 100g) - 1800g blue (013);
- hook number 5-6.
Finished product dimensions: blanket from Isoveli yarn -140 x 210 cm; Napco yarn blanket -110 x 180 cm.
Knitting density: the diameter of one motif is 17 cm.
Work progress and diagrams
The plaid consists of separately linked full and half motifs. For a complete motive, dial a chain of 6 VPs, close it into a ring SS. 1st row - dial 3 VP lifting, in the center of the ring knit 1 SSN, 2 VP, * 2 SSN, 2 VP *, repeat * - * 4 more times, close the SS row. Next, knit according to pattern 1 from the 2nd to the 5th rows. Cut the thread and secure. Tie 104 motifs with Isoveli or 67 motifs with Napco.

For a half motive, dial a chain of 4VP, close it in the CC ring. 1st row - VP, 2 SSN, 2 VP, 2 SSN. Next, knit in straight and reverse rows according to pattern 2 from the 2nd to the 5th rows. Cut the thread and secure. Tie 8 of these motifs with Isoveli or 6 motifs with Hanko.
Assembly
Strip each motive lightly. Connect the motifs to each other according to pattern 3 (Hanko motifs highlighted in gray). For an Isovely yarn blanket, crochet the fringe. To do this, cut the threads into a length of 45 cm, fold from 3 pieces and tie along the edges. Perform 7 brushes for each motif.

Knitted blanket from squares
A very fashionable phenomenon that designers and housewives love with taste - a crocheted plaid from squares in. There are a huge number of crochet patterns for a variety of geometric shapes for patchwork, most of which look very interesting in their jumble of colors and patterns, while others are elegant in the same color, but made in different complex motifs. Such a playful and uplifting plaid will look good not only in the nursery, but also in the living room, and in an armchair on the balcony. In addition, you can give it to friends or relatives - let them also rejoice.
Consider such a blanket made of squares, which is easy to knit according to step-by-step instructions.

Instruments:
- yarn - 200 g dark blue SMC BRAVO;
- 100 g each of beige, orange, red, purple, green, blue, brown, yellow and pistachio SMC BRAVO yarn;
- hook number 3.
The main pattern is square
Tie a chain of 6 VPs and close it in a ring with 1 SS. Knit a circle. in rows. Every circle. start the row with 3 VP of the rise and end with 1 SS in the VP of the rise of the previous row. Attention! 2 CCH + 2 VP + 2 CCH are designated in the instructions as a group of CCH.
1st circle. row: 3 SSN, 2 VP, * 4 SSN, 2 VP, repeat from * 2 more times.
2nd circle. row: 3 CCHs, in an arch of 2 VP, tie a group of CCHs, * 4 CCHs, in an arch of 2 VP, tie a group of CCHs, repeat from * 2 more times.
3rd circle. row: 5 CCHs, in an arch of 2 VP, tie a group of CCHs, * 8 CCHs, in an arch of 2 VPs, tie a group of CCHs, repeat from * 2 more times, 2 CCHs.
4th circle. row: 7 CCHs, in an arch of 2 VP, tie a group of CCHs, * 12 CCHs, in an arch of 2 VPs, tie a group of CCHs, repeat from * 2 more times, 4 CCHs.
5th circle. row: 9 CCHs, in an arch of 2 VP, tie a group of CCHs, * 16 CCHs, in an arch of 2 VPs, tie a group of CCHs, repeat from * 2 more times, 6 CCHs.
6th circle. row: 11 CCHs, in an arch of 2 VP, tie a group of CCHs, * 20 CCHs, in an arch of 2 VPs, tie a group of CCHs, repeat from * 2 more times, 8 CCHs.
7th circle. row: 13 CCHs, in an arch of 2 VP, tie a group of CCHs, * 24 CCHs, in an arch of 2 VPs, tie a group of CCHs, repeat from * 2 more times, 10 CCHs.
8th circle. row: 15 CCHs, in an arch of 2 VP, tie a group of CCHs, * 28 CCHs, in an arch of 2 VPs, tie a group of CCHs, repeat from * 2 more times, 12 CCHs.
9th circle. row: 17 CCHs, in an arch of 2 VP, tie a group of CCH, * 32 CCH, in an arch of 2 VP, tie a group of CCH, repeat from * 2 more times, 14 CCH.
10th circle. row: 19 CCHs, in an arch of 2 VP, tie a group of CCHs, * 36 CCHs, in an arch of 2 VPs, tie a group of CCHs, repeat from * 2 more times, 16 CCHs.
11th circle. row: 21 CCHs, in an arch of 2 VP, tie a group of CCHs, * 40 CCHs, in an arch of 2 VPs, tie a group of CCHs, repeat from * 2 more times, 18 CCHs.
12th circle. row: 23 CCH, in the arch of 2 VP, tie a group of CCH, * 44 CCH, in the arch of 2 VP, tie a group of CCH, repeat from * 2 more times, 20 CCH.
Cut and secure the thread.
Assembling motives in a plaid
Connect 54 different colored squares. Connect the edges of the squares to each other by performing along the faces. side 1 row of RLS with a dark blue thread. For the blanket, collect 6 x 9 squares in the desired order.
Perform a circle around the perimeter of the blanket. row of dark blue thread border. Every circle. the row starts with 3 VP of the rise instead of 1 CCH (or 2 VP of the rise instead of 1 RLS) and end with 1 SS in the last VP of the rise of the previous row. Attach thread to the beginning of the corner square and knit as follows.
1st circle. row: ** 2 CCHs, * 4 CCHs, skip 2 base loops, 4 CCHs, repeat from *, tie 4 VPs before the next corner, skip 2 base loops, 2 CCHs, then tie the CCHs group into an arch of 2 VPs of the previous row, repeat from ** on each side of the bedspread.
2nd circle. row: perform 1 SS in the next loop, ** 4 CCH, * 4 VP, skip 4 base loops, 4 CCH, repeat from *, tie 4 VP before the next corner, skip 4 base loops, tie the CCH group into an arch of 2 VP of the previous row , VP 4, skip 4 base loops, repeat from **.
3rd circle. row: ** 1 CCH, 4 VP, * 4 CCH, 4 VP, skip 4 base loops, repeat from *, tie 4 VP before the next corner, skip 2 base loops, tie the CCH group into an arch of 2 VP of the previous row, 4 VP, skip 2 base loops, 3 CCHs, repeat from *.
4th circle. row: ** 1 RLS, * 4 PRS, 4 RLS, repeat from *, 4 PRS, 2 RLS, 4 PRSs in the arch from 2 VPs of the previous row, 2 RLS, 4 PRSs, 3 RLS, repeat from **. Cut and secure the thread.
Video tutorial
It is always better for novice needlewomen to preview a few video instructions on crocheting, especially when it comes to such a responsible business as a blanket for a newborn baby.
Crochet baby blanket video: