A useful hobby like hand knitting is still popular. For centuries, it has been used to make vital furnishings and clothing. Today, his role is reduced to creative self-expression and a kind of therapy.
What is good about the hook
Crocheting has many advantages over knitting. Among the most obvious are:
- The presence of only one working loop.
- The ability to change the direction of knitting at your own discretion.
- The widest selection of patterns that are easy to perform.
- The ability to add and reduce loops, so you can get canvases of a wide variety of shapes and configurations.
That is why knitted toys, summer fishnet clothes, clothes for animals and other similar products are much easier to make using a crochet hook.
Why do you need to tie the edge
Knowing the basic principles of crocheting will be useful even for the most ardent adherents of knitting needles. The harness (schemes for such work are very easy to find) will be useful for decorating a variety of items:
- Caps.
- Blouses, sweaters and cardigans.
- Plaids and knitted blankets.
- Napkins and towels (both knitted and textile).
All open edges of the product are required for strapping. Some models provide for the execution of planks, edges or other types of edge decoration during the knitting process.
This method has its advantages: the strapping forms a single whole with the canvas, there are no abrupt transitions, there is no need to worry about the accuracy of its implementation and the coincidence of the density parameters. However, if with the help of strapping they plan to correct the size of the product, apply a different color or texture of the yarn, as well as a specific pattern, then the only way out is to crochet the edge of the product. Schemes and examples of ready-made straps are located below.
Corner strapping
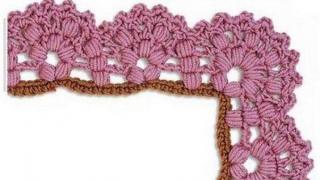
Openwork corner decoration is the most popular type of strapping. the corners of the products has its own pattern: the obligatory expansion of the canvas at an angle of 45 degrees. Comparing two such angles gives a right angle (90 degrees). This principle must be taken into account if you have to independently develop a scheme for strapping them. For example, if you liked the pattern, but did not show the diagram of the formation of the corner.
If everything is found, then all that remains is to follow the instructions. Below is a knitting pattern for a crochet strap, built on the principle of circular expansion of the canvas.

The center of the "circle" is a picot of three air loops (VP), into which five lush columns are knitted. Successive expansion forms a rounded corner.
The pattern is universal in that, if desired, it can be continued further, observing the rules of expansion and formation of corners.
Transverse strapping
We can also offer an old method of making vintage cotton or linen ties. They were used to decorate:
- towels,
- rushnikov,
- tracks,
- pillowcases,
- tablecloths,
- curtains,
- blankets and other decorative textile and knitted items.

Such a crochet pattern is not very suitable for clothes, unless it is planned to make something in the folk style.
How does this happen
They begin to knit with a set of air loops, the number of which corresponds to the height of the future strapping, and knit according to the pattern, building up the fabric until its height along the side is equal to the length of the edge that needs to be strapped. Then the finished harness is sewn with an overlay seam to the edge of the product.

A characteristic feature of this type of harness is the formation of a pattern by combining empty and filled square cells. Empty cells are two double crochets (CCHs), between which there are two VPs. The filled cells are two CCHs, between which there are also two CCHs. The crochet pattern shown here perfectly illustrates this description: filled cells are indicated by crosses.
Knitting product tying
Separately, it is worth mentioning the process of crocheting knitted products. This is done in pursuit of several goals:
- achieving a neat edge;
- if desired, decorate the edge with an openwork pattern;
- when knitting a button strip;
- if necessary, change the dimensions of the product (increase the length or width).
The process begins after the main work is completed, all the details are connected and sewn. The best preparation for strapping a garment is to steam it with an iron or wash it in warm water. So you can see the actual dimensions of the product.
Then the first row of strapping is performed, which always consists of single crochet posts (RLS)! Here you have to strain your spatial imagination, since the loop-to-loop principle is irrelevant, especially when working with the side edge of the product. It is necessary to select the number of strapping loops "by eye".
An insufficient amount will lead to a shrinkage of the canvas, and an excessive amount will lead to a ruffle effect. Therefore, experienced knitters recommend performing a trial tying pattern on a piece of the product, at least 15 cm long (for an objective assessment of the result).

Woven tying
If you need to decorate a textile napkin, kitchen or bath towel, tablecloth or clothing, you can use two types of straps.
- A harness tied directly onto the fabric. To form its first row, a thin hook is used, which is threaded between the threads of the fabric. You can also use on which to then crochet the canvas (as in the photo below). The disadvantage of this method is the complexity of calculating the required number of loops.
- Tie the hem separately and then sew to the garment. Such a crochet strapping scheme is much simpler than the previous one and has the advantage: it is easier to adjust and correct the size of the strapping in time. However, here you have to deal with sewing on the border, and the seams can look rough.
Tying the diagram and photo
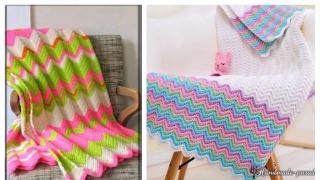
When making a blanket or bedspread, one of the mandatory stages of work is strapping.
It is started when the product is completely ready. Crocheting products (the diagrams are located below) can consist in knitting elementary RLS or decorating a blanket with a more interesting border.

In the first case, the right angle is formed by knitting three RLS from one corner RLS, in the second, by observing the expansion rules described above.
Knowing the basic principles and owning, even at an initial level, crochet techniques, you can quickly and accurately decorate the edge of any product.
Crocheting is such an extensive art that even tying the edges of a wide variety of products allows you to choose from many possible options. Moreover, a detail such as a crocheted border can give a simple thing, like the most ordinary dress or blouse, an elegant sophisticated look, or, conversely, turn it into an absurd-looking product that you don't want to wear, even if it turns out to be the only one in your wardrobe. Therefore, it is so important to learn how to combine crochet styles and successfully apply them in the details that play a role in the formation of the style - the crocheted edges of the product.
Tablecloths, handkerchiefs, napkins, towels, curtains, sleeves and the neck of any part of the wardrobe will look completely new if you choose the right pattern for crocheting the edge. By the way, this technique is also used if there is a need to “hide” the mistakes of the craftswoman, which can be easily seen at the edges of the products with the naked eye. And the trimming of the edge with various knitted patterns can give a second life to any old thing that you don't want to part with at all.
Crocheting the edge of the product - diagrams and description
Choosing the right pattern on the border is already half the success. This issue has its own subtleties, which are important to consider when choosing a pattern for the edge of the product:
- Narrow border (up to 1.5 cm) - suitable for light knitted items with openwork motifs, and also ideal for children's clothing;
- Border that passes into the collar (5-8 cm or 15-20 cm) - goes well with most knitted items.
- Wide trim pattern (1.5 - 4.5 cm) - looks good on products made of medium-thick yarn, namely, on the edges of the sleeves and necklines of jumpers and pullovers.
A beautiful pattern along the edge can be knitted directly when creating a whole thing - then you do not have to suffer by attaching an openwork ribbon to the product, but you can sew on a finished border by tying it in advance. The choice here is quite simple.
But the options for the patterns for binding the edges provide much more space. So, what are the possible options for finishing and decorating the edge of a crocheted product do needlewomen have?
- Rach step

Popular articles:
The most favorite crocheting option among beginner knitters is a crustacean step, consisting of single crochet stitches that are knitted from left to right: starting to the right of the working loop. This pattern allows you to maintain the original shape of the canvas, preventing the edge from stretching. This method of trimming the edges also has its own varieties.
Rach step from left to right
The hook is inserted into the first loop on the right and a single crochet is knitted. Insert the hook into the next loop on the right and knit a single crochet again. And so on until the end of the row.
Rach step from right to left
This option for tying the edges is considered more difficult, but also more familiar. With the work loop on the hook, insert the hook into the loop on the left and grab the work thread. Pull out the thread and, with both loops on the hook, turn the nose of the hook counterclockwise (see diagram above). After twisting the loops on the hook, make a yarn over and pull it through both loops on the hook. With one working loop on the hook, insert the hook into the loop to the left (moving away from you) and grab the working thread. Pull out the loop. Twisting the loops on the hook again, make a yarn over and pull it through both loops on the hook. Continue in the same way. The resulting glad should look something like this.
- Pico
 Patterns of crochet options for pico.
 The pico harness consists of closed in a circle chains of several air loops - from three or more. These loops are ideal for tying cuffs and sleeves.
A row of pico is performed on the front side of the product. Do 1 stitch, skip the first single crochet, work 1 single crochet into the next single crochet. Work a chain of 4 stitches, then single crochet into the first stitch of this chain to create a picot. Work 1 single crochet into each of the next 2 single crochets. Continue knitting pico and 2 single crochets around the hem in the same way. There are also several other options for knitting pico (see diagram above).
- Arch rail or Shell

The pattern is obtained by knitting stitches of different heights with the highest stitch in the center. The shell can be performed in a row, connected with single crochets, half crochets and double crochets. The strapping is performed on the front side of the product. Stitch 1, work 1 single crochet into next stitch. Skip 1 st, do 1 double crochet, 3 double crochets and 1 double crochet, all into the next stitch. Skip 1 loop and work 1 single crochet into the next loop to secure the edge of the shell. Continue tying the shells around the edge of the garment in the same way.
- Border from decorative openwork patterns
Here, the form and all kinds of patterns are not limited by anything except the imagination and capabilities of the knitter. There are so many options for crocheting openwork border, from the simpler to the incredibly complex. Often they are crocheted separately from the entire product and then sewn on to the desired edges. Let's consider several schemes and how to apply them to different things.
Neck strapping
Very often, needlewomen are looking for ways to crochet the neck of a sweater or sweater so as to hide the open sections of the product, and at the same time the thing has acquired a more interesting and special look. There are many ways to do this, you just have to choose the most suitable strapping from dozens of schemes. Let's look at a few examples of how to crochet the neck beautifully to improve the look of the knit and not ignore the principle of completeness.
- Quick neck strapping

This step-by-step design option is suitable for beginners and those needlewomen who do not have time to perform more complex neck processing. It turns out beautifully and simply.
The knitted product can be decorated with a neck made in a circle, or connect the ends of the neck with a seam.
We take the finished fabric and crochet from the seamy side from the working thread to pull the loop to the front side.
Thus, we collect several loops on the hook. Important: the loops should not be loose.

Then these loops are thrown onto the knitting needle, after which we continue to collect loops with the help of a hook. Pull the loop with a crochet, transfer it to the knitting needle, etc.

The loops are dialed. Now we knit the first row in such a way that there are front loops from the inside out, and purl loops in the front row. If we knit the neck in a circle, we knit purl loops. If with a seam - facial.

If you want to achieve a "factory effect" of connecting the collar with the product, we knit the first row with knitting needles as follows: on the seamy side of the product, the first row is knitted with front loops (on the front side, the loops will be purl), and then the first row on the front side looks as if the collar is riveted with a needle.
According to the first option for knitting the first row, the following result is obtained:

Then we knit the neck of the desired length. If this is a loop lapel, we close it with knitting needles or crochet, if desired. If this is a stand-up collar, it is better to close the loops with a needle.
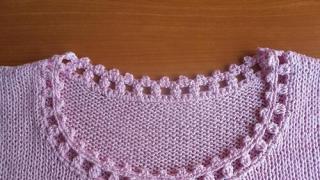
- Beautiful processing of the neck

This is also a simple crochet option for a beautiful edge, in which the most difficult and important thing is to correctly calculate the pattern rapport.
The rapport height is the width of the plank. The width of the rapport is the number of loops by which the number of loops of the entire length of the neck is divided without a remainder. For example: plank height 16 rows. 16/2 = 8. The rapport cannot be less than 8 loops. On 8 loops, we will have an openwork decoring.
In this case, the neck is 180 stitches. The selection method was used to determine the rapport of 12 loops 180: 12 = 15. 15 repetitions of rapport.
It is better to have 2 additional loops for sewing the bar. In my case, this is not, but the difference in the pattern of the neckline on the shoulder line is not noticeable.
You need to knit according to the following scheme, in which only odd rows are indicated:

- Flower pattern

The pattern for the strapping is made up of a bush from a chain of three air loops and two double crochets. It is knitted from one point - the base of the chain. The bushes are fixed with a half-column at some distance from each other (for example, in two loops of the securing neck row). At the beginning of the row, make one air loop for lifting. Follow the scheme.

Beautiful sleeve processing
Often, crocheting the sleeves is done in the same pattern as the neck processing - in this way, the thing is designed in the same style, which means it looks harmonious. Let's try to knit a few simple patterns.
- Sleeve festoons

First, cast on a chain of 5 chain stitches.
Insert the hook under the dialed chain, grab the working thread and pull the loop.
Grab the working thread again and knit the extended loop. This is how the first single crochet was obtained, tied from under the chain, and 2 loops remained on the hook.
Knit an extended loop, another loop will be added to the hook.
When there are 11 stitches on the hook, grab the working thread and knit all the stitches from the hook.
Now secure the scallop by knitting a single crochet, stepping back 3 loops from the beginning of the scallop. Knit scallops to the end of the row following the step by step photo.

It is necessary to work according to the following scheme:

- Large lace trim

At the beginning of the row, tie an air loop. Insert the crochet hook under the nearest braid to be tied. Knit a single crochet. Knit an air loop again.

Insert the hook into the front loop of the upper braid of the single crochet previously knitted and then insert the hook into the left side loop of the same single crochet. Insert the crochet hook under the nearest braid to be tied. Pull out the loop. Pick up the thread and knit a single crochet. You need to repeat from 4 to 8 points. As a result, we get such a strapping of the edge, which, due to its elasticity, will not tighten the bottom of the product.

Bottom of the product
You can crochet the bottom of the product in a variety of ways, but we will consider one of the easiest options, and a more complex and beautiful way of tying, suitable not only for knitted items, but also for towels, tablecloths and other material products.
- Strapping the bottom of the Pico thing

Along the edge of the garment, start knitting with two single crochets.
Next, complete 3 air loops and direct the hook to the base of the single crochet as shown in the photo. Then do two single crochets again, followed by 3 stitches.

- Flower border

A row with a floral motif is knitted as follows: 3 vp. lifting, 3 CCHs in the first arch from vp, 1 CCHs in the next arch. We begin to knit a flower: 3 VP, 3 unfinished CCHs on one loop of the base, knit all loops on the hook = 1st petal. 4 vp, remove the hook from knitting, insert it into the upper part of the connected group of columns from right to left, grab the last loop of the chain and drag it through all the loops = ring.
Next petal: * 3 VP, 2 CCHs in a ringlet, 3 VP, RLS in a ringlet * (= 2nd petal), repeat from * to * 2 more times. Last petal: 3 vp, 3 unfinished CCHs, knit all loops on the hook (= 5th petal). The flower is ready.
3 CCHs through one arch of the previous row, 1 CCH into the next arch, and we begin to knit the next flower.

Video tutorial
Decorating the edges of knitted products with a crochet is not an easy task, because first you need to choose a beautiful pattern, then knit it correctly and without unnecessary broaches, and then sew it so that it looks perfect, and most importantly - in its place. It may be difficult for novice craftswomen to cope with this task at first, but do not despair. You can always "spy" the secrets of this craft from more experienced craftswomen.
Crocheting the edge of the product video:
Each of us has a favorite thing that seems to be out of fashion, but we don't want to get rid of it at all. Fortunately, crocheting the neckline is a good way to update it. In this article, we will present some good tips for experienced craftswomen who know how to work with knitting tools, and we will also tell you for beginners. how to crochet the neckline.
Anyone who has never crocheted before should first practice, and only then start creating a strapping:
- Cast on a chain of about twenty loops (although 10 will suffice for training).
- Tie several rows of six single crochet stitches (without crochet). It is advisable to stick to the direction - from right to left.
- The subsequent rows need to begin to start differently from the first. Knit should be from air stitches.
- Place the hook under the third loop (you need to grab the thread and then pull it out).
- The resulting loops (there should be two of them) must be tied together.
As a result, you should have such an even canvas:

Now let's figure out how crochet a square neck sweaters:
- Place the hook where the shoulder seam area starts
- Hook the thread and pull it out (this is how you need to create air loops around the edge of the product)
This is the simplest crochet square neck strapping scheme:

An example of how to crochet the neckline of a dress?
You can decorate your favorite dress with an original harness. There are two common methods that craftswomen are used to using:
- "Rachin 'step"

- Lace

Let's figure it out first, how to crochet the neckline using the "Rachy step" method:
- Take a long thread (it should be several times longer, 10 times longer than the edge of the neck)
- Attach one end of the thread to the edge of the shoulder seam.
- Next, we make a regular loop (air)
- You need to put a hook under this loop to pick up the thread and pull it out.
- The resulting loops are tied into one piece
- As a result, only one loop should remain (with it you need to start the knitting process from the very beginning)
Here are a couple of indicative schemes for beginners, which will help learn how to tie the neckline using the crochet hook method"Rachy step":


A beautiful way to tie the neck using a crochet hook according to the "Lace" pattern:
- 1 - knit with simple loops (you should get an "air" chain of ordinary loops)
- 2 - we knit a chain consisting of three columns b / n and terkh air loops (they should alternate in turn)
- 3 - we knit a chain consisting of two s / n columns (with a crochet) and two air loops (they should alternate in turn)
- 4 - we knit a regular chain, as in the first row
- 5 - we knit a chain of 4 regular columns, which need to be completed with 1 column of s / n
- 6 - we knit a chain consisting of 1 column with two crochets and 1 column s / n (these loops should alternate with each other along the length of the entire row)
- 7 - we knit a chain consisting of one column with two crochets and 1 air loop (the alternation is repeated)
- 8 - we knit a chain with 1 column with two crochets and 3 air loops (again the loops alternate in turn)

An example of how to crochet the neck of a sweater?
Recently, pullovers have become very fashionable - knitted jumpers, which are worn mainly by women. Therefore, for many, the topic may be relevant, how beautifully crochet the neck of a half-faith. We offer you several options:
- Crochet neckline crochet
- 1 - we knit a chain from one column b / n and from an air loop (loops alternate)
- 2 - completely knitted from s / n posts
- Subsequent rows must be repeated one by one.


- Crocheting the v-neck using a crochet crochet pattern
- 1-3 - knit with columns b / n
- 4-6 - we knit only with regular loops (air)
- 7-9 - we knit like the first three rows with columns b / n
- 10-12- we knit from 4 columns b / n and 3 air loops (they should alternate with each other)


An example of how to crochet the neckline of a vest?
Vests look very nice, the cutouts of which are crocheted with an openwork pattern.
- 1- fits for crochet neck strapping with single crochet
- 2 - knits from 3 air loops, one s / n loop, 2 air loops, one s / n loop and 7 air loops
- 3 - for crocheting the edge of the neck fits like this: 1 column b / n, 4 air loops - so to the end of the row
- 4 - knits according to the second row pattern
- 5 - knits according to the third row pattern
- 6 - knits according to the scheme of the fourth row
- 7 - knits according to the pattern of the fifth row
- 8 - knits from 3 air loops, 1 s / n loop, 2 air loops, one s / n loop;
- 9 - knits from 4 columns b / n, pico, 4 columns b / n, pico, 3 columns b / n, pico, 3 columns b / n


You can also crochet the cutout of the vest with a trim. For this you need:
- In the first row, you need to make 6 single crochets
- The second row is knitted like this - 1 single crochet, 2 air loops, 4 double crochets, 2 air loops

It turns out a very beautiful border, which outwardly resembles graceful lace.
Crochet hooks for different types of necks


Do not rush to say goodbye to a thing that has worn out. Get creative, get creative and DIY a beautiful neck tie for your old sweater or dress. Sometimes handicrafts can give things new life. We hope that the patterns and crochet options presented in this article will be useful to you in your work, because they can be mastered even by those who have never held knitting tools in their hands before.
Video: "How to crochet the neckline?"
Tying a thing is only half the battle. Without beautifully designed edges, the product will look unkempt and unfinished. At the same time, by giving a beautiful shape to the edge of the product, you can transform and decorate a not quite bright thing. Or give a new life to the old one, tying it with a beautiful bright border. Regardless of how the product was connected? knitting needles, crocheting or by car, the crocheted edge of the product can be varied, beautiful and stylish.
To get openwork edges will not work either with knitting needles or by car. This can only be done with a crochet hook. You can tie any edges: necks, sleeves, tablecloths, hats, and so on.
The most simple and interesting schemes are laid out below.


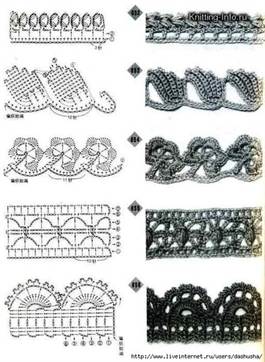
The most common crochet edge trim patterns
There are a huge number of different types of crochet trims, but the most common ones are as follows.
Rach step
This type of strapping is called so because it is performed from left to right, that is, in the opposite direction of normal knitting. Its essence lies in the fact that the single crochet stitches are not knitted as usual - in the loop to the left of the working one, but in the loop to the right. Thus, it is very easy to get a beautiful edge binding.
If the edge of the product has a non-uniform shape, then before tying the edge with a "crustacean step" with a contrasting thread, it is better to make a row of single crochet columns with a thread of the same color as the main canvas. And then finish with contrasting yarn to process the edge of the product using this type of tying. "Rachy step" is considered to be the simplest type of edge strapping.

Pico
Using pico, the edge is more beautiful and interesting. It is most suitable for processing the edge of caps, sleeves.
Pico is knitted like this: a single crochet is made, then 3 or more air loops are knitted. The number of loops depends on the thickness of the yarn as well as the desired size of the final pico. On average, this is 3 air loops. Next, a connecting column or single crochet is knitted into the same loop from which the first column was knitted. Thus, it turns out, as it were, a jagged edge of the product.


Openwork
There are a great many varieties of openwork today. It all depends on the style of the product, on the imagination and taste of the knitter.
Openwork consists of a combination of different columns with and without crochet, pico, air loops. This is the most difficult type of strapping of the product. However, even a novice knitter will cope with such a task, precisely following the pattern of the selected pattern.

In some cases, crocheting the edge will help secure the end of the garment. That is, if the main canvas begins to curl around the edges, then by tying its edges this can be avoided.
Also, with the help of, for example, an openwork strapping, you can update the tablecloth on the table. Using openwork strapping, dull napkins or coasters for hot cups will sparkle with new colors. It can be an expensive gift to family and friends. So, to strap the edge you will need:
- The yarn is either the same with which the main fabric was tied, or in a contrasting color;
- Hook of the appropriate size;
- Scissors;
- Scheme.
Before proceeding to the strapping, the edge of the product should be prepared. To do this, for a start, with the same yarn that the product was knitted, crochet a row of single crochet stitches. Thus, the harness will look neater. The strapping should be done so as not to pull the edge of the product. To do this, the columns must be knitted into each link of the edge, without missing a single one, but at the same time, without adding extra loops.
Related videos
Details, as you know, can ruin or save any thing. Knitted in a variety of techniques, the product will have a complete look if it is supplemented with a strapping that is suitable in style. The hook is an indispensable tool when decorating the original edge of a knitted blouse, dress, napkin or tablecloth. The strapping patterns are so diverse that they allow you to crochet not only the finished thing, but also hide the flaws that often happen when the edge of the strap, bottom and other details of the knitted product is sewn. In addition to interesting finishing of the edge, hook patterns are used to gracefully finish knitting cuffs, collars, tying necklines and knitting borders for interior items. After this article, tying the edge with a crochet hook will not be a problem, because we have selected schemes for work especially for you.
The most common methods of processing the edge are a rachis step, pico, strapping with openwork, arched from air loops.
The method of crocheting the edge with diagrams and descriptions
This type is considered the easiest way to make a beautiful neat edge, it is especially in demand in children's models. It is performed most often with single crochets, which are knitted into a loop to the right of the working loop. Such an unconventional move - from left to right - explains the entrenched name.
There are several options for knitting a crustacean step, we will show one of them in the video:
Method 2: pico for beginners


Pico is a slightly more complex way to crochet the edge. Interesting for tying the edges of the sleeves, cuffs, caps, berets. There are several ways to knit a pico, based on the thickness of the thread, the number of air loops connected in a pico is selected. The diagram shows different variants of this knitting.

Method 3: arch strapping from air loops
It is carried out with air loops according to the scheme, it is often used in the border of stoles and shawls, it can be supplemented with a variety of tassels.

Method 4: we knit beautiful laces
How to crochet the desired edge of the product? Openwork, which combine all of the above patterns, as well as many others, which will require more complex patterns to create a beautiful product. The choice of an openwork pattern is always determined by the style, the purpose of the product, it depends on the taste of the knitter and her skills in crocheting.
To decorate the bottom of a tablecloth, a large napkin, where you need to knit a beautiful border, you can use the following schemes:


We have collected the most common openwork patterns in a selection of ideas, the schemes are taken from sources found in the public domain.