How to make a paper cube? There are two ways to quickly and easily create this equilateral paper hexagon.
The first method is to first draw and cut a flat pattern of the cube, and then glue it together.
If this method suits you, you need to prepare the necessary tools and accessories. In order to make a scan, you will need paper, a pencil, a ruler, as well as scissors and glue. This stationery set is sure to be found in everyone who needs to make a paper cube.
The three-dimensional hexagon pattern is very simple. Initially, you need to draw a figure in the shape of a cross and divide it into six equal-sized squares so that one side of the cross is twice as long as any other. It should be noted that there should be narrow stripes on the outer sides of each square.

With the help of these strips, it will be easy to gently glue the figure. This is one of the ways to make a paper cube.
The second method does not require the use of any special devices. The technique with which you can create this polygon is called origami. How to make a paper cube using origami? It's not difficult at all. It is necessary to start folding the hexagon from a square piece of paper. First of all, you should fold the sheet into a standard origami shape - a double triangle. Such a figure will turn out if you fold the paper in half, making a rectangular piece of a square sheet, and then fold it again, again getting a square. After that, we open the resulting figure in such a way that a triangle is formed on both sides. This is the first of the answers to the question of how to make a paper cube using origami.
Then you need to make a few more manipulations with the double triangle.
Its edges on both sides must be bent to the top. Again, we got a square, the opposite corners of which we fold to the center. So, we made a hexagon that has two pockets on each side. In them, you need to fold two halves of paper at the top of the figure. Next, we take a needle and make a small hole in the top of the hexagon, and then we must blow strongly into it. So the desired volumetric body is obtained.
There is another technology for making a cube using origami. But it requires six sheets of paper, which are folded into a certain shape and then assembled into a cube. Accordingly, the more materials are used, the less rational the volumetric body is, therefore we do not describe this origami method. The two options discussed above are less time consuming and therefore ideal.

Now you know two convenient ways to make a paper cube very quickly and effortlessly. But your theoretical skills can only be worked out in practice, so take a square piece of paper, the necessary tools, and make this beautiful hexagon that can be used not only as a visual aid, but also as an interior decoration!
Have you ever thought about how to make a paper cube and why you need it? Let's say how to make a cardboard cube on our own, we will tell you and even show you. What useful functions will you give an origami cube? Here's a hint: remember your children's blocks with letters, from which you learned to add the first words, not yet knowing how to write. And if you paste over a paper cube with pictures from old children's books, you will get no less interesting puzzle-constructor than in our distant childhood.
There are countless options for the game use of a colored paper cube. And at the same time, you don't have to worry that children will hurt each other by throwing such a toy. Our wooden ones were heavier. We are already ready to show you how to make a paper cube with your own hands right now. Ready to get started?
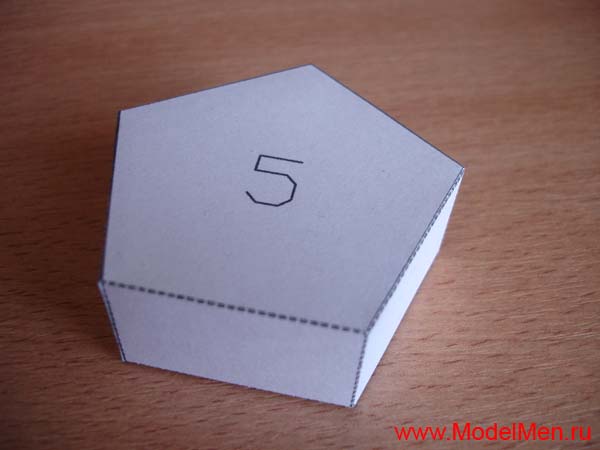
Simple paper cube
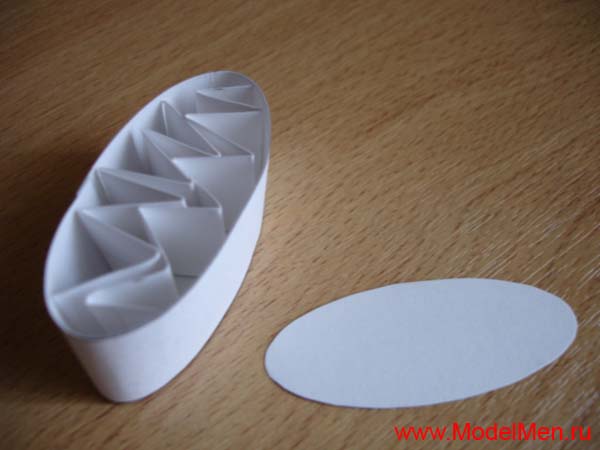
A 3D hexagonal cube is folded from a square sheet of paper without glue. And even scissors are not required here. Is it possible to cut off the extra "tail" from A4 sheet to get a square blank. But the skill of inflating balloons will come in handy, because now we will teach you how to make an inflatable cube. Intrigued? Then let's start:

- Diagram 1 is your visual reference. It should be used whenever the folding algorithm seems complicated. Take a paper square and fold it diagonally, then in half - it's all just markup;
- Focusing on the diagonal-folds, form a triangle by bending the side planes of the workpiece inward (see diagram). 4 walking corners at the base of the triangle must be bent to the top, 2 on each side of the workpiece;
- Bend the side opposite corners to the center - you have a vertical reference axis here. Repeat on the other side. The walking corners of one of the conical protrusions (on the second the corners are "closed") are double-folded so that they can be neatly tucked into the middle corners-pockets;
- Similarly, tuck the double-folded corners into the pockets on the back of the workpiece. The cube model is ready, it remains to give it volume. Find an open corner and inflate the model through it.
Modular cube: assembled cube 6 colors
We have already discussed how to make a cardboard cube on our own, and for this modular cube, multi-colored paper of 6 colors (or 3 repetitive ones) will be enough. It will turn out to be quite dense even without cardboard due to the folding algorithm of the modules (each individually and all together). Let's start to understand step by step. We'll warn you right away that the whole process will be divided into 7 steps - folding the modules and assembling the cube (you can use glue - it will be stronger). Some time will be spent, but the result will definitely please you: the cubes will turn out to be bright, multi-colored, not requiring additional decorations or painting.

- Take a square piece of paper and fold it so that you get a visible division into 4 identical rectangular planes (see Fig. 2). Fold the small corners at the diagonal corners of the starting square;
- Fold the leaf 'sashes' like closing a window shutter. Using the corner guides (folded earlier), bend the previously unused corners inward, then tuck them inward on both sides. You will get a parallelogram;
- Turn the structure upside down, bend the corners towards you so that you get a small square with triangular bend ears. Make 5 more. such modules.
Connect the blocks into a cube by introducing the corners of the modules into the median planes-pockets of the neighboring blocks. Be smart, as a last resort the scheme will help. You have mastered how to make an origami cube from bright modules in practice. Try to glue the cube from blocks at the assembly stage so that it is even stronger and does not crumble into modules in the game. You can, of course, take a standard cube scan, just print it and glue it - ready-made templates are always at hand. And if the typical pattern does not suit you and the game needs an original counting cube, you can add it yourself for one or two times. What is easier when you know how to make not such wisdom out of paper. You may be interested in folding schemes or.

The most complex and unusual forms of structures, devices, mechanisms are based on elementary geometric shapes: a cube, a prism, a pyramid, a ball and others. First, learn how to create the simplest shapes, and then you can easily master more complex shapes.
Many modelers start out with paper models. This is due to the availability of the material (it is not difficult to find paper and cardboard) and the ease of processing (no special tools are required).
However, paper also has a number of characteristic features:
- moody, fragile material
- requires high accuracy, attentiveness, perseverance when working
For these reasons, paper is a material for both beginners and true masters, and models of the most varied complexity are created from it.
In this article, we will explore the simplest geometric shapes that can be made from paper.
You will need the following materials:
- paper
- pencil
- ruler
- eraser
- scissors
- PVA glue or glue stick
- glue brush, preferably hard bristle
- compass (for some figures)
How to make a paper cube?
A cube is a regular polyhedron, each face of which is a square
The creation of a cube consists of two stages: creating a flat pattern and gluing. figures. To create a diagram, you can use a printer by simply printing the finished diagram. Or you can draw a flat pattern yourself using drawing tools.
Drawing a flat pattern:
- We choose the size of the square - one side of our cube. The sheet of paper should be at least 3 sides of this square wide and slightly more than 4 sides long.
- We draw four squares in the length of our sheet, which will become the sides of the cube. We draw them strictly on one line, close to each other.
- Draw one of the same squares above and below any of the squares.
- We finish drawing strips for gluing, with the help of which the edges will be connected to each other. Every two faces should be connected by one strip.
- The cube is ready!

After drawing, the reamer is cut out with scissors and glue the PVA. Spread the glue with a very thin layer evenly with a brush over the gluing surface. We connect the surfaces and fix them in the desired position for a while, using a paper clip or a small load. The glue setting time is about 30-40 minutes. Drying can be accelerated by heating, for example, on a battery. After we glue the next faces, we fix them in the desired position. Etc. So gradually you will glue all the edges of the cube. Use small amounts of glue!
How to make a paper cone?
A cone is a body obtained by combining all rays emanating from one point (the top of the cone) and passing through a flat surface.
Drawing a flat pattern:
- Draw a circle with a compass
- Cut out a sector (a part of a circle bounded by an arc of a circle and two radii drawn to the ends of this arc) from this circle. The larger the sector you cut, the sharper the end of the cone will be.
- We glue the side surface of the cone.
- We measure the diameter of the base of the cone. Using a compass, draw a circle on a sheet of paper of the required diameter. We finish drawing the triangles for gluing the base with the side surface. Cut out.
- We glue the base to the side surface.
- The cone is ready!

How to make a paper cylinder?
A cylinder is a geometric body bounded by a cylindrical surface and two parallel planes intersecting it.
Drawing a flat pattern:
- We draw a rectangle on paper, in which the width is the height of the cylinder, and the length will determine the diameter of the future figure. The ratio of the length of the rectangle to the diameter is determined by the expression: L = πD, where L is the length of the rectangle, and D is the diameter of the future cylinder. Substituting the required diameter in the formula, we find the length of the rectangle that we will draw on paper. We finish drawing small additional triangles that are necessary for gluing the parts.
- Draw two circles on paper with a cylinder diameter. This will be the top and bottom bases of the cylinder.
- Cut out all the details of the future paper cylinder.
- We glue the side surface of the cylinder from a rectangle. Let the details dry. We glue the bottom base. We are waiting for drying. We glue the upper base.
- The cylinder is ready!

How to make a paper box?
A parallelepiped is a polyhedron with six faces and each of them is a parallelogram.
Drawing a flat pattern:
- We select the dimensions of the parallelepiped and the values of the angles.
- We draw a parallelogram - the base. On each side, draw the sides - parallelograms. Draw a second base from either side. Add glue strips. A box can be rectangular if the sides are rectangles. If the box is not rectangular, then creating a flat pattern is a little more difficult. For each parallelogram, the required angles must be maintained.
- Cut out the flat pattern and glue it together.
- The box is ready!

How to make a paper pyramid?
A pyramid is a polyhedron, the base of which is a polygon, and the other faces are triangles with a common vertex.
Drawing a flat pattern:
- We choose the size of the pyramid and the number of its faces.
- We draw a base - a polyhedron. Depending on the number of faces, it can be a triangle, square, pentagon, or other polyhedron.
- Draw a triangle from one of the sides of the base, which will be the side. Draw the next triangle so that it has one side in common with the previous one, and so on. So we draw as many triangles as there are sides in the pyramid. Finishing the gluing strips in the right places.
- Cut out and glue the shape.
- The pyramid is ready!

A large selection of sweeps of simple geometric shapes.
Children’s first acquaintance with paper modeling always starts with simple geometric shapes such as a cube and a pyramid. Not many people succeed in gluing a cube the first time, sometimes it takes several days to make a truly even and flawless cube. More complex shapes of a cylinder and a cone require several times more effort than a simple cube. If you do not know how to accurately glue geometric shapes, then it is too early for you to tackle complex models. Take care of yourself and teach your children to crate these "basics" of modeling using ready-made sweeps.
To begin with, of course, I suggest learning how to glue a regular cube. The sweeps are made for two cubes, one large and one small. A small cube is a more complex shape because it is more difficult to glue it than a large one.

So, let's begin! Download a five-sheet sweep of all the shapes and print on thick paper. Before printing and glueing geometric shapes, be sure to read the article on how to choose paper and how to properly cut, fold and glue paper.
For better printing, I advise you to use the AutoCAD program, and I give you sweeps for this program, and also read how to print from AutoCAD. Cut out the sweep of the cubes from the first sheet, along the fold lines, be sure to draw a compass needle under the iron ruler so that the paper bends well. Now you can start glueing the cubes.

To save paper and for every fireman, I made several sweeps of a small cube, you never know you will want to glue more than one cube or something will not work out the first time. Another simple figure is a pyramid, you can find its sweep on the second sheet. The ancient Egyptians cost similar pyramids, though not made of paper and not so small :)

And this is also a pyramid, only unlike the previous one, it has not four, but three faces.
Sweep of a three-sided pyramid on the first sheet for printing.

And one more funny pyramid of five faces, its sweep on the 4th sheet in the form of an asterisk in two copies.


A more complex shape is a pentahedron, although a pentahedron is more difficult to draw than to glue.
Development of a pentahedron on the second sheet.

So we got to the complex shapes. Now you have to strain yourself, glueing such figures is not easy! To begin with, an ordinary cylinder, its sweep on the second sheet.

And this is a more complex figure in comparison with the cylinder, because at its base is not a circle, but an oval.

The sweep of this figure on the second sheet, two spare parts were made for the oval base.

To neatly assemble the cylinder, its parts need to be glued end-to-end. On one side, the bottom can be glued without any problems, just place the previously glued tube on the table, put a circle on the bottom and fill it with glue from the inside. Make sure that the diameter of the pipe and the round bottom fit snugly together, without gaps, otherwise the glue will leak and everything will stick to the table. The second circle will be more difficult to glue, so glue the auxiliary rectangles inside at a distance of paper thickness from the edge of the pipe. These rectangles will prevent the base from falling inward, now you can glue the circle on top without any problems.

A cylinder with an oval base can be glued in the same way as a regular cylinder, but it has a lower height, so it is easier to insert a paper accordion inside, and put the second base on top and glue it along the edge with glue.
Now a very complex shape - a cone. Its details are on the third sheet, a spare circle for the bottom on the 4th sheet. The whole difficulty of gluing the cone at its sharp top, and then it will be very difficult to glue the bottom.

A complex and at the same time simple figure is a ball. The ball consists of 12 pentahedrons, a sweep of the ball on the 4th sheet. First, the two halves of the ball are glued, and then both are glued together.

Quite an interesting figure - a rhombus, its details on the third sheet.

And now two very similar, but completely different figures, their difference is only at the base.

When you glue these two figures together, you will not immediately understand what it is all about, they turned out to be completely imperceptible.

Another interesting figurine is a torus, but we have it very simplified, its details are on the 5th sheet.

And finally, the last figure of equilateral triangles, I don't even know what to call it, but the figure looks like a star. Sweep of this figure on the fifth sheet.

That's all for today! I wish you success in this difficult work!
- thick paper or cardboard (preferably colored);
- ruler;
- pencil;
- scissors;
- glue (better than PVA).
For the manufacture of volumetric geometric shapes, the main thing is to have templates that can be cut and then glued.
Can be made from white or colored paper. Can be cut out of paper with any drawings or numbers.
I propose to make an unusual volumetric figure using the origami technique. Watching the video:
In order for children to better remember what geometric shapes are, and know what they are called, you can make volumetric geometric shapes... By the way, they can be used to make beautiful gift wrapping.
You will need:
The most difficult thing is to develop and draw development plans, you need at least basic drawing knowledge. You can take ready-made maps and print them on a printer.
To keep the fold line straight and sharp, you can use a blunt needle and a metal ruler. When drawing a line, the needle must be strongly bent in the direction of movement, practically laying it on its side.
This is a sweep of a three-sided pyramid.
This is a cube sweep

This is a sweep of an octahedron (tetrahedral pyramid)

This is a dodecahedron sweep

This is a sweep of the icosahedron

Here you can find templates for more complex shapes (Platonic Solids, Archimedean solids, polyhedra, polyhedra, different types of pyramids and prisms, simple and oblique paper models).
Volumetric geometric shapes are the best way for a kid to explore the world around him. An excellent study material / excellent study guide for studying geometric shapes is, in fact, three-dimensional shapes. In this way, geometric shapes are better remembered.
The best material for making such volumetric figures is thick paper (you can color) or cardboard.
For manufacturing, you will need, in addition to paper, a pencil with a ruler, as well as scissors and glue (cut and glue the reamers).
You need to draw the sweeps in a similar way and cut them out:


Then they need to be glued edge to edge.
You should get the following kind of volumetric geometric shapes:


Here are some schemes by which you can make 3D geometric shapes.
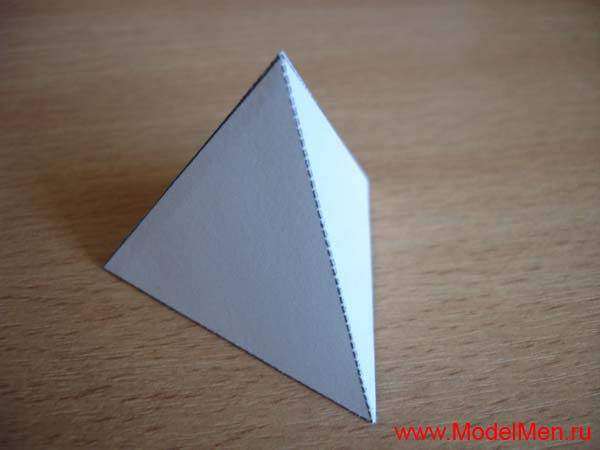
The simplest one is tetrahedron.

It will be a little more difficult to make octahedron.

But this volumetric figure - dodecahedron.

One more - icosahedron.

More details about the production of volumetric figures can be found here.
This is how the non-assembled volumetric figures look like:

And this is how the finished ones look like:

You can make many original crafts from bulk geometric shapes, including gift wrapping.

Before you start making volumetric geometric shapes, you need to imagine (or know how it looks) the figure in 3D dimension: how many faces this or that figure has.
First, you need to correctly draw a figure on paper along the edges, which should be connected to each other. Each figure has a specific shape: square, triangle, rectangle, rhombus, hexagon, circle, etc.
It is very important that the length of the edges of the figure, which will be connected to each other, have the same length, so that during the connection there will be no problems. If the shape consists of the same faces, I would suggest making a template while drawing to use this template. You can also download ready-made templates from the Internet, print them, bend them along the lines and connect (glue).
Taper pattern:

Pyramid pattern:

You will need to make volumetric geometric shapes both in school and for studying shapes with kids. This process can be turned into a game, making dense volumetric geometric shapes out of cardboard.
To make figures, we need - a pencil, a ruler, colored cardboard, glue.

You can print diagrams from the Internet, then apply them on thick paper, not forgetting about the fold lines that will stick together.
And you can use the following schemes:


And here they are already in finished form.

So you can have fun and usefully spend time with your baby, studying geometric shapes.
Having independently made volumetric figures out of paper, you can not only use them for entertainment, but also for training.
For example, you can visually show the child how this or that figure looks, letting it hold it in your hands.
Or, for the purpose of training, you can print out diagrams with special symbols.
So I suggest that you familiarize yourself with the seme below dodecahedron, both simple and with small drawings that will only attract the attention of the baby and make learning more fun and entertaining.


Also the diagram Cuba can be used to teach numbers.


Scheme pyramids can help you understand the formulas that apply to this figure.


In addition, I suggest that you familiarize yourself with the diagram octahedron.


Scheme tetrahedron among other things, it will help you learn colors.


As you understand, the above templates must be printed, cut out, bent along the lines, glued along special narrow stripes adjacent to the selected sides.
Volumetric geometric shapes are simply necessary in teaching: they provide students with the opportunity to hold them in their hands, to consider, which is an important part of the educational process, they are simply necessary as a guide when studying the famous Euler's theorem - clearly demonstrating that even with deformations, curvatures, the number of polyhedron faces , and hence the Euler ratio, will remain unchanged:
In addition, 3-D shapes can be a great tool to help students explain how to find the surface area of a polyhedron.
So, using the templates below, you can easily make the following shapes:
Triangular Prism

N-angle prism

Tetrahedron