A branch of the poultry business such as raising pigeons requires a complete commitment from the farmer. These beautiful birds preserve health and produce high-quality offspring exclusively when performing a variety of mandatory conditions... One of them is the presence of a comfortable dovecote, built and equipped in such a way as to be ideal for birds to live in the summer heat, winter cold and unstable autumn-spring weather. In this article we will tell you how to build a dovecote with your own hands for the cultivation and breeding of a healthy population of birds.
The farmer will be able to equip a comfortable dovecote only in one case: when the place of its intended location is far from the city, with its noisy streets and constant traffic. This requirement has the following justifications.

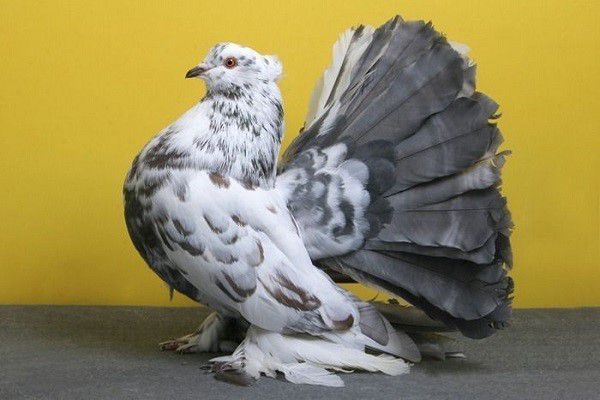
First of all, you should understand that comparing the rare breeds of birds that you are going to do with city pigeons is at least stupid, since the latter lack both health and a long life expectancy. Of course, they have developed a certain immunity to the gasoline exhaust and noise present in the city, and can live crippled for a long time. But, ultimately, the high mortality rate among urban pigeons is no secret to anyone.

Video - How to build a dovecote
Additional requirements
Now let's discuss additional requirements for the placement of birds. There should not be:
- electric lines;
- cesspools;
- neighboring poultry houses, chicken coops, pigsties, etc.
Electric lines, as a rule, cannot be avoided, because now in the villages and villages they are present everywhere, but do not worry, over time the pigeons will learn to bypass this air obstacle.
![]()
Now about the cesspools and dwellings of neighboring birds and animals. All of these structures are the source of infectious diseases. Pigeons are particularly susceptible to them, therefore it is strictly forbidden to place a dovecote near the above places.


Types of pigeon poultry houses
Before proceeding with the construction process, consider what types of dovecote exist.
Mounted dovecote
This variety can be called a rural economy option. This is what amateurs often build in order to keep a non-pedigree bird inside in small numbers, one or three pairs. Appearance such a bird's house resembles an ordinary wooden box, which is attached to the outer wall of the house, under the roof itself.
Introducing comparative table advantages and disadvantages of hinged dovecotes:

Specifically, hanging pigeon houses are not suitable for breeding. Their undoubted advantages include the low cost of materials and the ease of manufacturing the structure, which is why they are very popular in the villages. However, such poultry houses cannot serve as a refuge for birds from frost or wind, just as they cannot save them from attacks of predatory animals or birds. Among other things, their location makes the process of caring for a bird so difficult that over time it discourages any desire to engage in this branch of poultry farming. The high mortality rate of chicks is largely due to the presence of a hanging dovecote, because it is simply impossible to constantly monitor their health and development.
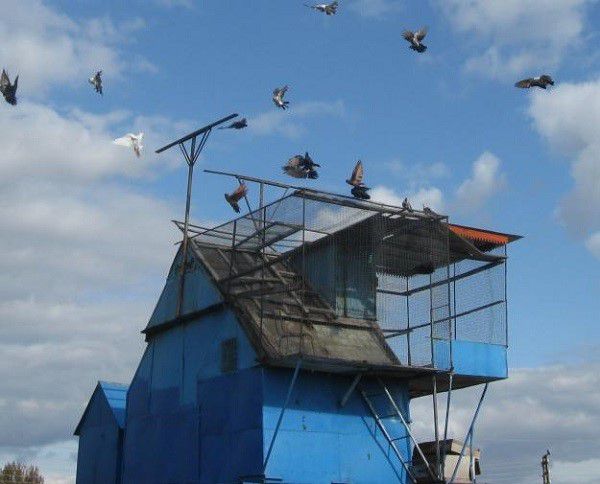
Tower dovecote
Such a dovecote cannot be compared with a hinged dovecote, as it is more practical and suitable for breeding purebred birds. Usually it is erected in the form of a tall structure, which can reach 4 meters, in the form of a round turret.

Inside the tower dovecote, the following arrangement of residential pigeon sections by floors is adopted:
- the first floor is given as a warehouse for equipment and feed for pigeons;
- the second and subsequent floors are occupied by nests.
Each nest is separated from the others by walls. The interior of the room must remain free so that the nests are always accessible.
We present a comparative table of the pros and cons of tower pigeon breeding.
The tower structure of the poultry house is attractive for its unconditional practicality, it is perfect for achieving breeding goals of the poultry farmer. However, the price of the materials that will be required for its construction will hit an insolvent farmer in the pocket, in addition, demanding significant labor costs from him.

The main question that you must honestly answer to yourself - what are you ready to do to do what you love? If breeding pigeons is just a temporary hobby for you, you should not make an expensive dovecote. However, remember, even ordinary pigeons have difficulty in the cold in a hanging pigeon house.
Dovecote in the attic
The most optimal and convenient location of the pigeon house for successful breeding. The attic arrangement of a pigeon dwelling does not require serious investments and hard physical work, since the room under the roof will need to be supplemented only with a bird walking area.
It is best when the pigeon attic is located on a sturdy house building, on the ground floor of which you can keep tools, bird food and other devices. The building must be insulated.

Do not allow drafts to walk inside the attic, some breeds of pigeons are very sensitive to them.
Let's discuss the advantages and disadvantages of attic dovecotes.
As you can see, this method of placing the dovecote has an overwhelming amount of advantages. As for cleaning, it will have to be done in any case, this minus accompanies the breeding of birds in any room. Next, we will consider the construction of a dovecote in the form of an attic superstructure over an adjoining building and a tower dovecote.
Do-it-yourself dovecote in the attic
Depending on what material was used to build the base house, the attic space can be built from:
- wood;
- bricks;
- gland.
In the case of each of the selected materials, there are nuances.

A wooden building requires filling the internal joints, joints with the roof, as well as lining the room from the inside with sheets of plywood so that the internal microclimate is not disturbed by drafts and excessive humidity from the outside. Brick walls are putty in a similar way, however, they do not need plywood sheathing. The metal superstructure from the inside over the entire area is sheathed with wooden boards, then with plywood sheets of small thickness.
Construction boards prices
Construction boards
Parameters of the future dovecote
There are basic parameters that must be observed when building a dovecote.
- For every pair of pigeons inside a bird's dwelling, there must be at least 50 cubic centimeters.
- The room is divided into sections to keep different breeds of birds separate or to separate them by age.
- The capacity of each compartment is no more than 15 pairs of pigeons.
- In winter, birds are seated according to gender;
- The presence of a branch for young animals is mandatory.
- In the construction project, the place for placing the feeders and drinkers is taken into account.
The height of the future pigeon dwelling should be at least two meters. The outer walking area is usually built in the form of an equilateral square. The larger the pigeons you breed, the larger it is.
The location of the entrance depends on the size of the bird. Sports-oriented breeds need to be placed about 1.5 meters from the floor, meat poultry - and a height of 30 centimeters.
Let's start building
Walls
First of all, you need to build the walls. If a tree is chosen as a building material, collect the frame of the future room from the bars and upholstery it with boards from the inside and outside.

Floor
The floor of the dovecote is made of wooden planks laid one after another. In winter, it must be covered with straw or soft sawdust in order to increase the level of heat inside the house and protect the birds from various diseases.

Roof
Now we need to make a framing grille for the roof. As a coating, you can use any material, the main thing is to make hydro and thermal insulation to avoid the penetration of wind and rain.

Window
The well-being of the pigeons and the heating of the room also depend on the correct placement of the windows. By placing the windows on the east and south sides of the building, you will give your feathered wards a lot of light and warmth.

Walking area
We are building a tap hole. This element of the building looks like a small platform on which pigeons can land and take off from it.

Now you need to build the walking area itself. It is usually made from fine mesh metal mesh. It will be good if the size of the walking area matches the side of the roof on which it is located. The floor area of the walking area can be covered with thin sheets of plywood directly over the mesh.

So that in the summertime the pigeons can fly out for walks, make another entrance outside the walking area.
Prices for a mesh netting for fencing a dovecote
Rabitz
Ventilation
One of the conditions for the healthy keeping of any bird is good ventilation of the premises. The least costly way of arranging the ventilation system is an additional mesh door to the room, which is attached after the wooden one from the inside of the room. When it gets hot in the house, swing open the wooden door to let in fresh air.

An additional fine-mesh metal mesh door is the easiest way to ventilate a room
It will not interfere with the arrangement of the hood on the ceiling of the dovecote, which, along with cooling, will take away excess moisture, as well as unpleasant odors.
To keep the air inside the house always fresh, arrange one or two small barred windows at floor level.
Heating
According to the recommendations of experienced farmers, heating in the dovecote is not worth it, but you need to take care of the pets and seal all the cracks, as well as insulate the floors. In autumn and winter, it is necessary to constantly change the insulating bedding inside the house to avoid it becoming damp.
There is a trick. In cold weather, reaching -40 degrees or more, pour warm pigeons, and not cold water drinkers and feed them nutritious food. These folk wisdom, in combination with high-quality finishing of the premises, solve the problem with heating.

![]()
Internal construction works
After the external construction work is completed, you can proceed to the internal ones.
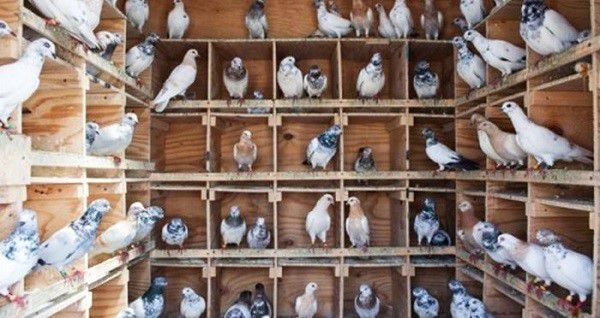
We design perches
At a distance of at least 30 centimeters from the ceiling, we place long bars, about 4-5 centimeters wide, and equip them with bumpers made of thin-walled slats. Such perches are usually placed in rows going down. Now it is necessary to divide the perches into equal sections - nests. They resemble boxes in shape. Each cell is separated from neighboring cells by walls.


The approximate parameters of each socket will be as follows:
- width - 40 centimeters;
- height - 35 centimeters;
- length - 75 centimeters.
To save money, you can build boxes specified parameters from plywood, and place them in a row on top of each other. And move the perches to the opposite side of the poultry house.


Pigeon nest prices
Nest for pigeons Ø23 cm
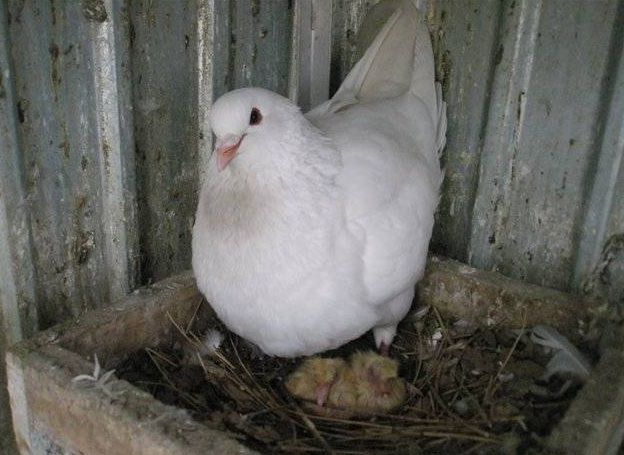
In addition to the construction of the nests themselves, it is necessary to provide the birds with bedding, however, do not lay it in the boxes yourself. The fact is that pigeons approach the floor of the nest creatively, choosing the softest straw and the most comfortable twig. Just leave the following materials for them on the floor of the dovecote:
- hay;
- straw;
- small branches.
If you want to breed pigeons and have your birds lay eggs, you will need nests. What should be the correct nests? What can you make a nest with your own hands? Read about it in. Step-by-step instructions, photos, videos.
Drinking bowls and feeders
It is best to equip the pigeon house with drinkers and feeders that dispense the contents automatically, without human intervention. Their number is determined depending on the size of the bird population. However, add some old style feeders to fill them with mineral feed.
A correctly assembled feeder is the convenience of the pigeons and the economy of the owner. Read on to learn how to make a DIY pigeon feeder. Requirements for feeders and their parameters, how to choose materials for feeders and drinkers, step-by-step instruction... Autodrinker heated.


For adult pigeons and young animals, separate drinkers and feeders are installed in different sections of the room.

![]()
Tower dovecote: step by step instructions
We start building a tower dovecote.
Step 1. We install wooden support posts in the shape of a square, each side of which is 1.5 meters. The height of each log is 2.5 meters, 0.5 of which are dug into the ground.
Step 2. Having measured about 1.5 meters from the ground, we connect the pillars to each other with fasteners made of wooden beams in order to increase the level of rigidity and stability of the structure. The parameters of the bar are 100x100 millimeters.

Step 3. We also connect the upper ends of the wooden posts installed by us with a frame made of timber, each side of which is 2 meters. We carefully fix all the joints of the parts and fasten to each other with bolts and nails.
Step 4. We lay a wooden plank on the resulting frame. This is the future floor of the dovecote, which we then cover with a soft bedding. It is better to grind the boards before laying them on the floor, so you minimize the chance of splinters in the delicate pigeon legs.

Step 5. At the corners of the resulting platform, we install frame pillars, the height of which is 1.5 - 1.75 meters. On top of the resulting "skeleton" we put another frame made of 100x100 timber.
Step 6. We line the upper frame with a plank, like a floor. This is our ceiling. Now you need to install the roof of the building. She may be:
- single-slope;
- gable;
- hipped.
The roof is protected from precipitation by sheets of roofing iron, which is firmly laid on top. Then, the attic space is putty and insulated in any convenient way.

Step 7. The side posts are sheathed with fine-mesh metal mesh. On the one hand, a snap-on transom is installed in it, with parameters of about 50x50 centimeters.
Step 8. Inside the site, a second room is installed - a deaf box made of boards, between the floor and the ceiling. On one side of the box, a door is mounted so that the owner can visit his wards. On one side of the box, nests and perches are installed in a row, according to the instructions from the attic arrangement.

Step 9. At a height of 1.2 meters, entrances for pigeons are made, in the form of a small window-arch, with a base width of 20-12 centimeters. The holes are small but frequent, so there will be enough for all your livestock.
Step 10. In order to extend the daylight hours for your birds, it is recommended to supply electricity to the turret and install a lamp or several lamps under the ceiling.

Step 11. A ladder is attached to the floor of the building from the ground, which can also be assembled independently from:
- 2 thick boards;
- sawn short planks set at a slight angle.
It leads to a hatch, which must be installed in the floor of the platform in order to periodically visit your feathered pets.
Step 12. A closable pipe is installed on the roof as an additional ventilation element. Shutters should also be prepared for the entrances, similar to human country houses, in order to close them in case of severe frosts.

Let's summarize
As you can see, every farmer who has a little knowledge of construction tools will be able to equip a feeder, absolutely without resorting to the help of professional builders.
According to the scheme for constructing an attic for pigeons described in the article, you can rebuild a dovecote from scratch, without using the finished first floor as a basis.

When choosing materials for construction, remember that the health of your wards and their offspring depends on their quality. Puttying and insulation are mandatory elements of construction work, because pigeons react most sensitively to drafts and high humidity.
Video - Do-it-yourself dovecote
Recently I was asked how to make a pigeon mask. Let's face it, it's not an easy question. The Internet is full of photographs of factory-made pigeon masks of something like this:
Well, I must admit - the similarities are very convincing. But, looking at these masks, I realized that I would not build such a structure either from paper (cardboard) or fabric. And there is no need - a mask-bag on the head with two holes for the eyes should be insanely inconvenient in practical terms.
How then? Well, let's try the same principle as. But it is necessary to introduce specific pigeon features.

What do we see? - A very convex forehead overhanging the eyes and giving the impression of sullenness and a slightly hooked beak with a white wax at the base.
At the first stage, we will try to make a powerful forehead. Let the pattern be like this. This is in relation to A4 sheet:


This is exactly what will ensure the bulge of the forehead:

Now we will start and glue the darts on the forehead and glue the triangular inserts on the temples:

The base of the mask is ready.

It's time to decorate it with a beak. The pattern will be like this:

The odd fringed piece will serve to connect the halves of the beak from the inside at the bend. We glue it like this:

Glue the finished beak into the nose armhole, putting the side valves on the wrong side.

At this stage, it is very important to ensure that the mask is symmetrical.
Let's try it on the face - the view is quite birdlike. And how to make wax over the beak?

Well, I cut a cotton pad in half and pasted both of these parts on the bridge of the mask - it turned out quite voluminous.

Let's paint in large black nostrils - and here's the mask of a white dove.
But those pigeons that we see in the city are gray. If you need certainty, paint the mask a bluish-grayish color. You can even purple - the audience will easily accept this convention.

In the picture, I also painted on orange eyes - the view became one hundred percent pigeon. But in practice, I do not recommend sticking such decorations into the eye slits - they will greatly narrow the field of view. In general, do as you like. I myself prefer the white version - a kind of dove of peace.
Among all paper crafts, one of the most popular is the dove, which personifies the desire for a peaceful existence. Doves can be used to decorate a room or as a child's toy; modules and garlands of large and small pigeons look no less attractive. To make a bird of peace using any technique you will not need much time - 10-15 minutes will be enough.
Do you know what methods of making paper pigeons are there?
A dove can be made from corrugated paper, from napkins, cut according to the template and glue. It will be easiest for children to cope with the application.

Craft materials
In order to make a pigeon, you need medium-weight paper. You can buy one specially designed for creativity or take regular office sheets. The pigeon will look good in both glossy and matte paper. Children will love colored paper doves, which can be decorated with beads, ribbons, glitter glue or sequins. Watercolor paper or square origami sheets work well.

Advice
Sometimes pigeons are used to make a beautiful decorative element, reminiscent of a "dream catcher". To do this, the birds are attached to strings and hung from a hoop.
- We'll need a square piece of paper. We bend it diagonally so that we get an isosceles triangle.
- Fold the triangle in half again, then again, with the upper layer wrapped in one direction, the lower in the other.
- We bend the top of the resulting triangle to its base on one side, then on the other.
- Expand the triangle. If you did everything correctly, you will see folds inside the shape.
- Fold the triangle in half, and wrap its upper part inward along the folds. We do this on both sides.
- Bend the wings of the bird up.
- To form the beak from the side of the wings, bend the corner of the triangle downward, and then turn it outward. The dove's beak is ready.
- Bend the tail down from the side opposite to the beak. You should have a blank that looks like a kite on top.
- Around the tail, bend one half inward, then the other.
- The dove is ready.

Conclusion:
Even a child can make a beautiful dove out of paper. The main thing is to consistently perform manipulations and the bird using the origami technique will be ready. It remains only to decorate it - you can draw eyes or put a green twig in the beak.
Paper dove
How to make a paper dove
Paper dove using origami technique 10/08/2017
Creation paper crafts, especially with children, this is a great way to diversify any holiday. A child's birthday, Valentine's day or a wedding - a light and elegant paper souvenir will add a sense of solemnity and joy everywhere.
How to make a paper dove - a simple description
In modern culture, the white dove symbolizes peace, love and purity. Thanks to the biblical myth of Noah, where a dove brought a twig, signifying the end of the flood, the white dove is also considered a symbol of good news. The newlywed couple is also often depicted as a pair of white doves. In a word, this bird reminds of peace and quiet, so the dove-shaped craft will be an excellent decoration for any holiday. Consider a few simple options on how to make paper pigeons using available materials.
Volumetric dove from a cardboard template
1 - You need to print ready-made template on cardboard (or just thick paper), and accurately cut out all the details on it: head, torso, wings and tail.
2 - Along the dotted lines, you need to make additional cuts to simulate the details of the wings and tail.
3 - The body of the bird, the main part of the template, should be folded along the central dotted line.
4 - Now you need to glue the existing parts, attach the wings and tuft, and then straighten the figure so that it looks more voluminous.
5 - If your pigeon is supposed to soar in the air, in the center of the body it is worth stretching a thin white thread for which the bird will be suspended from the ceiling.
How to make a paper pigeon using regular napkins
Very simple craft, available to manufacture even a child. On a background sheet of paper or cardboard, a dove figure is created, the illusion of volume is given to it with the help of paper napkins.
1 - First, a background sheet of cardboard is selected suitable color, on which the outline of the dove is drawn, as well as other images required by the author's idea. Can use background white, but then you have to paint it.
2 - Prepare napkins that will create volume for the figure. To do this, you need to cut many small squares, about 1-2 centimeters in diameter, and roll them all into balls.
3 - When a sufficient number of balls have been prepared, apply a layer of glue to the background cardboard, respecting the area already marked by the pigeon figure.
4 - The contour of the pigeon smeared with glue is immediately pasted over with balls of napkins, and, to enhance the effect of volume, the layer may be uneven.
Combined paper doves
Now let's see how to make paper pigeons, choosing a slightly more complex option that combines several different techniques, as well as the use of a variety of materials. Let's make a dove, with a body made of a fluffy pom-pom, the material of which will be woolen threads.
1 - First, using the ready-made and printed template, cut out the outlines of all the details of the bird, getting two main elements - the body with the tail and wings and the head.
2 - From thick cardboard, make a blank for making a thread pompom. The workpiece consists of two cardboard circles, about 10 centimeters in diameter, in which holes are made for winding the thread.
3 - Now we are preparing a fluffy pompom. A thread is inserted between two cardboard circles, which is wound until a pompom blank of the desired size is obtained. Then the thread is cut from the outer edge, and those ends that were from the inside of the circles should be tightly tied to prevent its "self-dissolution".
4 - Alternatively, the inner ends of the threads may not be cut, but tied together. In this case, with the help of large knots, a kind of paws will be created.
5 - Assembling the model: the previously cut head and body with tail and wings are glued to the resulting volumetric pompom.
How to make paper doves that look truly memorable
How to make a paper dove to really impress your home party? There are even more sophisticated techniques for this. Of course, such methods will require certain skills, as well as time to learn them. Consider for example volumetric applique- quilling. You can learn this technique by watching numerous master classes. The basis of quilling is the use of rolled paper blanks (or, as one of the options, napkins), giving the appliqué a three-dimensional effect. Especially for this type of crafts, special corrugated paper is also produced.
When making crafts using the quilling technique, first a cardboard blank is used, on which silhouettes of pigeons are placed, cut along the finished contour. After that, additional details such as feathers for the wings and tail. It is these details that give the quilling its impressive volume.
Prepared volumetric parts are attached to a cardboard blank using glue or double-sided tape. The resulting applique can be further decorated by painting the background, adding clouds, sun or flowers.
With a little imagination, you can come up with independent options for the crafts listed here. For example, a combination of two doves, made in any way, is useful for decorating a wedding hall, or for decoration original postcard for Valentine's Day. For such cases, you can use red or pink paper as a base.
To decorate large festive spaces, you can use even more paper doves, connected in garlands of various lengths.
There is also a classic Japanese technique for making paper crafts, known to everyone by origami. This technique originated over 1000 years ago, and in our time has developed into a separate field of art. You can get acquainted with origami by watching the numerous video tutorials that exist online. A feature of origami is the variety of existing crafts, including models that are available even to beginners.
Trying to find new ideas interesting activities with child? A paper craft can be done with your baby if you choose an easy method of work. Make unusual decorations... Teach kids new skills. This is a necessary, wonderful and exciting chance to spend time. So how to make a paper dove?
The main types of application "Dove"
Such a paper craft can be made in different ways: from a glued flat pattern. With large parts created by folding and gluing auxiliary elements (ponytail, wings). Made of material with a textured surface created from napkins. From details in quilling technology. As you have already noticed, there is far more than one method of creating a product. Small children can also cope with the first if you give them a cut out template. The latter method is suitable for an older child or for working together with parents.
Using paper birds
If you approach work with joy and good mood, will come out quite an interesting application "Dove" from paper. You can independently make a postcard, a beautiful panel for decorating an apartment, a simple box decor using this idea. What holidays is it worth making this beautiful bird:
- The theme can be suitable both for decorating congratulations for the Defender of the Fatherland Day, and, for example, for Mother's Day.
- A bird in the form of an addition to a bunch of roses can also appear on a postcard for the sweet holiday of March Eighth.
- At home, you can give a child this type of work to create a present for someone from the family or for your friends at a wedding.
These paper birds - symbolize peace, goodness and love - they can decorate any celebration.

Materials and fixtures
Before going to work, you should always be well prepared. To create a beautiful bird, you need to take the following:
- White paper.
- Napkins.
- Pencil and washing machine.
- Sharp scissors.
- Gun with glue.
- Sample.
To work in quilling technology, you will need to take stripes about five mm wide, as well as a device for twisting them. For this task, you can take a knitting needle, toothpick, or something similar. It turns out that there is nothing difficult, so the work can be safely entrusted to your child. All you need to do is find templates - make an outline or print a picture.

Simple option
Now it will be disassembled, a master class on creating a simple pigeon. The easiest way to create a bird can be created in the following way.: Take a sheet of white or multi-colored cardboard or paper in the form of a base (background).
Leave it flat, or try folding it into a folding card. Prepare by any method, patterns of birds made of white cardboard. Stick the birds onto the base.
Picture or glue beautiful eyes and a beak, you can also glue a part of the wings or tail on top. It is good to decorate such a craft with ordinary flowers, the image of the earth, children's palms or people holding the handles.
For an older child, you can complicate the work: Take napkins and tear them into small pieces. The smaller the pieces, the more interesting the applique will come out. Place all material in a plate or similar container and add some water. When the napkins are wet, wring out the unnecessary and add simple glue to the material. Stick the paper products onto the dove template you cut out earlier.
After drying, the surface of the product will become textured and slightly voluminous. Thus, you can even create something similar to the relief, showing the shape of the wings. By this principle, it is easy to work with crumpled material.
Volumetric pigeon
To make such a bird, use one of the methods shown below.
Method # 1 starts with the following: Take the pigeon template. Make different squares out of white napkins (choose the size yourself so that they fit the size of the pigeon). Twist the made parts in the form of cone-shaped bags. To do this, you can use a simple pencil. Dip thin parts of the product in the glue so that the napkin does not get wet, and stick to the surface of the product. After completing all the actions, you will have a bird with a very cute openwork plumage.
Method number 2 is to prepare or make with your own hands the desired bird pattern, from which you can make the whole shape, and then, using the folds of the elements, make a voluminous bird.
The surface of such a craft can be easily decorated with any of the methods discussed above. To make a more lively craft, make individual plumage elements in the form of scales out of paper. Stick them all over the product. On the wing, the elements may be larger, on the sternum and trunk - small. This option is, of course, quite difficult, but older children can cope with it.
Application "bird" made of cardboard different ways... Choose the correct method according to the age of the children and their ability to work with crafts. Do different jobs with the guys and teach them something new.
Templates for work
 To quickly make a dove out of paper, cutting templates will come in very handy. The first image below shows the lightest version of the bird drawing. Such a craft can be perfectly taken for children's entertainment with the smallest kids. The form is light here, and it will not be difficult to fill it with a mass of material.
 The second picture shows a paper dove, volumetric template... You can work with the second template, both for creating children's leisure time, and for decorating a wedding celebration. For children, you can cut out auxiliary parts that will repeat the shape of the wing and tail. The parts glued with the auxiliary layer will give the effect of relief to the craft. Many people think about how to correctly make a dove out of paper with their own hands. Bird patterns and silhouette help you create any craft and make your work easier.
Attention, only TODAY!


