Knitted products are always exclusive and in a single copy, since even the same craftswoman will not be able to make a copy and repeat exactly the drawing of a hand-made item. We also love them because they are warm in winter and not hot in summer. Scarves, hats, mittens, socks, sweaters, pullovers are knitted. Light things, such as weightless dresses, fishnet tops, interesting skirts, are made with a simple tool - crochet. In all knitted products, regardless of the tool used, the edges are necessarily processed. This article provides answers to questions about why to handle edges and how to crochet the neckline.
What else can the hook do
Products, crocheted, find their application in interior design, with their help a unique cosiness is created. For example, openwork napkins will decorate festive table, especially if the tablecloth is made using the same technique. Ordinary sofa cushions can be transformed into a masterpiece of art by simply wearing the fillet pillowcase. Finally, decorating the window with graceful crocheted viscose yarn can be eye-catching and chic to the room.
Why process the edges of your products?
And how to crochet the neckline? If you made a summer pullover, top or other item, you need to give it a complete look. Crocheting the neck, bottom, armholes, sleeves will give additional rigidity, the edges will not twist, the integrity of the form will be preserved. It should also be remembered that the thing will take on a stylized and aesthetic appearance only if one processing technique is used.
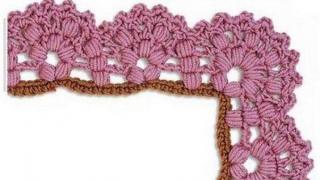
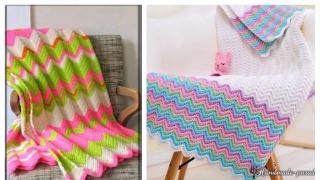
The edging of the product can be performed continuously, that is, starting from the bottom of one edge and ending with it, while the neck is also processed (see the first photo). The second way to tie the neckline is to work it out separately from the bottom (pay attention to the second photo).

Where to start with neck strapping?
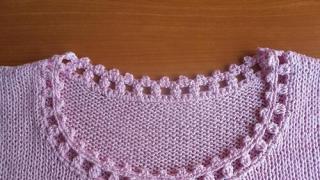
Knitting is a simple science, and even a teenager can master it, especially if he has a mother who is a craftswoman. For training, you will need thick threads and an appropriate hook - this will facilitate the tasks, and you will be able to clearly see your efforts. It is better for novice craftswomen to start with making samples, they will help to master the technique, then you can already apply the knowledge gained in practice. For example, crocheting the neckline on the finished product is already within the power of novice craftsmen. To process the neck openwork blouse, for example, single crochet, you need to learn how to create an even canvas. Look at the third image, in it you can see a sample made in this technique.
How to knit a single crochet pattern?
- We start work with air loops, of which you can dial about 20 pieces.
- Then we knit in single crochet from right to left.

After the air loops are typed, we begin to knit the first row. We direct the hook under the third loop, the loop on the hook is counted (insert the hook under two threads, one remains at the bottom), then grab the thread and pull it out of this loop. There are two threads on the hook, again grab the thread and pull it out of these two loops at once. You can assume that two single crochets are already ready. Crocheting the neckline continues in the same way as it began, only the hook "dives" into each loop. So continue to the end of the row.
Begin the second row and subsequent ones with an air loop. Then we turn the knitting and continue in the same spirit, not forgetting that the hook is inserted under the two threads of the base. (Each loop has two threads - front and back, here you need to guide the hook under both). You should end up with an even rectangle or square.
Tying the neck with single crochet
The sample is ready, after that you can already take the necessary threads and knit the neck of the product. The color can be chosen in contrast or to match the thing. Crocheting the neckline (you see the diagrams for it below) begins by inserting the tool directly into the canvas with front side away from you, the thread is grabbed and pulled out. A loop is formed on the hook, then it is grabbed again and sent to this loop. This is how the first row is knitted on the product, the second and subsequent ones are knitted with single crochet columns. The difference from the sample is that you do not need to dial air loops.
Look at the finished product (fourth photo). The shape here is round with close fitting, with a gradual decrease in loops. To make the loops smaller, it is necessary to alternate the single crochets with the connecting ones. Do the work in a circle, make sure that the knitting is even. Try on the garment, then fasten the thread like this: air loop and trim the thread, then pull it. For the fortress, you can additionally sew it.
Connecting post: the hook is guided into the loop of the previous row. Grab the thread and pull it through the loop that is on the hook.

Tying the neck with knots
Let's continue learning how to crochet. The neck strapping will be a little more complicated by adding a decorative element to the already familiar technique. A beautiful strapping of the neck is obtained when knitting with single crochet ends in knots. To do this, you need to process the edge several times with single crochets (see the technique above). The number of rows depends on how wide you want the edging. Finish the last row with knots. So, let's start creating. Photo # 5 shows a diagram and a sample. On it, dots indicate air loops, the letter "t" - single crochet, triangles - knots.

We combine three air loops with a connecting column with the first loop - we get a knot. (How the connecting post is made was described above). Then, after three or four loops of the single crochet of the previous row, we again do it. We continue in the same way. Nothing complicated!
Technique of the "crustacean step"
Neck processing can be performed using an interesting "crustacean step" technique. The canvas is processed in the opposite direction, that is, from left to right, as if a cancer is backing away. Knitting is based on single crochet, with which the fabric is previously knitted, and the last row ends with this technique. Without turning the material, they knit single crochet: the hook is sent away from itself into the first loop, then the main thread is captured and pulled out through two loops over the work. You should get a ribbed edge - a "trail of cancer".
Finishing of the neck with a "flag"
Crocheting the neckline, the diagrams of which are below, can begin separately from the product. There are various finishes that are used to trim the edges of clothing or to decorate other items such as curtains, tablecloths. They are made according to schemes, then they are tied or sewn to the finished product. You can finish the bottom of the dress, sleeves with this edging; in our case, crochet trimming with a "flag" trim will be made.

So, a chain of air loops is typed, then a row or more is knitted with single crochet, only after that you can start creating an elegant decoration. It fits like this.
Two chain stitches, one double crochet on the third single crochet of the previous row, two chain stitches, three double crochets on a double crochet that has just been tied, wrapping around it three times. We continue in the same way.
In front of the double crochet, two air loops are always made, then the column is tied: yarn over the hook, direct the hook into the third loop of the base, pull out the working thread through this loop, grab the thread and pull it out through the loop and yarn. We grab the thread again and pull it through the two loops that remain on the hook. The result is a double crochet.
After these manipulations, we got a finished finish, now it can be sewn on or tied to the finished product. Crocheting will become your favorite pastime, as it is one of the most interesting areas of needlework.
Each of us has a favorite thing that seems to be out of fashion, but we don't want to get rid of it at all. Fortunately, there is good way update it - crochet the neckline. In this article, we will present several good advice for experienced craftswomen who know how to work with knitting tools, as well as tell for beginners, how to crochet the neckline.
Anyone who has never crocheted before should first practice, and only then start creating a strapping:
- Cast on a chain of about twenty loops (although 10 will suffice for training).
- Tie several rows of six single crochet stitches (without crochet). It is advisable to stick to the direction - from right to left.
- The subsequent rows need to begin to start differently from the first. Knit should be from air stitches.
- Place the hook under the third loop (you need to grab the thread and then pull it out).
- The resulting loops (there should be two of them) must be tied together.
As a result, you should have such an even canvas:

Now let's figure out how crochet a square neck sweaters:
- Place the hook where the shoulder seam area starts
- Hook the thread and pull it out (this is how you need to create air loops around the edge of the product)
This is the simplest crochet square neck strapping scheme:

An example of how to crochet the neckline of a dress?
You can decorate your favorite dress with an original harness. There are two common methods that craftswomen are used to using:
- "Rachin 'step"

- Lace

Let's figure it out first, how to crochet the neckline using the "Rachy step" method:
- Take a long thread (it should be several times longer, 10 times longer than the edge of the neck)
- Attach one end of the thread to the edge of the shoulder seam.
- Next, we make a regular loop (air)
- You need to put a hook under this loop to pick up the thread and pull it out.
- The resulting loops are tied into one piece
- As a result, only one loop should remain (with it you need to start the knitting process from the very beginning)
Here are a couple of indicative schemes for beginners, which will help learn how to tie the neckline using the crochet hook method"Rachy step":


A beautiful way to tie the neck using a crochet hook according to the "Lace" pattern:
- 1 - knit with simple loops (you should get an "air" chain of ordinary loops)
- 2 - we knit a chain consisting of three columns b / n and terkh air loops (they should alternate in turn)
- 3 - we knit a chain consisting of two s / n columns (with a crochet) and two air loops (they should alternate in turn)
- 4 - we knit a regular chain, as in the first row
- 5 - we knit a chain of 4 regular columns, which need to be completed with 1 column of s / n
- 6 - we knit a chain consisting of 1 column with two crochets and 1 column s / n (these loops should alternate with each other along the length of the entire row)
- 7 - we knit a chain consisting of one column with two crochets and 1 air loop (the alternation is repeated)
- 8 - we knit a chain with 1 column with two crochets and 3 air loops (again the loops alternate in turn)

An example of how to crochet the neck of a sweater?
V recent times Pullovers have become very fashionable - knitted jumpers, which are worn mainly by women. Therefore, for many, the topic may be relevant, how beautifully crochet the neck of a half-faith. We offer you several options:
- Crochet neckline crochet
- 1 - we knit a chain from one column b / n and from an air loop (loops alternate)
- 2 - completely knitted from s / n posts
- Subsequent rows must be repeated one by one.


- Crocheting the v-neck using a crochet crochet pattern
- 1-3 - knit with columns b / n
- 4-6 - we knit only with regular loops (air)
- 7-9 - we knit like the first three rows with columns b / n
- 10-12- we knit from 4 columns b / n and 3 air loops (they should alternate with each other)


An example of how to crochet the neckline of a vest?
Vests look very nice, the cutouts of which are crocheted with an openwork pattern.
- 1- fits for crochet neck strapping with single crochet
- 2 - knits from 3 air loops, one s / n loop, 2 air loops, one s / n loop and 7 air loops
- 3 - for crocheting the edge of the neck fits like this: 1 column b / n, 4 air loops - so to the end of the row
- 4 - knits according to the second row pattern
- 5 - knits according to the third row pattern
- 6 - knits according to the scheme of the fourth row
- 7 - knits according to the pattern of the fifth row
- 8 - knits from 3 air loops, 1 s / n loop, 2 air loops, one s / n loop;
- 9 - knits from 4 columns b / n, pico, 4 columns b / n, pico, 3 columns b / n, pico, 3 columns b / n


You can also crochet the cutout of the vest with a trim. For this you need:
- In the first row, you need to make 6 single crochets
- The second row is knitted like this - 1 single crochet, 2 air loops, 4 double crochets, 2 air loops

It turns out a very beautiful border, which outwardly resembles graceful lace.
Crochet hooks for different types of necks


Do not rush to say goodbye to a thing that has worn out. Get creative, get creative and DIY a beautiful neck tie for your old sweater or dress. Sometimes handicrafts can donate things new life... We hope that the patterns and crochet options presented in this article will be useful to you in your work, because they can be mastered even by those who have never held knitting tools in their hands before.
Video: "How to crochet the neckline?"
Any knitted product, be it a blouse or a dress, has a cutout that needs processing.
Knitting with needles
Most novice needlewomen have a question: "How to tie the neck?" The neck with knitting needles can be of various types. The most common are round and V-shaped.
V-shaped neckline
Neck knitting patternLet's take a closer look at the V-shaped cutout. This method of processing is universal and, at first glance, seems very simple, but it is worth adding a weave of braids or loops of a different type, for example, if the pattern is based on the front, then we add the purl, and vice versa, as a result we get an interesting, elegant model.
So, the neck with knitting needles is created from two steps: the first is the decrease, the second is the inlay.
Subtraction for V-notch
It is necessary to determine the center of the back or front by dividing the total number of loops by two. If there is an odd number, then it is recommended to remove the middle one on a temporary loop using an additional knitting needle. Further, from the middle of the product, we begin to decrease on both sides, forming bevels.
This is the general principle of making the neck with knitting needles, on which all types of reductions are based.
 Knitting a V-neck with a medium loop
 The types of subtractions are:
- Simple. It is carried out directly at the edge of the bevel of the product. In every fourth row, we knit two loops together with the front one: for the right half - at the end of the row, taking into account the slope to the right; for the left - at the beginning by tilting to the left.
The set of loops for tying the inlay will be complicated, and the result will be a little upsetting, it will turn out not quite neatly. Therefore, the following form is recommended.
- Execution with some deviation from the edge. The result is sharper and more pleasing cutout edges. We perform the reduction by stepping back several loops from the edge of the bevel, in every fourth row. For the right half: knit a row, leaving the last four loops, then knit together two and one front, hem, taking into account the slope to the right. Left half: knit an edge, one front, then knit two loops together with a tilt to the left.

- Execution with a pattern passing through the center of the product. For example, the front loops of the rhombus, going along the edge of the bevel, give an uncomplicated and at the same time interesting decrease. Or, for example, you can use braids along the edge of the bevel as a continuation of the main pattern. Depending on the originality of the pattern, the trim for the neckline may not be needed when using this type of reduction.
V-Neck Trims
With the help of the decrease, we got a cutout with an angle in the center of the product, which we need for the further stage of processing the neckline - knitting the edging.
 V-Neck Trims
 - A widely used method is tying along the edge of the cutout, having previously typed the loops on additional knitting needles. We start knitting from the neck of the middle of the product. We carry out the binding with an elastic band of a certain width, adding one loop at the beginning and at the end of every second row. We connect the binding with the ends and sew to the edge.
- You can decrease the loops in the center of the front, then you get a symmetrical binding. To do this, we collect an even number of loops, knit in a circle with an elastic band, knitting two loops together in every second row, taking into account the slope of the half. With this method, the center of the inlay does not look so beautiful, so the following is recommended.
- In every second row we knit with an elastic band, leaving one in front of the middle one, then we remove two as front ones, the next one needs to be tied according to the pattern and two removed through it.
- To get a bake with a two-by-two elastic band, two front loops must be tied in the center of the front. In every second row, we leave one loop in front of the two middle ones, then we knit two together with the front one, the next two we knit according to the pattern, taking into account the side of the slope.
- If the decrease was selected relief pattern, then the processing of the edge should be barely noticeable, you can knit an elastic band with a width of one row.
Cutout shape finishing
The finishing of the cutout shape plays an important role in the creation of the model, as the top of the garment is usually more visible and helps to complete the image of the person. That is why you should seriously consider the design and shape of the neck, taking into account the latest fashion trends, the figure, the shape of the neck, in order to favorably emphasize the advantages and hide the shortcomings. V-neck knitting needles ideal for people with short necks. Now you can tie the neckline of your models using the methods above and look pretty.
Who started knitting a sleeveless jacket, haven't quit it yet? Let's finish it.
Knitting to armholes should not cause any questions. Perhaps only a mismatch with the pattern - the canvas is either Narrower than necessary, or wider. Even with the most accurate calculation of the loops, this is quite possible. This does not mean a lack of skill.
Here you need to look: if + or - small - well ... you can leave it as it is. When the Canvas has narrowed, you usually smooth it out with your hands according to the pattern with the thought: "I will stretch it with an iron ...". When the pattern is wider it turns out: “Ah! I'll sew more on the sides! " Do not count how much during my knitting age I have dismissed almost finished products, hoping to stretch and sew like this. Believe me, all craftswomen are faced with this. It is better to eliminate the error at the very beginning.
Our armhole is rectangular. Having tied the last row of the fabric, you can "crawl" up to the beginning of the armhole with connecting loops (Fig. 1), make a rise and knit a row to the beginning of the armhole at the opposite end. You can also just break the thread by tightening the knot and tie it to the beginning of the row along the armhole line (fig. 2). As you prefer.
Having tied to the line of the beginning of the neckline (it does not matter - it will be rounded or, as in our pattern, V-shaped), we mark the middle of the canvas with a colored thread or a pin (Fig. 3). Moreover, the middle is determined not just by folding the canvas in half, but by counting the loops. You need to do everything exactly. After that, knit the right and left parts separately.
Decreasing the columns when knitting does not have to be done in each row, the pattern should dictate the frequency of the decreases. Here, the entire arsenal of what we already know is used: double crochets and without, connecting and air loops. It is necessary to learn how to knit such more columns - with a common top. In the diagrams, they are usually indicated as Λ with transverse sticks indicating the number of yarns. It is they who are necessary when decreasing our V-shaped gate. In the video, they fit in three, but we will need two together.
In short, you need to knit anything you want, so that the edge exactly matches the pattern (Fig. 4). It is impossible to explain something here once and for all. Achieved only by trial and error. If the knitting pattern is very complex, then a couple of the last or first loops associated with decreasing will not break it. If the canvas is knitted with simple columns, everything is much simpler.
Mandatory rule: each row begins and ends with attachment to the pattern. My assistant at this stage of work is a low children's table, on which everything can be laid out without any problems.
If knitting, when decreasing, behaves as in fig. 5, this means that the decrease is not enough. And if so, as in fig. 6, - you need to subtract less often.
Having knitted one part to the shoulder, we cut off the thread and tie it, as in Fig. 7, i.e. as if we continue to knit the interrupted row in the same direction. Otherwise, it will turn out that the same row will be connected "towards each other", then one half of it on the front of the canvas will be the wrong side.
The collar on the back will be rounded. Better than in the videos, it is impossible to explain. It doesn't matter how deep the gate is. The principle of knitting is one. Don't be confused by the fact that in the second video we are talking about a round armhole.
When the back and front are connected, you will need to sew them along the shoulder seams.
The next lesson is about this and about filling the armholes with strapping.
.JPG)
.JPG)
.JPG)
.JPG)
.JPG)
.JPG)
.JPG)
Learn to knit V-neck
This kind of neckline is for knitted products is unlikely to go out of style. It is used for knitting sports and sophisticated models for men, women and children. You can wear a model with such a cut over a blouse or just on the body, beautifully knit a scarf that is well-matched to the model.
For a V-shaped cut, the loops are divided in the middle and bevels are formed on both sides from the middle with the help of decreases. With an odd number of loops, close the middle loop or leave it temporarily (see the red ring in photo 3).
Simple decreases are performed directly at the edge, for this one loop is pulled through the other (of which 1 chrome.). For the right half of the work in every 4th p. knit a row, except for the last 2 sts, then knit these 2 sts together with the front one (photo 1). For the left half of the work, knit the first 2 points together with a tilt to the left, that is, remove the 1st point as the front one, knit the second point with the front one and stretch it through the removed loop, then continue knitting with the main pattern (photo 1 ).
It is not so easy to type on the binding stitches around such edges. Therefore, the 2nd method is recommended, in which the decreases are noticeable, since they are performed at a distance of one or more loops from the edge. For the right half of the work in every 4th p. knit a row, except for the last 4 sts, then knit 2 stitches together with the front one, finish with 1 front and edge stitches (photo 2).
For the left half of the work, start with an edge and 1 front loop, then knit 2 stitches together with a tilt to the left, as described above, then continue knitting with the main pattern (photo 2). An inclined track is formed between the main pattern and the edge. Decreases made with some interval from the edge may have a slope of the loops towards the bevel, then they are a decorative design of the cutout. In this case, knit, as in the previous version, but 2 sts, knitted together with the front, and 2 sts, knitted with a tilt to the left, are interchanged (photo 3). When knitting with some patterns, such as semi-patent or patent elastic bands, the cut is not formed with simple decreases, because they fall alternately on the front or purl loop.
Decreases for V-notch
In this case, it is recommended to perform double reductions, which are made not in every 4th, but in every 8th p. In photo 4, the part is made with a semi-patent elastic band. For the right half of the work, knit all the loops of the row, except for the last 6 sts, then knit 3 sts together (= 1 double decrease), finish the row with 2 sts of semi-patent elastic and edging. For the left half, start with an edging and 2 sts of a semi-patent elastic, then make a double decrease, i.e. remove 1 st as the front one, knit 2 sts together and pull the removed loop through the knitted one (photo 4). If there is a pattern motif in the middle of the knitted part, it is recommended to use it for the V-neck.
For example, the two oblique front loops of the rhombus serve as the edge of the V-notch (Photo 5). The middle "braid" continues on both sides along the bevels of the cutout (Photo 6). Symmetrical middle motif of white pullover from page 23 at the beginning of the V-neck is divided into 2 parts that continue on both sides of the neckline. Decreases in this model are performed at a distance of 27 points from the edge.
V-Neck Trims
When knitting a binding, a corner should be formed in the middle of the front. There is a very simple way to knit the inlay. Cast on circular or flexible knitting needles along the edge of the cutout (start and finish in the middle of the front) and knit the tape with an elastic band (alternately 1 front, 1 purl) in rows in forward and backward directions to the desired width.
In every 2nd p. at the beginning and at the end of the bake, add 1 p.
Place the ends of the tape on top of each other and sew along the edge of the cutout (photo 7). If the V-neck is deeper and the inlay is wider than in the photo, then the design of the neckline with such an asymmetrical inlay is very effective.
For symmetrical binding, the stitches decrease in the middle of the front. Cast on short circular needles along the edge of the cutout an even number of loops and knit in a circle with an elastic band (alternately 1 front, 1 purl).
In every 2nd p. knit the last 2 sts before the middle of the front together with a tilt to the left, the next 2 sts knit the front together (photo 8). If the middle loop of the main pattern was closed or temporarily left, then it is included in the binding. For the inlay shown in photo 9, in every 2nd p. knit a row of loops with an elastic band, except for 1 st in front of the middle loop, remove the next 2 sts together, as persons. (i.e., insert a knitting needle from left to right, first into the middle, then into the previous loop), knit the next loop in accordance with the pattern and stretch the removed loops through it. If the neckline is made out with a double inlay, then first on the faces. to the side of the bake on the middle loops, they perform decreases, then on the inside. on the side of the bake, also on the middle hinges, there are increases. Knit the trim with decreases, as described above, to the desired width and mark the fold line = purl row. Then, on both sides of the middle loop, increments are performed (knit 1 crossed loop from the broach) in the same rhythm as the decrements, until there is an initial number of loops on the needles, respectively. a double-width binding is tied (photo 10).
If the binding is performed with a 2x2 elastic band (alternately 2 faces. And 2 out.), Then in the middle of the front there should be 2 face loops. In every 2nd p. knit loops, except for 1 point before the middle 2 points, then knit 2 points together with the front one, knit the next 2 points together with a tilt to the left (photo 11).
If the main pattern is embossed, especially along the edge of the cutout, then the processing of the edges should be simple and inconspicuous. Cast on loops along the edge of the cutout, tie 1 p. with an elastic band (alternately 1 person. and 1 out.) and close the loops (photo 12). The pullover from page 23 has an edge tied with st. b / n and pico, emphasizes the romantic openwork pattern.