Admin 2015-06-03 at 3:52 dp
This new article is devoted to the peculiarities of designing collars of various types and cuts, methods of processing them and joining them with the neckline. And with this post I am opening a new section on my blog: 100 collars. I will keep filling it until I describe exactly 100 collars.
I don’t know if I’ll type so much in my memory - well, there is the Internet - I’ll look there. And you, dear reader, will help, if anything. So send your models - I like to understand the designs of clothes.
Today I will describe the first collar - of this kind:
And I’ll tell you how I used perforated glasses for the first time today to improve vision.
So, how many collars are there, their shapes, sizes, processing methods and the number of incoming parts?

Studying the varieties of collars in fashion magazines, catalogs and just samples of finished products, I always pay attention to what determines the shape of the collar:
First, I look at the shape of the collar.
Second, I decide how it connects to the neckline (set-in or one-piece cut).
The third - how the collar fits to the neck - tightly, at some distance, or even flat on the bodice.
And fourth - how the collar is connected with the fastener - is there any at all, the fastener to the top or to the fold of the lapel.
Structurally, the collar most often consists of details of the upper and lower collars, as well as the details of the gasket.
In total, there are several varieties of collar cut: flat-lying with different heights of the stand, set-in stands (vertical and inclined), stand-pieces cut with details of the front and back, shirt collars, collar-collar, turn-down collars with a stand in the middle, and collars for products with an open fastener: jacket collars, shawl collars, apache collars.
A lot, right? We will gradually consider all these constructions in the next articles of this new column of mine.
And now let's start with the simplest collars to design, these are:
Fold-over collars:
This is a collar that completely repeats the shape of the neckline and shoulder area of the product - fold-down flat-lying.
A distinctive feature of this collar is the absence of a stand. That is, the collar lies flat on the figure.
The pattern of such a collar is based on the base of the shelf and back of the product.
The shape of this collar changes depending on the shape of the neckline.
The line where the collar is sewn into the neckline completely follows the contour of the neckline of the product. The detachable part of the collar can have different shapes - rounded or pointed edges, different collar widths.

The fastener in products with such collars can be either on the shelf or on the back. Also, there may be no fasteners at all.

Consider the most common model of such a collar - round or, as it is now called "Peter Pan".

The pattern of such a collar is easier to build than everyone else - immediately based on the neck of the product.
In the drawing, set aside the shelves along the contour of the neckline 6 cm in order to outline the contours of the collar. The contour of the collar departure is rounded to the center of the front neckline with a smooth line. The collar width is usually the same along the entire contour and varies depending on the model. In a children's dress 4 - 5 cm, in a woman's dress or blouse 5 - 6 cm, in a coat 7 - 10 cm or more.
On the back along the contour of the neckline, you also need to set aside the width of the collar, in this case 6 cm. If there is no fastener on the back, then the collar can be with a seam located in the center of the back. If there is a fastener, then the collar on the back is not sewn, but is made out with rounded lines. And thus, two parts of the collar are formed - the left and the right.
The design of the lines of the collar on the back should be done with a closed shoulder dart. This dart can be temporarily closed and transferred to the armhole, or it can be conventionally considered closed by extending the shoulder seam in a straight line from the point of the neck towards the shoulder.
Of course, there should not be a seam along the shoulder line on the collar.
The contour lines of the collar are copied onto a separate sheet of paper, aligned along the shoulder seam and a collar pattern is obtained.
For the collection, I offer several other forms of the neckline, suitable for a flat turn-down collar, without a stand:
The algorithm for constructing the pattern of such collars is simple - we change the neckline according to the model, then draw the collar lines.
Using the open cut as an example, I will again note that the key changes in the neckline are its width and depth. And also the shape of the cutout on the chest - round or y-shaped:
Similarly to the previous model, the neckline of the next dress is formed, but there is also a y-neck on the back. The shape of the ends of the collar also differs - they are not round, but sharp. The width of the collar is curly and gently narrows towards the shoulder.

Detachable collar - decorated with beads and rhinestones.


The neckline is designed in a boat, the right collar piece is superimposed on the left one, and then sewn into the neckline as one piece.

Let's continue the topic of collars in the next article -.
My reader and participant in the training group, Tatiana, sent me an interesting letter. Quote:
“Helen, I see you wearing positive glasses. My mother is over 70 .. in three months she restored her near vision. She has good eyesight in life. So, she is "not a believing Thomas" until she checks herself - she will not believe.
I bought her glasses with perforations, such as with "holes". During this time, she read for an hour a day, looked at something on the Internet and suddenly once again puts on strong glasses, and they smear everything. She went, rubbed them, no result.
I put on other glasses, weak ones that I had not worn for a hundred years - and immediately began to see! Well, it went on. This is already the second person who, in my presence, began to see well up close - "farsighted". And the first grandmother, she is 80 years old, and so she restored her eyesight and reads small letters calmly. The witness herself and it all began with her. And I have myopia and I calmly watch movies in them. So if you're wondering, as they say, this is the first-hand result. "
My vision really began to deteriorate - I can't see well at close range. I can't even see the phone button without glasses.
Thanks to Tatyana - I bought these glasses today - they are perforated - these are such small holes on ... I mean, on the glasses. But these are plastic "Glass". In general, here is a photo of how they look, these glasses:
And now I report on my impressions: (I bought it, by the way, in optics. They cost 890 rubles) I ask the seller - "How do they work?" She - "You will read in the instructions." And asks to put on these perforated glasses and read. I say, "I won't see such small letters." She is "put on your glasses that."
Well, I put it on - I look and see! Small letters. I see! You can read right through the perforations and sharpen letters and objects. But it is unusual, however, - the image seems to split in two and you have to somehow get used to it.
Now I am writing these lines in new glasses. And what is interesting, when I read this instruction to the glasses, I tried to bring the text very close to my eyes - almost end-to-end - 5 cm distance - and you can still see it.
I spent about an hour in them today. Then I took it off - and when reading my mail I could see the text - it is true, vague, but I could read it without glasses at all. Marvelous! Eyes rested in these glasses, or what? In general, I am a believer in Thomas, therefore, I will continue to study them.
I will write about the results, if interested. So, n do not miss it. And for today I have everything.
Round collar shirts entered our wardrobe reliably and for a long time. If you decide to sew blouses or dresses and are faced with a round collar, then it will be useful to find out the rules for sewing it. So, how to sew a round collar with your own hands.
And for sewing lovers, lessons and master classes:
How to prepare fabric
We need tracing paper, scissors, cloth, pencil, chalk, pins and a sewing machine. It is advisable to pre-wash and dry the fabric, so that later the collar does not lead.
The cut of the round collar should correspond to the shape of the neck of the product. Therefore, you need to attach a dress or blouse to the tracing paper and draw the lines of the neckline.
Draw the collar drawing from this line. Its dimensions depend on the size of the shirt. So, for example, the width of the round collar for a blouse of size 42 will be 5.5 cm.Do not forget to leave a seam allowance of 0.5 cm.
Collar pattern construction
We make a pattern for the tailoring part. With its help, we will attach the collar to the product. Its base corresponds to the shape of the base of the collar, and its height is 1.5-2 cm.

We cut out the collar along the warp thread. Sewing on the collar, if your model requires it (then the pattern of the collar and the trim piece should be made less than the armhole by the size of the assembly). We seal the collar with non-woven fabric. Sew on a decorative overlay as desired.


How to attach a collar to a shirt or dress
Place the two collar pieces right-side-in to each other. Place a non-woven backing on top. Sweep the collar with a needle-forward stitch, leaving a 1.5-2 cm hole in the center of the lower base of the collar, so that later the collar can be turned out.
Sew the part on the sewing machine and turn it right out. Sew the remaining hole with an overlock stitch. Iron and strip the collar.
Fold over and stitch the bottom and sides (i.e., those that do not join the neckline and collar) of the trim.
Place the collar over the blouse, on top of it, face down, lay the undercut. Baste all parts, and then sew.

Then lift the trim and tuck it inward into the neckline. Stitch it to the wrong side of your blouse.


The collars are very diverse in shape. They usually consist of two parts: visible - departure and invisible - racks... In this case, the rack can be either cut-off or one-piece with a fly-off. The stance and departure are separated by an inflection line.
The collar is connected to the product with a seam line. Its length is equal to the length of the neck of the shelf and back. The stitching line can be straight, concave or convex, therefore, depending on its curvature, the collar is more or less adjacent to the neck.
If the seam line has a concave shape, then the collar only slightly adheres to the neck, a straightened or straight line increases the degree of collar fit, and a convex line provides maximum fit.
To build a drawing of a collar, it is necessary to know not only the length of the stitching line, but also the amount of rise in the middle of the collar. We choose it according to the model, depending on the degree of fit of the collar to the neck.
For collars with a high stand take smaller values, for flat collars with a low stand take larger values.
The neckline in the products is formed either along the line of the base of the neck, or expands, deepens depending on the model features. The widening of the neckline in the area of the shoulder seams, its deepening in the back and in the front ensures the lag of the designed collar from the neck.

Turndown collar pattern close to the neck
2. From point O horizontally lay a segment equal to the length of the neck of the shelf and back (measured by the product from the middle of the back to the middle of the front) minus 0.5-1 cm (this is a coefficient, the value of which depends on the curvature of the collar stitching line; a smaller value is chosen when straight line of insertion, more - with a curved).
3. Upward vertically from point O, the amount of lifting the middle of the collar is laid off (from the table): ОВ = 2-4 cm.
4. Connect straight points B and A, divide the segment into three parts. The division points represent O 1 and O 2.
From O 1, the perpendicular is restored upward and 0.5 cm is laid.

5. A smooth line is used to draw the line for stitching the collar through points B, 0.5, O 2, 0.2, A.
6. Width of the collar on the back: BB 1 = 8-10 cm (according to the model).
The same amount is deposited on the perpendicular restored upward from A to segment BA: AA 1 = BB 1 = 8-10 cm.
7. Connect the straight line B 1 and A 1 and extend it to the right by 3-6 cm (the size of the corner protrusion).
A 1 A 2 = 3-6 cm.
8. From the middle of the segment B 1 and A 1, restore a perpendicular of 1-1.5 cm upwards.
9. With a smooth curve coming out of point B 1 at a right angle to the segment ОВ 1, draw out a cut-off cut of the collar through points B 1, 1-1.5, A 2.
10. Connect straight line A to A 2

Turn-down collar pattern with cut-off stand
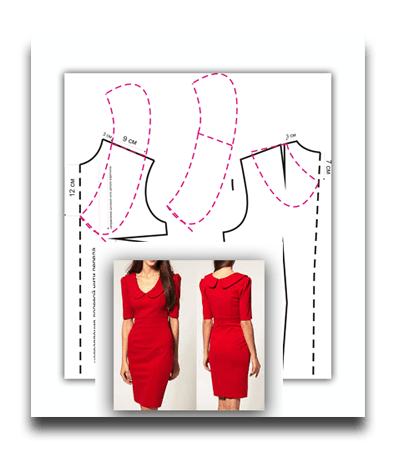
Thanks to the cut-off stand, such a collar ensures a good fit of the product on the figure. First, a collar with a one-piece stand is drawn, then the stand is cut off from the collar. The collar and the collar stand change - the length decreases along the line of their connection. As a result, the collar is closer to the neck and looks better than a turn-down collar with a one-piece stand.
1. In the drawing of the base base of the product, expand the neckline along the shoulder line by 1 cm; deepen in the middle of the front by 1.5 cm, in the middle of the back - by 0.5 cm.
Draw a new neckline at right angles to the middle of the back.
Mark on the new neck of the front the point of the bead ledge at a distance of 1 cm from the middle of the front towards the armhole.
Measure the length of the new front and back neck from the center of the back to the point of the bead ledge.
2. Draw a horizontal line along which to set aside to the left of the starting point O the value of the neckline length of the product minus 0.5 cm.
3. From point O to postpone upward:
- the height of the collar stand - 3.5 cm,
- the height of the cut-off collar stand - 4 cm,
- position of the collar stand fold line - 0.5 cm,
- collar width - 5.5 cm.

4. From point A set aside 0.7 cm upwards and from the obtained point set aside 3.5 cm to the left.
VA 1 = 3.5 cm.
5. Through A 1 draw up a vertical line on which to detect an arc from B with a radius equal to 10 cm.
BB 1 = 10 cm.
6. Make sections of the collar and stand in accordance with fig. The cutting line of the strut starts at a distance of 3 cm from point B.

7. Draw cut lines on the collar and upright.
8. Cut the collar along the seam line of the collar and collar stand. Make cuts from the cut in of the collar to the cut of the collar departure.
9. Place the collar and stand sections along the cut lines on top of each other by 0.3 cm at the joint seam cuts. Also narrow the collar and stand along the midline.
Shirt collar pattern with one-piece stand
1. Build a right angle with the apex at point O.
2. From point O horizontally lay a segment equal to the length of the neck of the shelf and back minus 0.5 cm.
OA = neck length - 0.5 cm.
3. From A to the right, lay the size of the collar shoulder, which is equal to the width of the half-nose (allowance for the fastener on the product).
AA 1 = 1.5-2-2.5 cm

4. The amount of rise in the middle of the collar: ОВ = 2-4 cm.
5. Points B and A are connected by an auxiliary line, which is divided into three parts. The division points represent O 1 and O 2.
From point O 1, the perpendicular is restored upward and 0.5 cm is laid.
From the middle of the segment between the points O 2 and A, a perpendicular is drawn down, on which 0.2 cm is laid.
The edge of the half-slug is raised from point A 1 by 0.3-0.5 cm.
6. Draw a line for stitching the collar through points B, 0.5, O 2, 0.2, A, 0.3-0.5.
7. The size of the collar: BB 1 = 2.5-3.5 cm.
8. Through A to the straight line OA, the perpendicular is restored upward, on which a segment equal to the height of the rack is laid: AA 2 = BB 1 = 2.5-3.5 cm.
9. Make the protrusion of the stand with a rounded curve.
10. Collar width in the middle: BB 2 = 7-9 cm.
11. From B 2 draw a horizontal line to the right. Its intersection with the vertical drawn from A is designated A 3.
Line B 2 A 3 continues to the right by 1-4 cm and put B 3.
A 3 B 3 = 1-4 cm.
12. Connect straight line A 2 with B 3 and extend it upwards. On it from A2, lay 7-15 cm (length of the corner).
A 2 B 4 = 7-15 cm.
13. Segment B 2 A 3 is divided into three parts and the right dividing point is connected by a smooth curve with B 4.
Shirt collar pattern with cut-off stand

1. Draw a horizontal line along which to set aside to the right of the starting point A the value of the neckline length of the product minus 0.5 cm.
AA 1 = neck length - 0.5 cm.
2. From A1, restore the perpendicular upwards, on which 2-4 cm are laid.
A 1 A 2 = 2-4 cm.
3. Connect straight line A with A 2, extend it to the right by 2-2.5 cm (allowance for half-skid).
A 2 A 3 = 2-2.5 cm.
4. Segment AA 2 is divided in half and a 1 cm perpendicular is restored downward.
The edge of the half-slug is raised from point A 3 by about 5 cm.
Make a smooth curved line for stitching the rack through points A, 1, A 2, 0.5.
5. Height of the collar stand: AA 4 = 3-4 cm.

6. From A 2 and A 3, restore the perpendiculars upward to the segment AA 3, on which 2.5-3 cm are laid.
A 2 A 5 = A 3 A 6 = 2.5-3 cm.
7. Connect points A4 and A 5 with an auxiliary straight line and restore a 1 cm perpendicular downward from the middle of the segment.
8. Points A 4, 1, A 5 are connected with a smooth curve, and the protrusion of the rack is drawn with a rounded line.
9. The line for stitching the collar into the stand is drawn with the same bend as the upper cut of the stand.
From A 5, a horizontal line is drawn to the left, which is the axis of symmetry.
A segment equal to A 4 B is laid up from B.
BB 1 = A 4 V.
Connect point B 1 with a straight line with A 5, divide the segment in half and restore a perpendicular of 1 cm.
Connect B 1, 1, A 5 with a smooth curve.
10. Collar departure width: B 1 B 2 = 4-5 cm.
11. From B 2 draw a horizontal line to the right, its intersection with the vertical drawn from A 5, denote B 3.
12. From B 3 in a straight line, set aside 1-5 cm.
B 3 B 4 = 1-5 cm.
13. Connect straight line A 5 with B 4, extend it upwards and on it from A 5 set aside 9-14 cm.
A 5 B 5 = 9-14 cm.
14. Segment B 2 B 5 is divided into three parts and the right dividing point of the smooth curve is connected to B 5.

Shirt collar pattern with high cut-off collar
The high stand of this strict collar is fastened butt at the center line of the front with hinged loops and buttons.
1. Make the necessary changes to the neck on the drawing of the base base of the product as shown in example 2.
Measure the length of the new front and back neck from the middle of the back to the middle of the front.
2. Draw a horizontal line along which to set aside to the left of the starting point O the value of the length of the changed neck of the product.
3. From O set aside 4.5 cm - the height of the collar stand, then set aside 4.5 cm - the height of the collar rise and 5.5 cm - the width of the collar departure.
4. From A, set aside 2.5 cm upwards and from the resulting point B draw a cut line for stitching in the collar stand.

5. At right angles to the segment OB, draw the middle front line of the collar with a length of 4.5 cm (the height of the stand at this level).
BB 1 = 4.5 cm.
6. Make the cuts of the collar stand as shown in the figure.
7. From B 1 set aside along the upper edge of the rack 0.3 cm to the right. From this point, draw a horizontal line to the left with a length of 1.5 cm, from the last point draw a vertical upward.
8. Make the collar cuts in accordance with the picture.
You can process the neckline of a dress in various ways; one of the simplest ways is to design the neckline with a turn-down collar.

Turn-down collars in a light dress can be cut out without a seam or in two halves. The turn-down collar can be single or in two parts, a lower and an upper collar.
The edges of the collars can be finished with an overstitch, edging, hemstitch or trimmed with frills, lace, piping.

Building a turn-down collar pattern, even for a simple children's dress, is not as easy as it might seem. Any calculations used to build a collar pattern will still have to be adjusted in the finished product. The collar may not "lie" well, the connecting seam along the neck may not match and turn inside out, etc.
The proposed scheme for constructing a turn-down collar is more suitable for sewing a children's dress. All collar sizes are conditional, you must adjust them for this pattern according to your dress. Transfer the resulting pattern to a test fabric and connect the collar with the neck of the dress with a basting seam and try on.
In order not to build a collar pattern on your own, you can use a ready-made turn-down collar pattern from various magazines. The convenience of such a pattern is that you can clearly see, from the available photo, what the collar will be in the finished form. The existing mismatches in size and shape can be easily corrected.

If the collar is cut in two parts (lower and upper), the upper part is folded with the lower front sides inward. Equalize the cuts and sweep away. Sharpened along the edge with a fit of the lower collar at the corners and roundings. Seam width 0.5-0.7 cm.
Sections of the seams in the corners are trimmed, leaving an allowance of 0.2-0.3 cm. The sweeping threads are removed.
The collar is turned to the front side, the corners and seams are straightened.
The collar is ironed from the side of the lower collar, forming the edging of the upper collar with a width of 0.1-0.2 cm.
If you are experiencing difficulties in collar processing edging, then it must be swept out in advance.
You can connect the collar with the neckline of the dress in different ways. The figure shows two ways.
The first method involves edging the connecting seam with a bias tape cut from the same fabric as the dress.
The second method consists in sequential connection of both parts of the collar (bottom and top) with the neckline.
First, the lower part of the collar is sewn, and then the upper part. Both the lower and upper parts need to be swept away before sewing on a typewriter. Finishing stitching is given along the top of the collar.
Glue-lined collar
In collars with a lining made of fabric with a one-sided adhesive coating, the lining is applied with an adhesive coating on the inside of the lower or upper collar and glued with an iron.
If the collar is processed with a cotton or proklamilin lining, the lining is applied to the inside of the lower collar and grinded from the side of the lower collar.
In products made of woolen, silk fabrics and fabrics containing synthetic fibers, the upper collar is folded with a lining with the wrong sides inward and swept, making the upper collar fit at the corners and roundings. Then the upper collar is folded with the lower collar with the front sides inward and grinded from the side of the gasket along the line of marking the gasket to the upper collar, or, stepping back from it towards the middle by 0.1 cm.The gasket is cut out from the seam, leaving 0.1 cm. The collar is turned out on the front side, the corners and seams are straightened. The piping is washed out towards the lower collar. The collar is ironed on from the side of the lower collar. The sewing threads are removed.

In collars with a frill, the frill is placed inside out on the front side of the lower collar. Slices are leveled and grinded from the side of the frills. The number of gathers should be greater at the corners of the collar than at the edges.
After that, the lower collar is folded with the upper collar with the front sides inward and grinded from the side of the lower collar. The line is laid in the seam of attaching the frill, or stepping back from it by 0.1-0.2 cm towards the middle of the collar. The collar is turned to the front side. The corners and edges are straightened and ironed.


If the top collar is cut separately, it is folded with the bottom collar right sides inward. The cuts are leveled and grinded from all sides, leaving a hole along the edge of the rack for turning out. Sections of the seams in the corners are trimmed, leaving an allowance of 0.2-0.3 cm. Through the left hole, the collar is turned onto the front side.
The corners and seams are straightened and swept, forming a piping from the upper collar. The collar is ironed on from the side of the lower collar, the embroidery threads are removed. The hole left on the edge of the rack for turning out is stitched on the machine or sewn by hand with blind stitches. The cut of the rack can be not turned, but overcast with a "zigzag" seam or edged, depending on the fabric shedding. Sections of single collars at the ends and overhangs can be processed in the following ways: a hemmed seam with a closed cut, a strip of fabric, an edging seam and lace.
Several seasons ago, removable collars of various models came into fashion. They can be separate from the thing with which they are combined, or attached to it using buttons or buttons. As a rule, according to the model, these are flat-lying collars or collars on a stand. With the help of such a piece of clothing, you can decorate and update your favorite sweater, blouse or dress. ? Today I want to acquaint you with the process of sewing a flat-lying round collar made of faux fur.
For work we need the following materials:
Artificial fur
Atlas
Non-woven
Lace no more than 5 cm wide
Small clasp or hook
This pattern is the basis of a flat-lying collar; you can change the width and shape of the collar as you wish. When you make your paper template, be sure to try it on and adjust it to fit your neck. Cut the neckline as desired.

We cut the top of the collar out of faux fur. I want to note that fur always has a direction of the pile and it will be more convenient and more beautiful if the direction of the pile coincides with the vertical line of the front of the collar, when laid out on the fabric, this is a fractional line, that is, directed along the roll of fabric. In the photo, the direction of the lobar is shown by arrows.


We make 4 parts: 2 parts from fur (left and right collar) and 2 from satin fabric, respectively (you can take any fabric that matches the color, but not stretching). We retreat 1 cm from the edge of the template on all sides.

Now we need to glue all the details with non-woven fabric. Now there is a large selection of non-woven fabrics, choose not very tight so that the collar does not stand with a stake, but is soft enough. In the photo, the non-woven fabric that I used, under the collar details. Our collar has a front and a back, do not forget to mark them so as not to be confused in the future. I am guided by the direction of the share. Let me remind you that the direction of the share is indicated by the arrows in the photo.

Another important point. I think you will come across it while working with fur. When connecting the front and back of the collar, the fur will need to be laid with the pile inside and it will constantly slide off. Therefore, after connecting the left and right parts separately with the front sides, first sweep them.

Now sew the details, leaving the side of the neckline open and then cut the fabric 0.5 cm from the edge, in the rounded places you can a little more so that when finished, the edge of the collar is smoother.


We turn out both halves of our future collar and lay a stitch on the front side of the lower parts of the collar close to the sewing line of the parts, grabbing the allowance that we cut off. We iron both halves. Next, you need to cut off that centimeter along the neckline, which we gave when cutting, since in this model the neck will be processed. If you want to make a collar with an inner seam along the neckline, then leave this allowance. Stitch together the details of both halves along the neckline.


We combine the centers of the front collar. Now we will sew lace, which must be stretch, otherwise you will not be able to lay it out. The width of the lace should be at least 2 cm, the appearance of your choice. We measure the total length of the neck with a centimeter and add another 1 cm. Cut off the lace of the resulting length. Fold the lace face up in half lengthwise and iron it.
Then we turn out the edges of the lace and cut it off, retreating 0.5 cm from the edge. We turn out the lace and pin it to the neck, clasping it on both sides. We make a line on the front side, preferably along the edge of the lace, so as not to disturb the pattern. If the edges of the lace are asymmetrical, then you will not be able to capture two of its sides with one line. You will need to sew the lace on the inside of the collar with your hands. On the back half from the bottom, I sewed on small hooks. Alternatively, it can be a small flat button with an air loop.

OK it's all over Now! Our collar is ready! Look how he decorated an ordinary blouse. I found 2 brooches on my farm, which, in my opinion, were very suitable for him.
If you have any questions about this master - class, write, I will definitely answer.
For those who love detachable collars, I propose to get acquainted with another curious creation experience. It will be a great addition to many outfits.
Share interesting information with your friends. Good luck to everyone!
Subscribe to the news to find out even more useful information!
Find out even more interesting things:

Shibari stole


