Creating a holiday atmosphere is facilitated by decorating the room with various New Year's crafts made from simple and affordable materials. A DIY corrugated paper Christmas tree is a great activity for children, as well as an original New Year's gift. Today, with the help of our master classes, we will learn how to make Christmas tree crafts from corrugated paper. It's better to create with the whole family. So let's begin!
Christmas tree made of corrugated paper: master class with photos
Let's make a New Year's tree in a “traditional” green color. First, let's prepare the necessary materials and tools.
Necessary materials:
- green paper
- cardboard sheet - A4 format
- beads, rhinestones and tulle
- needle with thin fishing line
- PVA glue
- scissors
- scotch
- pencil
Step-by-step instruction

How else can you make needles? We wrap the corrugated paper tightly around the pencil, which we then remove. At one end of such a “roll” we glue a “twig” to the cone. It turns out to be a very fluffy Christmas tree.

To complete the composition, you can decorate the Christmas tree with beads, stars, paper snowflakes, pieces of tulle and bows. At the same time, it is important to adhere to moderation - after all, our green tree is beautiful in itself.
How to make a Christmas tree from corrugated paper: master class with photos
There are many options for creating paper New Year's crafts. Here your imagination will tell you what to do - just choose! Let's make a soft lilac Christmas tree, and use beads and sequins as decorations.
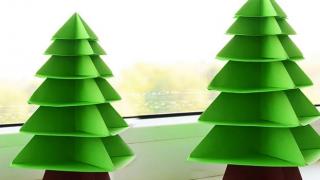
The photo shows a finished Christmas tree made of corrugated paper:


We stock up on materials and tools:
- corrugated paper
- cardboard
- scissors
- thread and needle
- heat gun
- decorative elements - beads and sequins
Step-by-step guide to action

Christmas tree made of corrugated paper: master class with photos
A fluffy, voluminous Christmas tree made of corrugated paper is obtained using a completely simple technology. This tree is perfect for decorating a home or office workplace. And if you complement the composition with a bright scarlet bow and gold or silver threads of beads, you will get a real exclusive decoration.

Consumables and necessary tools:
- cardboard - A4 format
- green corrugated paper
- scissors
- pencil
- beads and bow
Step-by-step instruction:

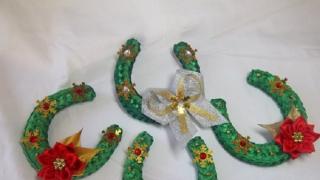
In the photo - different options for wonderful paper Christmas trees:


DIY Christmas tree craft made from corrugated paper, video
An unusual handmade decoration always attracts attention. Here you can imagine from the heart - the Christmas tree can be of any color and design. This video shows in detail the process of creating a Christmas tree from corrugated paper. Happy crafting!
The New Year is coming very soon and this, of course, becomes a worthy occasion to test the child’s creative potential. If you wish, you can learn how to make a Christmas tree from corrugated paper with your own hands and then enjoy the craft in the future.
Christmas tree on a cone
A master class on making a Christmas tree is one of the most interesting options for holding creative events at home. The first toy can be supplemented with a small loop, thanks to which it will certainly take its rightful place on the Christmas tree and immediately bring the right shades of mood into the interior of the house.
Required materials:
- cardboard;
- green corrugated paper;
- special glue (two jars are required for different gluing technologies);
- bow for decorating the Christmas tree;
- garland in the form of beads;
- red and yellow beads.
How to create an interesting New Year's craft:
1. The first task is to make a paper cone as a base. To do this, cut out a cardboard circle of the optimal size.


3. Now carefully cut out corrugated strips 50 cm long. The optimal thickness is about centimeters.

4. The next stage is to fold the cut strip along the length by half a centimeter. The folded end is gently stretched with your finger. To successfully complete the task, the paper is pulled with both hands in different directions. If you forget about accuracy, corrugated paper can tear.

5. Lubricate the elongated strip with a glue stick.

6. Corrugated paper is glued to the cone of the Christmas tree.

7. Each next row will be placed higher. The task is to create a beautiful spiral.


8. The top is decorated with a bow. To do this, use a glue gun.

9. Another idea is a beaded garland. It is placed in a spiral and secured with a glue gun.

10. Large yellow and red beads are carefully glued to the Christmas tree. To do this, use tweezers and a glue gun.


So, the New Year's beauty is ready! Every parent and their child have the right to successfully prepare for the New Year holidays. Various master classes contribute to the realization of creative potential.
Knowing how to make a Christmas tree from corrugated paper and understanding the basic scheme for completing the task, you can choose the appropriate option for successful implementation in practice.
Flat Christmas tree with star
When planning to make a Christmas tree with your own hands from corrugated paper, it is recommended to pay attention to the flat variation. In this case, it becomes possible to use the created craft to decorate a holiday card.

Necessary materials:
- green corrugated paper measuring 10 by 15 cm;
- thick running paper or cardboard in A4 format;
- red cardboard measuring 5 by 5 centimeters;
- foil (10 by 10 cm);
- glue (PVA brand is recommended);
- scissors.
Progress:
1. First, green paper is cut into thin strips. The optimal thickness of each strip is 1.5 centimeters. A white sheet of paper or cardboard is folded in half to form a book.

2. Each strip of corrugated paper is cut into 4 rectangles. Their size should be the same. Blanks are used to form “petals”. One piece is twisted along the central part, after which it is bent in half.

3. The blanks are glued to the front of the holiday card. The size of the tree determines the number of elements.


5. Blanks in the form of foil and red cardboard are glued to the corrugated Christmas tree.

Now the flat Christmas tree made of corrugated paper is ready. If desired, it can be pasted onto a holiday card, which will be further decorated.
Christmas corrugated tree with blue decor
First, take corrugated green paper and cut it into 1.5 centimeters. The number of strips depends on the size of the craft. Then the cut strips are rolled up very thinly. The main task is to create coniferous branches. Carefully wrap the cut and folded green strips around thick wire.

At this stage, hot glue is used for gluing. According to this scheme, the optimal number of branches is created. Uniform lubrication of thick wire (including the gaps where the main adhesive layer ends) ensures that fluctuations are prevented. According to the above scheme, it is recommended to create not only branches, but also the top.
To make the top more splendid, glue a larger number of branches (their number can reach five). The lower branches are leveled. They should not be too lush, otherwise the tree will not look natural. After you manage to make a Christmas tree from corrugated paper with your own hands, you can decorate it with blue decor, which adds elegance. It is advisable to use small Christmas balls and lush bows.
Magical, kind and cheerful New Year's days are approaching, where wonderful gifts are given. The most expensive ones are those that are made independently. Making a Christmas tree out of corrugated paper with your own hands and giving it to your loved one is not happiness.
Fluffy beauty
What you will need to make a fluffy beauty:
- corrugated paper;
- office glue;
- Whatman paper;
- scissors;
- small Christmas balls.
How to make a Christmas tree from corrugated paper with your own hands step by step:
1. We start making the fluffy beauty with a cone base. To do this, take whatman paper, draw a circle with a compass, and cut it out. Then we take the circle and cut out a quarter with scissors and glue it together.

2. Take a roll of corrugated paper, measure 5 cm and cut it.

3. Next we make cuts on it, a little more than half. We unfold each thin strip and twist it. To do it carefully, you need to squeeze the piece between two fingers and scroll. Don't be afraid that the paper will tear.

4. Take a conical base, apply glue at the base and glue our blanks in a spiral to the very top. We make sure there are no gaps.

5. Making a Christmas tree from corrugated paper with your own hands is not difficult. All that remains is to dress it up with New Year's toys.

For decoration we use balls, which we attach to the tree with pins. You can add other toys, bows, snowflakes.

The final result of the work is a charming fluffy beauty.
On a wire
What you will need to make a Christmas tree:
- stationery glue;
- pencil;
- soft wire is better;
- scissors;
- corrugated paper;
- compass.
Stages of making a forest princess:
1. Draw the depicted template on colored paper.


3. Bend the corners of the blanks to form a cone and glue them together. We perform this operation in a circle.

4. This is how we get the bottom row of the Christmas tree, which we put on the wire.

5. Then we make a few more blanks, while gradually reducing the size of the circle. We put it on the wire.


6. To prevent the wire from sticking out at the tops, we make a cone. Close the wire and the craft is ready.

We make a Christmas tree with our own hands from corrugated paper together with the children. This process will bring only good emotions to all participants.
Unusual Christmas tree
What you will need:
- corrugated paper of different colors;
- wooden ice cream sticks;
- universal glue.
Progress:
You can even make a Christmas tree out of corrugated paper using three wooden ice cream sticks. To do this, lay out a triangle out of them and carefully glue them at the corners.


Merry Christmas tree
To make this version of the Christmas tree you will need: several different paper cupcake molds, multi-colored corrugated paper and universal glue.

The first step is to prepare the preparations. We take the molds and wrap them in corrugated paper, give them the desired shape and glue them together. The result will be a beautiful and bright New Year's craft.
From popsicle sticks and rhinestones
To make these Christmas trees you will need: wooden ice cream sticks, cardboard, glue, paper of different colors, corrugated paper, pebbles, and beads.

We begin our execution process by building a Christmas tree. To do this, take a wooden stick and place pre-cut cardboard strips perpendicularly on it. The bottom stripes are the longest, then the size decreases. We wrap each strip with corrugated paper and glue it to a piece of wood. We tie a rope to the top of the tree. All that remains is to decorate. Here everyone can be a designer and bring their crazy ideas to life.


Thus, using corrugated paper we get the chance to make many different types and styles of Christmas trees. Everything you have in the house will be used: cardboard, paper cupcake molds, ice cream cups, sticks, twigs. All this material just needs to be wrapped in corrugated paper and you can begin your creative process. Work will bring even greater joy if the whole family gets involved in it.
Green beauty. Master class on making a Christmas tree from crepe paper with step-by-step photographic material.
Additional education teacher Novichkova Tamara Aleksandrovna MBOU DOD Lesnovsky House of Children's Creativity.
Purpose: The master class is designed for children of primary school age, teachers, educators and parents who find time to communicate with their child. Nothing brings children and parents closer together than a joint creative process. A green beauty made with your own hands will bring a lot of pleasure and great joy. The Christmas tree will be a wonderful holiday gift and will decorate the interior of the room.
Target: making a Christmas tree from crepe paper for the New Year holiday.
Tasks:
- to interest and involve in the work of making a Christmas tree;
- teach technology for working with crepe paper;
- improve skills in working with scissors and wire, observing safety rules;
- develop fine motor skills of the hands and eye;
- cultivate hard work, accuracy, and respect for nature;
- create a festive mood.
Materials and tools:
Green crepe paper;
- thin wire, rod for the barrel (thick wire);
-glue pencil, scissors, ruler;
-pot, polystyrene foam;
-green electrical tape.
-decorations for the Christmas tree (toys, snowflakes, tinsel).


On the eve of the New Year holiday, a massive cutting down of Christmas trees begins. According to a long-standing tradition, people go to the forest, to Christmas tree markets and bring a live Christmas tree into their home. The unique smell of spruce needles fills the entire house. A Christmas tree decorated with toys, sparkling with garlands, pleases the eye. The Christmas tree becomes the center of the entire New Year holiday. Gifts are hung on her, round dances are performed around her. But let's think about it! How many green beauties were cut down, only to be thrown into the trash in a week, or even earlier. Entire landfills are filled with yellowed, no longer needed Christmas trees. Sorry sight! I would like to tell people: “Don’t cut down the trees! Let them live and delight us not only in winter, but also in summer.” It’s good that attention has been paid to the environmental problem in our time. Artificial Christmas trees have come into fashion since the beginning of the 20th century. And this, in my opinion, is an excellent way to preserve spruce on Earth. And children need to be told more often that cutting down a living tree is a crime for our Planet. Cutting down a tree will take several minutes, and for a tree to grow, it will take several years.
Today I want to offer a master class on making a New Year tree from crepe paper. By making it with our own hands, and even together with the children, we will preserve living spruce trees.

Step-by-step making of a Christmas tree.
Cut 6 cm pieces from a roll of green paper.

We straighten the rolls and cut them into strips 25 cm, 15 cm and 10 cm long. We will need 9 pieces of long strips, 12 medium ones, and 13 short ones.


We take each strip, fold it like an accordion and cut into narrow “needles”, not reaching the edge 2cm.


Lubricate the edge of the strip with glue, attach the wire and begin to twist it. Using your fingers, press the paper tightly against the wire, gradually moving down.


The result is a branch like this. We make them according to the number of stripes.


We do the same with other strips.


Now we have these branches.

Let's make a lush top for our Christmas tree. Let's take two long strips at once and carefully twist them onto the wire.


Let's form the branches in tiers. The first tier will consist of single small branches. There will be 5 of them.

For the second tier, we connect a medium-length branch with two short ones.

There should be four branches.

We make branches for the third tier. We twist a long branch with two medium ones.


We will also make four such branches.

We form branches of the fourth tier. We will need one long, two medium in length and two short. We twist them together.


We got these fluffy branches of the fourth tier. If you wish, you can make a fifth tier. And your beautiful Christmas tree will become even taller.

The branches for each tier are ready.


Let's start assembling. We screw the top of the head to the “trunk” using electrical tape, then attach the branches of the first tier.


We do the same with the branches of the second and third tiers. Our Christmas tree is “growing” before our eyes.


Wrap the trunk with a strip of green crepe paper to match the needles.


We insert foam into the pot and make a hole.
We put up the Christmas tree, lubricating the end of the barrel well with Titan glue. We admire it.


We'll dress up. There are many options. We use toys and tinsel.


Could be so. Blue balloons and the symbol of 2015 nearby.

I want something light and clean. Snow of course! And the real Santa Claus! If you really want it, there will be snow, and there will be Santa Claus!
Forest beauty made of crepe paper. Master class with step-by-step photos.
Alena Bastrykina, 11 years old, student of the “Handicraft” association at the Lesnovsky Children’s Art House.
Supervisor: teacher of additional education Novichkova Tamara Aleksandrovna MBU DO Lesnovsky House of Children's Creativity.
Description of work: The master class is intended for school-age children, preschool teachers, technology teachers, educators, and for those who like to create unusual, creative crafts with their own hands. A green beauty made with your own hands will bring a lot of pleasure and great joy. The Christmas tree will be a wonderful holiday gift and will decorate the room.
Purpose: for an exhibition of crafts for the New Year, interior decoration.
Target: Making a Christmas tree with pine cones from crepe paper.
Tasks:
- to interest and involve in the work of making a Christmas tree with your own hands;
- consolidate previously acquired skills in working with crepe paper;
- develop individual creative abilities and artistic taste;
- develop fine motor skills during work;
- cultivate a sense of beauty and harmony, independence in making crafts, accuracy in work;
- cultivate a caring attitude towards nature;
- create a festive mood.
Materials and tools:
- green and brown crepe paper;
- Titan glue, glue pencil;
- plastic stick for the barrel;
- wire, scissors;
- artificial snow - spray;

- stand for Christmas tree;
- Styrofoam;

I live in a village called Lesnoy. This is because it is surrounded by forest. This is mainly a mixed forest. But there are large areas of coniferous trees. And beautiful spruce trees grow on the territory of the village. They were planted by the first residents of the village near administrative buildings, a school, a House of Culture, a hospital, a kindergarten, and in Victory Park. Many years have passed, the Christmas trees have grown, and all year round the green beauties delight with their attire. And on the eve of the New Year's holiday, the Christmas trees light up with multi-colored lights. It's so cool! The live Christmas tree became a decoration of the village. I love looking at spruce. And before my eyes there appears a tall tree, its arrow-top reaching into the sky. At the very top of the head you see many, many cones, and below, powerful and at the same time graceful branches spread out to the sides. It smells of pine needles, and a wonderful aroma fills everything around. Spruce looks elegant and solemn at all times of the year. Since ancient times, it has become a custom to put up a Christmas tree on New Year's Eve. But we have to think that the tree is paying for this temporary pleasure with its life. Many years pass before an adult spruce tree grows from a tiny seed. The rains water it, strong winds bend the branches to the ground, the sun burns the delicate green needles. And the Christmas tree is trying to survive, to survive. Every person should know the law on environmental protection and try to save spruce trees from cutting down.
Not a leaf, not a blade of grass!
Our garden became quiet.
And birches and aspens
The boring ones stand.
Only one Christmas tree
Cheerful and green.
Apparently she is not afraid of the cold.
Apparently she is brave.


To make you feel the approaching New Year's holiday, I suggest making a Christmas tree with pine cones from crepe paper.

Step-by-step execution of a Christmas tree.
First stage. Making cones.
Take brown paper and cut pieces 4cm wide from the roll. We cut strips 15-20 cm long according to the number of cones. (The length of the strip depends on the size of the cone)

We begin to roll the paper. Place a corner, pressing it tightly with the fingers of your right hand. Once again we lay the paper with the corner facing us.


We hold the corner with our left hand, and with our right hand we turn the paper away from us. Again, a corner towards and away from you. It turns out to be a “figure eight” or a kind of zigzag.


The result is a twisted strip like this. I want to say that not everyone can do such a twist right away. But if you practice, you will definitely learn and get great satisfaction. This method of rolling paper makes it possible to make beautiful flowers.


We begin to form cones. Apply a little glue to the edge of the paper, place a piece of thin wire and twist the strip from top to bottom.


It turned out to be such a small bump. To prevent the paper from unwinding, glue the tip.

We make many cones of different sizes. We put them aside and move on to the next stage.

Second phase. Making branches for the Christmas tree.
Cut the roll into pieces 5cm wide.

We straighten the paper and cut strips 10cm, 15cm, 20cm long.

We fold each piece like an accordion and cut it from one edge into narrow strips 0.5 cm wide, not reaching the other 1 cm. It turns out fringe.

We twist each strip with our fingers, turning it into a thin “needle”.

We make a lot of these preparations. Everything will depend on how tall your Christmas tree will be and how patient you are.

From the resulting blanks we twist the branches, winding them spirally on the wire. We get branches with “needles”. We make branches shorter for the upper part of the tree and longer for the lower part of the tree.


We collect small twigs into branches, twisting them with wire


Let's prepare the branches with cones. We take the blank with the “needles” and wrap the pine cone. Don’t forget to glue the paper at the end of the branch and twist it with your fingers.


We collect twigs with cones into large branches.


We make a lot of branches with and without cones for the lower tier of the tree.


Third stage. Assembling the Christmas tree.
We form the crown. We take a long piece and wrap three small branches with small cones to it. We wrap the wire with a strip of green paper, forming a trunk.

We attach the branches of the second and third tiers and again wrap the trunk with green paper. Leave 5 - 6cm between tiers.

To make the tree thick, in the next rows we screw four branches to the trunk

Our Christmas tree is getting higher and higher.

Let's extend the trunk by tightly wrapping another piece of thick wire and decorating it with green paper. Let's add two more tiers.

We attach the largest branches. This is the tenth tier. You can admire the Christmas tree in all its glory. We put it in a stand. The height of the tree was 60cm. This technology allows you to create Christmas trees of any size. The main thing is to stock up on paper, wire and of course patience.


Let's look at it closer and from all sides.


Fourth stage. Let's install a Christmas tree.
We cut out the foam circles to size, make a hole in them and insert the Christmas tree into the prepared stand.


We install the Christmas tree. We straighten the branches, straighten the “needles”.

Sprinkle with snow. Sprinkle the branches with snow - spray.


Grandfather Frost did not have to wait long. He brought a big bag of gifts.

We looked at our Christmas tree and realized that we had not chosen the right stand for it. A bit tall. They spent a long time trying on pots and jars. We chose this option.
A new beautiful and simple craft for the New Year has become a tradition in our family. Today we will have a three-dimensional Christmas tree made of corrugated paper. This Christmas tree can decorate a window, bedside table or desk in the office. A master class and step-by-step photo will help you make such a simple craft for the New Year 2019.
We will need:
- A4 cardboard;
- paper scissors;
- corrugated paper - available in several colors;
- PVA glue with a brush;
- thin tape is better;
- Christmas tree decorations (we have adhesive rhinestones and a bead on the top of the head.
How to make a Christmas tree from corrugated paper with your own hands
We take cardboard and roll it into a cone like for seeds. We glue the edges of the joints along the surface so that the cone does not unfold. We cut the base so that the cone stands level on the surface without slopes. The main shape for the Christmas tree is ready.

Take corrugated paper and cut it into rectangles measuring 7 cm by 4 cm. We fold each resulting rectangle in half with a book and coat the edges parallel to the fold with glue with a thin strip. Glue it together. We cut the fold into strips up to the glued edges in 1 cm increments and without cutting 1 cm to the edge. You should straighten the cut strips so that they become voluminous and the fold is less noticeable. A beautiful creative Christmas tree branch made of corrugated paper is ready.

We assemble our Christmas tree starting from the bottom. We retreat 2.5 cm from the edge and glue our branches to the shape in a circle. We trim the branches of the Christmas tree carefully, apply glue thinly and only along the uncut edge.

We glue each next row 2 cm higher than the one already glued. We glue the paper branches of the Christmas tree to the very top. The last branch will need to be reduced in width to make a joint into a joint.

We decorate the branches of our three-dimensional Christmas tree like other crafts for the New Year 2019. We take rhinestones or any other light beads you have and glue them onto the cut strips-branches in any order. Glue a large bead like a star onto the top of the head.

Well, our volumetric one made of corrugated paper is ready. As you can see, anyone can make such a simple one with their own hands. 🙂