Not every knitted toy can be called amigurs. Consider the features and techniques of the Amigurs. In order to make mini-toys with your own hands, you need to understand the knitting technique. Description of knitting, where to start.
As you know, Japan is a very small country, and its inhabitants are very fond of all kinds of miniatures. And behind them, the whole world picks up the fashion for tiny mini-toys - amigurumi. In general, amigurumi is just a small knitted toy, from 1 to 15 cm, but the most common figures are 5-8 cm. Such knitting is to some extent a competition in the skill of creating tiny works with jewelry accuracy.

Amigurumi is crocheted by crocheting single crochet stitches in a spiral. Some people try to knit with knitting needles, but this is much less popular, and such works are not diminutive. The small size of the toys allows you to use the smallest leftovers and scraps of thread, which will certainly accumulate in every knitter.

Of course, the main thing is the skillful hands of the master, but certain requirements are also put forward for materials and tools: the thickness of the hook should be such that with a thin thread the knitting is quite dense, without holes and gaps.
Can be knitted from acrylic, cotton or any type of fine fluffy thread. It is only important to have a good command of the material and successfully select it for a particular toy.
Some craftsmen combine several types of yarn, getting fluffy cubs with a smooth face or bunnies with soft appliqué on the ears. You can stuff the toy with padding polyester, cotton wool or padding polyester, making some parts heavier with granulate.

For decoration, any materials that are at hand are used: thin cords, beads, fabrics, felt, etc. The image of the toy can be supplemented and accentuated with various embroidery: the knitters' skillful hands embroider mouths and eyebrows, stripes on the skin, sew glass eyes.
Interestingly, amigurumi can be not only an animal or a person, but also a plant, even a cake or a house.
Almost all toys are "humanized", they have eyes and smile. Toys should be cute and have a good mood. Initially, Japanese amigurumi bear the stamp of the culture of the land of the rising sun: they are made exaggeratedly large-headed, with small eyes and nose practically on the same line far from each other. The image of the infamous Hello Kitty is most similar to the style of such a toy. However, there are also more anthropomorphic animals and amphibians with realistic features.

Such a toy is rarely one-color, but it is not necessary to make it painted in bright colors. Amigurumi is loved by both children and adults, and it is better to choose clear calm shades for their creation.
Details in this technique are knitted in a circle without seams using a crochet hook small size... Knitting begins with a ring. Japanese scheme:

Ring knitting pattern:

Make a loop at a distance of 2-3 cm from the end of the thread. Place a working thread between your index and middle fingers.

Insert the hook into the loop, grab the working thread and pull it out in front of the loop.

Grab the working thread and pull it through the loop formed.

Pull out the working thread and tighten. This loop is not the first column in the ring.

Bring the hook underneath both threads, which form a large loop. Grab a working thread.

Hello everyone!
I collect all the materials from different sites, and also look through a lot of information in newspapers and magazines, and then such a huge selection appears, which contains many interesting ideas.
Often, I visit groups in contact on knitting and needlework, and it is from there that I take all kinds of new items. I remind all those who saw their work and do not want it to be distributed free of charge on this site, please inform me, I will delete it at the first request.
Today I will share with you mostly masterpieces that are popular at all times. These are wild and domestic animals and animals. Also, many of you have asked to publish templates for cartoon characters. Therefore, everything will certainly be stated here and now. Go.
Do not forget if you liked the note to share it in in social networks as well as with friends and family.
By the way, the next issues will be devoted to Christmas toys, namely symbols, so do not skip the necessary information and stop by to visit me more often. Better yet, add my site to your browser bookmarks.
What are all the same good fellows needlewomen who share with us completely free master classes and, of course, detailed instructions. So that even a beginner can master this business.
Knitted animals are always very popular, because our children certainly love them. Every year we make new masterpieces, and we usually fill our shelves with symbols of the coming year. Do you agree? After all, it is the year that personifies this or that animal. Therefore, my next note will be devoted to such a main character. So, if you are also interested in this topic, then scroll through and find the desired hero
And we will start with banal descriptions, suddenly someone saw it all for the first time and wanted to try himself in the role of a craftswoman. The most basic thing is, of course, a ring (or an oval), without it toys will not work, this is a kind of basics, here is its visual reproduction of actions.


And now I propose to focus primarily on the simplest and most uncomplicated products. For example, make a hippo or hippo.


Not a single cartoon, not a single fairy tale is complete without this hero - the gray wolf. Agree, and our stalwarts love them, and sometimes they are even afraid.


Take a look, baby raccoon, its description is in pdf format. To whom you need to write, I will send it.

A very tiny and small toy can also be knitted, shown on the example of a unicorn. You can also build a key fob.


And this toy is extremely cute and cute, such a funny and colorful hedgehog.


A sweet and charming little dog with removable dress and headband (Anastasia Makeeva).


Next work from Julia Piga. Such a funny and funny giraffe.


The most beloved and popular animal at all times is a bunny, a hare ... As kids don't call it. I propose such a model, reminiscent of toys with a tilde style (Antonina Krykanova).


Here is another free master class from Ekaterina Stroykova - rabbit Milka, her instagram @ igrushka_1


Or this one. By the way, I have a great selection of software. And not only that, it contains a lot of descriptions of Easter toys, such as cockerel, hen and chicken.

Or, make the product simpler. Here are such bright handsome men - a boy and a girl.


A funny tiny monkey (monkey), waiting for its owner (Natalya Shumova).


I would also like to show the bear, or perhaps you will tie a huge bear.


And this little bear is tenderness itself, and most importantly it knits easily and quickly.


Funny ginger fox or fox, call them whatever you want.

Well, and accordingly, you can't do without the king of beasts - it's a lion.

The long-legged frog frog will delight you too.


Perhaps this work will also be of interest, I can send an instruction by e-mail, write.

In addition, there is also such a fish, in the form of a shark with illustrations and step-by-step explanations.

Such a mischievous sheep will charm you.


Or prefer a lamb. In any case, the choice is yours.


Dedicated to all horse or pony lovers.


Either this cat, or rather the cat Marshmallow from Yulia Koroleva, will cheer everyone up, you can knit it as a gift.


Children are very fond of another cartoon - this is about Malysharikov or Smesharikov. Found descriptions of Hedgehog.


But also all the other participants - Panda.


Well, let's start in order, the first will be Krosh.


Now I propose a sketch of the calmest hero - Barashik.

And let's not forget about the beautiful Nyushenka.

A character from the Soviet cartoon - Cheburashka. Who needs to write, too large instruction, could not put it here.
Now "Three Cats" is still popular - these are Caramel, Korzhik, Sarzhik and Kompot. Also there, write.
Of the Barboskins, I only got Druzhok. Instructions in PDF format on 15 pages, did not fit here.
By the way, there is also such a selection, it also has many options. Take a look. Unfortunately, I am not able to fit everything into one article, so I have to publish something here, and send something if I want to. As you can see, this is Booba, the lion cub and the turtle from "I lie in the sun", Goldie and Mimimishki.
Here are Minions (already there) and Fixikov I will try to find more about supplementing this article, perhaps on this topic I will publish a separate post to put everything that I have.
Knitted toys amigurumi. Over 1000 free schemes
For those who do not like to sit and painstakingly search for something on the net, I have prepared ready-made materials that I borrowed from Irina Korneva, she shares them on social networks, makes collections. Many thanks to her for that! There are quite a few original works in her collection. There are just a bunch of them, not to count. But, before that, I will show a few other examples.
Here is such a beautiful doll in the form of an angel, also in my collection. Write to anyone I will send.
Quite original, girls will definitely appreciate - a little mermaid.
And this pretty girl will make anyone smile. This is, as you might have guessed, a dragon. A song about Tosha immediately comes to my mind, it is on the Carousel channel now.

For the boys, I have an airplane in my chest.


And finally, all of Irina's work that you can get if you leave your review or comment below, I will be very glad.
Well, let's start. Those who love dolls and there are many options for you.

Then large collection hares.
Also bears.
A collection of dogs, I will repeat again.

Kittens and other representatives of the feline family.
A plus Marine life, such as whales, turtles and even fish, too, can soon become yours if you start creating right now.
Those who love rodents or their representatives, such as mice, rats or hamsters, also settled here.
There are also birds and insects such as bees, butterflies and even a penguin.

Of course, predatory animals.

And also elephants, giraffes, etc.

And finally, the most beloved detailed instruction from Leithygurumi, on which you can tie any animal.

If you liked the work, unsubscribe below and I will certainly send it by email required schemes and master classes.
In general, of course, needlewomen create such masterpieces, then you are often simply amazed at their fantastic skills and ingenuity, even babies make rattles or mobiles for newborns over the crib.

In conclusion, I want to say thank you all more for stopping by to visit me. Patience, perseverance, creative success and of course a great mood, without it anywhere. Write reviews, wishes I will be glad. Till! See you.
2809
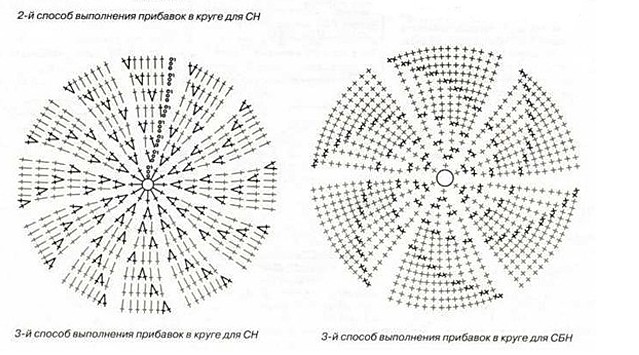
Amigurumi is a crocheting technique for small animals. It was invented in Japan. V Lately this activity is very popular. Diagrams describing how to crochet toys are necessary for choosing threads and creating a quality product.
Scroll:
Scroll:

The beginning of knitting
You need to start crocheting toys by studying the description and diagram.
To do this, you need to know the basic legend:
- VP - air loop;
- ss - connecting column;
- sbn - single crochet;
- ps - half-column;
- ssn - double crochet;
- ss2n - a column with two crochets;
- pr - knit 2 sbn in one loop, triple - 3 sbn;
- ub - we make sc in the next loop - there are 2 threads on the hook, again sc in the loop next to it - on the hook there are 3 threads. Pull the main thread through 3 loops. Thus, the two loops are combined.
- * 2sbn, pr *. Repeat * 2 times (8) - two single crochet, in the next column, etc. Repeat two times. It turns out only 8 loops.
Some components
Amigurumi technique involves knitting on both sides. Increases and decreases are used to shape the toy. You can't just skip the loop to decrease, as a hole will form at this place. To make the toy heavier, small beads are used, which are sewn into the fabric.
Starting to crochet toys, you must familiarize yourself with the description and diagrams in advance. All abbreviated names of the loops must be understood.
Ring: scheme and description of knitting amigurumi
Usually, most models start with a circle with a hole inside. The amigurumi ring technique will help solve this problem.
Detailed diagram:
- At a distance of 2.5 cm, make a loop, the thread is between the index and middle fingers;
- Insert the hook into the loop and stretch;
- Grab the working thread, pull it through the loop and tighten;
- Pull the hook simultaneously under both threads (main and tail);
- Crochet the main thread (there are 2 loops on the hook) and pull through the loops. It turned out the first sbn of the ring;
- Knit 6-10 sc and tighten the thread of the remaining ring. It turned out a semicircle from sbn;
- Thread the hook into the first loop and knit sbn.
Teddy bear - a simple diagram with a description for beginners
The height of the toy will be 8.5 cm, knit with iris brown and white, hook 1.15 (for a beginner 1.0). 
Details are knitted separately:
- Head
- Nose - white threads
Scheme:
- 2nd row - * pr * repeat 6 times (12);
- 3 row - * 2 sbn, pr *, repeat 4 times (16);
- 4th row - * 3 sbn, pr *, repeat 4 (20);
- 5 - 7 rows as 4th (20), sc for offset;
- 8 row - 20 cc. It is not tight to knit loops.
- Take brown thread. 9 row - 2 sbn, pr, 1 sbn, pr, 1 sbn, 3 increments, 2 sbn, 3 increments, 1 sbn, pr, 1 sbn, pr, 2 sbn (30);
- 10 - 12 row - * 4 sbn, pr *, repeat * 6 times (36);
- 13 - 15 row - * 5 sc, pr *, repeat * 6 times (42);
- 16 - 17 row - * 5 sc, dec *, repeat * 6 times (36);
- 18 row - * 4 sc, dec *, repeat * 6 times (30), sc for knitting offset;
- 19 row - * 3 sc, dec *, repeat * 6 times (24), sc for knitting offset;
- 20 row - * 2 sc, dec *, repeat * 6 times (18), sc for knitting offset;
Fill this part with padding polyester and give a neat shape to the head.
Face design: With black threads (floss or a simple thread folded in several rows) we embroider the nose with a triangle, from it to the sides there are two stripes in the form of a hook. Sew on beads - eyes and embroider eyebrows.
- 21 row - * sc, dec *, repeat * 6 times (12);
- 22 row - * kill *, repeat 6 times (6). Close the hole, hide and secure the thread.
Ears: Knit 7 stitches amigurumi ring. Tighten the thread to close the hole. 6 times pr, 1 ss (13). Leave the thread to attach to the head. Tie 2 ears. Choose the color of the yarn yourself (brown or white).
Torso:
- 1 row - an amigurumi ring of 6 loops;
- 2nd row - * pr *, repeat 6 times (12);
- 3 row - * sbn, pr *, repeat 6 times (18);
- 4th row - * 2 sbn, pr *, repeat 6 times (24);
- 5 row - * 3 sbn, pr *, repeat 6 times (30);
- 6 - 10 row - * 4 sbn, pr *, repeat 6 times (36);
- 11.12 row - * 4 sc, dec *, repeat 6 times (30);
- 13.14 row - * 3 sc, dec *, repeat 6 times (24);
- 15,16,17 row - * 2 sc, dec *, repeat 6 times (18);
- 18 row - * sc, dec *, repeat 6 times (12); Fill with padding polyester.
- 19 row - * sc, dec *, repeat 6 times (12), 1 ss
Leave the thread for sewing.
Lower legs:
- 1 row - 6 ch, 4 sc, start from the second loop, 3 sc in the last loop, 4 sc, pr in the same loop (13).
- 2nd row - pr, 3 sc, 3 increments, 4 sc, 2 increments (19).
- 3 row and a half - pr, 5 sbn, * pr, 1 sbn *. Repeat * 3 times, 5 sc, * pr, 1 sc *. repeat * 3 times, 7 sc (26). Change thread color.
- 4th row - 26 sbn behind the back wall for the stability of the paws.
- 5.6 row - 9 sc, 2 increments, 4 sc, 2 increments, 9 sc (30);
- 7 row - 9 sc, 6 decreases, 9 sc (24);
- 8 row - 8 sc, 4 decreases, 8 sc (20), sc for offset;
- 9 - 16 row - * 3 sc, dec *. repeat * 4 times (16);
- Sbn for offset;
- 17 row - * 2 sc, dec *. Repeat * 4 times (12).
- Fill with padding polyester.
- 18 row - * 1 sc, dec *. Repeat * 4 times (9).
- 19 row - * 1 sc, dec *. Repeat * 3 times (6). Leave the thread for sewing the legs to the body. Do not stuff the top of the legs too much, otherwise the legs will stick out.
Upper feet:
- 1 row - dial 2 VP, 6 PRS in the second loop from the hook (6);
- 3 - 6 row - * 3 sbn, pr *. repeat * 3 times (15);
- 1 sc for knitting offset;
- 7-15 row - 3 decreases, 9 sb (12);
- 2 sc for knitting offset.
- 16 row - * 2 sc, dec *. repeat * 4 times (9);
- 17 row - * 1 sc, dec *. repeat * 3 times. 1ss (6);
Leave the thread for sewing the legs to the body. Do not stuff the top of the legs too much.
Tail:
- (6);
- 2nd row - * pr *. repeat * 6 times (12);
- 3 row - * sc, dec *. repeat * 4 times. 1ss (8).
- Leave a thread.
Assembling the bear: Along with descriptions and diagrams, toys crocheted must be carefully assembled. This is a difficult stage and mastery comes with experience. Pin the lower legs. Sew the paws to the 6-7th row of the body. Sew the upper legs between the last and the penultimate row. Sew on the tail so that it does not interfere with sitting.
Chicken - a simple diagram with a description for beginners
Use hook number 2, yarn in yellow, orange, blue, lilac colors.
 To crochet toys, you must follow the description and diagrams.
 Head (yellow threads):
- 1 row - an amigurumi ring of 6 loops;
- 2nd row - 6 ave (12);
- 3 row - (1 sbn, pr) * 6 (18);
- 4 row - (2 sbn, pr) * 6 (24);
- 5 row - (3 sbn, pr) * 6 (30);
- 6 row - (4 sbn, pr) * 6 (36);
- 7 row - (5 sbn, pr) * 6 (42);
- 8-13 row - 42 PRS;
- 14 row - 7 sc, (1 sc, pr) * 3, 15 sc, (1 sc, pr) * 3, 8 sc (48);
- 15 row - 7 sc, (2 sc, pr) * 3, 15 sc, (2 sc, pr) * 3, 8 sc (54);
- 16-18 row - 54 PRS;
- Then there will be a decrease, therefore, between the 14th and 15th rows, sew on the eyes of the buttons;
- 19 row - (7 sbn, ub) * 6 (48);
- 20 row - (6 sbn, ub) * 6 (42);
- 21 row - (5 sbn, ub) * 6 (36);
- 22 row - (4 sbn, ub) * 6 (30);
- 23 row - (3 sbn, ub) * 6 (24);
- 24 row - (2 sbn, ub) * 6 (18);
- 25 row - (2 sbn, ub) * 6 (12);
- 26 row - 6 kill (6).
Stuff the torso with holofiber and pull off the thread.
Beak - orange thread:
- 1 row - 5 sc in the amigurumi ring;
- 2nd row - (1 sbn, pr) * 2, 1 sbn (7);
- 3 row - 7 sc;
- 4th row - (2 sbn, pr) * 2, 1 sbn (9).
Sew the beak between 16 and 20 rows, fill as it is sewn. Embroider eyebrows, eyelashes with black thread. Further, depending on the imagination, make a forelock, tint the cheeks.
Torso - yellow thread:
- Fill with holofiber as you knit.
- 2nd row - 6 ave (12);
- 3 row - (1 sbn, pr) * 6 (18);
- 4 row - (2 sbn, pr) * 6 (24);
- 5 row - (3 sbn, pr) * 6 (30);
- 6 row - (4 sbn, pr) * 6 (36);
- 7 row - (5 sbn, pr) * 6 (42);
- 8 row - (6 sbn, pr) * 6 (48);
- 9 row - (7 sbn, pr) * 6 (54);
- 10 row - (8 sbn, pr) * 6 (60);
- 11-18 row - 60 sb:
- 19 row - (8 sbn, ub) * 6 (54)
- 20-21 row - 54 PRS;
- 22 row - (7 PRS, UB) * 6 (48)
- 23-24 row - 48 sc;
- 25 row - (6 sbn, ub) * 6 (42);
- 26 row - (5 sbn, ub) * 6 (36);
- 27 row - (4 sbn, ub) * 6 (30);
- 28 row - (3 sbn, ub) * 6 (24);
- 29 row - (2 sbn, ub) * 6 (18);
- 30 row - 18 sbn.
Leave the thread and sew the head to the body.
Tail:
- The threads are yellow, not filled
- 1 row - 4 sc in the amigurumi ring;
- 2nd row - 4 ave (8);
- 3 row - 8 sc;
- 4th row - (1 sbn, pr) * 4 (12);
- 5 row - 12 sc;
- 6 row - (2 sbn, pr) * 4 (16);
Fold and connect sc. Sew on to the body at the level of the 8th row.
Wings - yellow thread, do not fill:
- 1 row - 6 sc in the amigurumi ring;
- 2nd row - 6 ave (12);
- 3 row - 12 sb;
- 4 row - (1 sbn, pr) * 6 (18);
- 5-16 row - 18 PRS.
- Fold and connect sc. Knit two pieces. Sew on at the level of the 24th row.
Legs - orange thread:
- Feet. Fill as you knit.
- 1 row - 6 PRS in CA;
- 2-4 row - 6 sc.
- Cut off the thread. Tie three pieces together. Fingers turned out.
- To connect, knit 2 sc on the first finger, knit the 3rd column of the first finger and the 1st column of the second finger together with a single crochet (i.e. we make a decrease), 1 sc, 3rd column of the second finger and 1st column we knit the third finger together, 4 sbn, the 6th column of the third finger and the 4th column of the second finger we knit together, 1 sbn, the 6th column of the second finger and the 4th column of the third finger we knit together, 2 sbn. There are 14 columns.
- 6 row - (5 sbn, ub) * 2 (12);
- 7 row - (2 sbn, ub) * 3 (9);
- 8 row - (1 sbn, ub) * 3 (6).
- Close the hole to hide the thread. Tie two pieces together.
- 1 row - 6 PRS in CA;
- 2 row - (1 sbn, pr) * 3 (9);
- 3-14 row - 9 sc.
Fold and connect the edges of the sc. We knit two parts. Sew the foot to the leg. With the edge that was connected by the sb, sew the legs to the body.
Easter Egg - Blue Yarn:
- 1 row - 6 PRS in CA;
- 2nd row - 6 ave (12);
- 3 row - (1 sbn, pr) * 6 (18);
- 4 row - (2 sbn, pr) * 6 (24);
- 5 row - (3 sbn, pr) * 6 (30);
- 6 row - (4 sbn, pr) * 6 (36);
- 7 row - (5 sbn, pr) * 6 (42);
- 8-16 row - 42 PRS;
- 17 row - (5 sbn, ub) * 6 (36);
- 18 row - 36 sc;
- 19 row - (4 sbn, ub) * 6 (30);
- 20 row - 30 sbn;
- 21 row - (3 sbn, ub) * 6 (24);
- 22 row - 24 sc;
- 23 row - (2 sbn, ub) * 6 (18);
- 24 row - (2 sbn, ub) * 6 (12);
- 25 row - 6 kill (6).
Close the hole, hide the thread. Cut off the braid, glue it to the testicle. Tie a flower. Sew a bead to the flower and glue it to the testicle.
Doggy - a simple diagram with a description for beginners
Hook No. 1, orange, white acrylic yarn. 
Head:
- 1 row: in 1 vp - 8 PRS.
- 2nd row: 2 sc from 1 loop.
- 3rd row: sc
- 7 row: sbn
- 8 row: 2 sc from 1 loop, 4 sc
- 9 row: sc
- 10 row: 2 sc from 1 loop, 5 sc
- 11 row: sc
- 12 row: 2 sc from 1 loop, 6 sc
- 13,14,15,16,17 rows: sbn
- 18 row: from 2 loops - 1 sbn (ub), 6 sbn
- 19,20,21,22,23 rows: sc
- 24 row: kill, 5 sbn
- 25,26,27,28,29 rows: sc
- 30 row: kill, 4 sbn
- 31,32,33,34 rows: sc
- 35 row: kill, 3 sbn
- 36 row: ub, 2 sbn, insert eyes between 22 and 23 rows, fill with stuffing for toys.
- 37 row: ub, 1 sbn ub, close knitting, thread the thread inside.
The head is ready.
Nose. Two details:
- 1 row: in 1 vp - 8 PRS
- 2nd row: 2 sc from 1 loop.
- 3rd row: sc
- 4th row: 2 sc from 1 loop, 1 sc
- 5 row: 2 sc from 1 loop, 2 sc
- 6,7,8,9,10,11,12 rows: sbn, cut the thread.
- Fold 2 pieces edge to edge, knit 12 stitches, connecting 2 rows.
Upper nose:
- 1,2 rows: sbn, strapping the outer edge.
- 3 row: kill, 2 sbn
- 4.5 rows: sc
- 6 row: Kb, 1 sbn Insert nose over eye, fill
- 7 row: decrease, knitting from 2 loops 1 sb, to the end. Sew the nose to the head.
White spot on the forehead:
- 1 row: 15 vp, 1 vp skip, 3 sc in 1 loop, knit to the last loop, in which to knit 4 sc
- 2nd row: from both ends you need to make 4 increments.
- 3 row: where they made an increase, 2 sc in 1 loop, between them - 1 sc
- 4 row: the whole row of ps. Close knitting.
Eye sockets:
- 1 row: in 1 vp - 8 PRS
- 2nd row: 2 sc from 1 loop.
- 3rd row: sc
- 4th row: 2 sc from 1 loop, 1 sc
- 5 row: 2 sc from 1 loop, 2 sc
- 6 row: ps whole row
- 1 row: 8 VP.
- 2nd row: 1 vp skip, knit sbn, in extreme loops we knit 4 sbn (pr).
- Knit the subsequent rows, adding where the pr is visible in the previous rows. A total of 4 increments from each edge. in the last row you should get 9 sbn
- Last row: sc without increments.
Sew the ears to the head so that one ear is raised.
Paws:
- Start knitting in white.
- 1 row: in 1 vp - 8 PRS
- 2nd row: 2 sc from 1 loop.
- 3rd row: sc
- 4th row: 2 sc from 1 loop, 1 sc
- 5 row: 2 sc from 1 loop, 2 sc
- 6 row: 2 sc from 1 loop, 3 sc
- Front paws - we knit 4 rows of sbn
- Hind legs - Knit 6 rows of sc
- 1 row: kill, 3 sbn
- 2 row: kill, 2 sbn
- 3rd row: sc
- 4th row: psbn
The result is pads: more for the hind legs, smaller for the front.
Go for a red thread. For the front paws: 2 rows of sc, on the 3rd row - dec, 2 sc. Next, we knit 4 rows of sc. Close knitting. For hind legs: 7 rows of sc. Stuff the paws. Connect 2 hind legs with a connecting loop, make a harness. 12 rows of sc. You should have about 49 stitches.
- 13 row: kill, 5 sbn
- 14,15,16,17,18 rows: sbn
- 19 row: kill, 4 sbn
- 20,21,22,23,24 rows: sc
- 25 row: knit the front legs from the bottom side, where the armpits are.
- 26 row: knit legs from the upper side, where the shoulders are.
- 27 row: sc. Close knitting. Stuff and sew the torso to the head.
Tail
- 1 row: in 1 vp - 8 PRS
- 2nd row: 2 sc from 1 loop.
- 3,4 rows: sbn. Close. Stuff and sew.
Embroider mustache, eyebrows, eyelashes. The dog is ready!
Kitten - a simple diagram with a description for beginners
The threads are white and gray. 
Head:
- 1 row - an amigurumi ring of 6 loops;
- 2 row - pr, (12)
- 3 row - sbn, pr (18)
- 4 row - 2sbn, pr (24)
- 5 row - 3 PRS, pr (30)
- 6 row - 4 sbn, pr (36)
- 7 row - 5 sbn, pr (42)
- 8 row - 6 PRS, pr (48)
- 9 - 14 row sbn (48)
- 15 row - 6 PRS, UB (42)
- 16 row - 5 sc, dec (36)
- 17 row - 4 PRS, UB (30)
- 18 row - 3 PRS, UB (24)
- 19 row - 2 sc, dec (18)
- 20 row - sc, dec (12)
- 21 row - 4 kill (6)
- Fasten the thread.
Torso:
- 1 row - Amigurumi ring of 6 loops
- 2 row - pr (12)
- 3 row - sbn, pr (18)
- 4 row - 2 sbn, pr (24)
- 5 - 8 row sbn (24)
- 9 row - ub, 2 sbn (18)
- 10 row - dec, sc (12)
- Fasten the thread and leave for sewing.
Rear paw (2 pcs.):
- 1 row - Amigurumi ring of 6 loops
- 2 row - pr (12)
- 3 row - sbn, pr (18)
- 4 - 5 row - sc (18)
- 6 row - sc, dec (12)
- 7 row - 2sbn, ub (9)
- 8-9 row - sc (9)
Fold in half, fill and sew. Leave the thread for sewing.
Front paw (2 pcs.):
- 1 row - amigurumi ring of 6 loops
- 2 row - pr (12)
- 3-4 row - sc (12)
- 5 row - 6 kill (6)
- 6 - 9 row - 6 sc
Stuff in and leave the thread to be sewn on.
Ears:
- 1 row - 5 loops amigurumi ring
- 2nd row - 5 sbn
- 3 row - pr (10)
- 4 row - 10 sbn, pr (15)
- Close and leave the thread to be sewn on.
Tail:
- 1 row: in 1 vp - 6 PRS
- 2nd row: 2 sc from 1 loop.
- 3,4 rows: sbn. Close
The next step: sew all the parts, sew on the eye beads, embroider the eyebrows, mustache, claws with black thread.
Crocheting toys is not difficult if you check the description and diagram. Detailed instructions help to complete the work quickly and efficiently.
Chicken toy - knitting pattern and description
Knitting details:

Knitting begins with making the head and torso. Details are made separately: beak, 2 legs and 2 wings. After assembling them, the crest and tail are formed. The final stage is decoration. A flower is put on the head of the chicken, the neck is decorated with a pendant, and the cheeks will become brighter with the help of blush.
Bunny toy - knitting pattern and description
Knitting details:

Knitting time: approx. 2-3 hours. Work on a toy must begin with making the head. Crochet toys with descriptions and diagrams are easy to assemble. To get a finished bunny, ears are sewn to the head, which are performed separately. Knitting ends with sewing in the eyelet, cheeks, nose and mouth.
Toy Elephant - knitting pattern and description
Knitting details:

Making an elephant begins with the creation of the head and body. Knit ears, trunk and legs are required separately. All details are alternately sewn to the body and head. The final stage of work on the toy is the sewing-in of eyes, mouth and bows.
Toy Kolobok - knitting pattern and description
Knitting details:

You should start knitting Koloboks from the body. When the base of the toy is ready, eyes, mouth and hair are sewn onto it. Bows will become the decor for the girl, and blush on the cheeks for the boy.
Toy mouse - knitting pattern and description
Knitting details:

Making a mouse begins with creating a head and torso. The legs, tail and tongue are knitted separately and sewn at the end of the work. Button nose and eyes are sewn to the head.
Piggy toy - knitting pattern and description
Knitting details:

It is necessary to start knitting pigs from the head and body. Legs, ears and heels are knitted separately. They are sewn onto the finished base of the toy. The final stage of work is decoration. The pigs should have hair, eyes, funny clothes and slippers.
Toy Cat with a Bunny - knitting pattern and description
Knitting details:

You should start making toys with knitting the head and body. With a description and diagrams, it is not difficult to assemble crocheted toys. Ears, tails, legs, scarves and mittens are created separately and then sewn to the body and head.
Toy Cat - knitting pattern and description
Knitting details:

The creation of a toy begins with knitting of individual elements: head, torso, paws, ears and tail. The final stage of knitting is the assembly of finished items. For decoration, a bow and a wire mustache are sewn to the cat.
Toy Snail - knitting pattern and description
Knitting details:
- The dimensions of the snail correspond to 10 cm in height and 5 cm in width (7 cm in the volume of the body).
- Body, head - peach-colored yarn.
- The shell is orange yarn.
- Flowers - emerald-colored yarn.
- Beads of 5 mm are required for the eyes, and 15 pearl-colored beads to decorate the shell.
- Knitting time: no more than 3 hours.


Snail making begins with the creation of the torso and head. When the base of the toy is ready, a separate shell is sewn to it. Then details are added: horns, flowers, beads and eyes.
Elk toy - knitting pattern and description
Knitting details:

Knitting should start by creating the base of the toy - the head and body.
The knitting is completed by assembling the finished elk. Handles and legs, horns and ears, tied separately, are sewn to the base.
Toy Panther - knitting pattern and description
Knitting details:

First of all, the head and body are created, which will serve as the basis for the future toy. To the finished base, it is necessary to sew alternately the hind and front paws, and the tail. A muzzle and ears are placed on the head. All parts for assembly are knitted separately. The panther is decorated with heart-shaped sequins.
Toy Sheep - knitting pattern and description
Knitting details:
- The dimensions of the lamb are 15 cm in height and 5 cm in width (in the volume of the body is 8 cm).
- The head and torso are white yarn.
- Legs, hooves and fur coat - pink yarn.
- Shoes - purple yarn and pink beads.
- For the eyes, you need 2 small black beads.
- The skirt requires pink polyester.
- Knitting time: no more than 4 hours.


Knitting begins with shaping the head and torso. When the head and torso are connected, the limbs are sewn to them. The head is decorated with eyes, nose and mouth. The shoes are decorated with beads. A fur coat is put on the finished toy.
Toy Bear - knitting pattern and description
Knitting details:

The base of the toy will be the head and torso, which are knitted at the beginning. Handles and legs, made separately, are sewn to the body. The head is decorated with ears, muzzle and eyes.
Toy Little Dragon - knitting pattern and description
Knitting details:

Knitting begins with shaping the head. Following her, the body is formed. With a description and diagrams, it will not be difficult to assemble a finished crocheted toy from many parts. Handles and legs, comb, wings are attached to the body by a rope method. The head is formed by the nostrils, eyes and ears.
Toy Pony - knitting pattern and description
Knitting details:
- The size of the pony is 33 cm in height and 11 cm in width (in the volume of the body 14 cm).
- The head and torso base, ears and legs are purple yarn.
- Hooves, crest, tail - lilac yarn.
- The muzzle is pink yarn.
- For the eyes, you need black, white and blue yarn.
- Knitting time: no more than 4 - 5 hours.


Knitting should be started by creating the head and neck. Then the torso is formed, as well as the legs alternately. The assembly completes the knitting. The head is formed by ears, eyes, nostrils and mouth. It joins the torso with a filler-filled neck. Legs and decorative elements are sewn on: mane and tail.
Toy Doll - knitting pattern and description
Knitting details:

Knitting begins with creating the basis for the future toy: head, torso and legs. The handles are knitted separately and attached with a thread fastening. The final stage is decorating the doll with hair, dress and shoes.
Toy Kitten amigurumi - scheme and description of knitting
Knitting details:

It is necessary to start knitting from the head and neck. Then the torso of the toy is created. The assembly of small parts is completed: legs, tail and ears. You can decorate the finished kitten with a bow.
Toy Duckling - scheme and description of knitting
Knitting details:

Knitting begins by creating a head and torso with a tail. Wings, paws, straps and a beak are sewn to the finished base of the toy. Decorating the shoulder straps with buttons completes the work. When crocheting toys, it is important to rely on patterns. With their help, the toy will exactly match the description.
Cute knitted toys that can fit in the palm of your hand came to us from Japan. Amigurumi - translated from Japanese means "knitted-wrapped". From year to year knitting amigurumi attracts new supporters into its ranks.
How amigurumi differ from ordinary toys
The main features of knitted amigurumi toys:
- They should be small. As a rule, the size of a toy does not exceed 7-10 cm, although there are also large figures.
- They should be cute: animals and dolls have arms and legs, eyes and a mouth are required on a pretty face, it is possible to tint the face to make it more attractive.
- Toys often have a disproportionate figure: a large head in relation to the body with low-set eyes and a high-set nose and mouth, the face expresses some kind of emotion: sadness or joy, surprise or admiration.
- Amigurumi are knitted with a very dense viscous, through which the gaps are not visible, then the parts are stuffed and connected using threads or hinges.


All parts for the toy are made separately, so crocheting amigurumi for beginners may seem difficult, because the knitting should be tight, and given the miniature size of the toy, it is not so easy to make it. Therefore, it is recommended to start with more simple toys and then complicate the job.

Materials for work
You can crochet or knit miniature toys. The yarn should be chosen based on the size of the desired toy:
- for the smallest toys "Iris" is suitable;
- cotton - the best way for amigurumi, but such yarn requires knitting skills, since it must be dense;
- you can take wool if you want to get a voluminous, fluffy animal - after finishing work, the toy can be additionally combed;
- "Grass" allows you to get shaggy funny animals. Knitting from this yarn is easy and fun, the "grass" can be combined with other yarn: for example, use it for the body, and knit the rest of the parts from ordinary yarn.

You will need a crochet hook or knitting needles for knitting. Knitting amigurumi toys is done in a circle, so the hook is more convenient in work, only you need to choose it with a smaller diameter than for regular knitting: this way the fabric will be denser.


Master class for beginners
Begin knitting with a ring. The amigurumi ring is knitted in one of two ways:
- Leaving the end of the thread, make 2-3 turns of thread around your finger, tie the resulting ring with half-columns. When you reach the end, tighten with a ring and knit the next rows in a spiral.
- Loop around the hook and draw out the thread. Tie the resulting ring as indicated above.

The first way - traditional Japanese, is considered to be stronger.

Having mastered simple techniques, you can knit any toy: photos of the amigurumi and description are presented on various sites of needlewomen.

We suggest to start with knitting a small bear. We knit amigurumi, starting from the head:
- We make a ring of 6 single crochet stitches, knit two over each stitch, for a total of 12 stitches.
- In the third row, add 1 loop each through 2 loops of the previous row.
- We knit 4-5 rows without additives.
- In the 6th row, you need to evenly add 6 columns, the 7th row - without additives.
- In rows 8, 9 and 10, add 6 columns evenly.
- We knit rows from 11 to 16 without additives (total 42 columns).
- From the 17th row, we make decreases - in each circle, 6 loops evenly, at the end we tighten the thread.
- In about 18-19 rows, you need to fill the bear's head with filler.

The torso of a bear
The body of the bear is knitted according to the same principle: the additions need to be done in 3, 4, 5, 6 and 7 rows, then knit without changes until the 16th row, make decreases from the 17th row (6 in each row), do not forget fill in the body before pulling the last loops.


When the principle of circular knitting is clear, it is not difficult to make the arms and legs: starting with the amigurumi ring, add 3 columns in 3, 4, 5 rows, then knit from 6 to 8 rows without changes.

Knit rows 9-11 like this: 4 tbsp. b / nakida, 4 tbsp. with / yarn. From rows 12 to 15, subtract 3 columns in each row. Stuff in the handles and tighten the thread.

Bear legs
- We collect 5 air loops and knit: 3 tbsp. b / nakida, 3 of 1 air loop;
- 2nd row: 2 tbsp. b / nakida, 3 of 1 air loop, 2 tbsp. b / nakida;
- 3-4 rows without additions, you should have 16 columns;
- 5 row: 5 tbsp. b / nakida, 3 decreases with 1 yarn, 5 tbsp. b / nakida;
- 3, 6, 8, 10,11, 12 rows - no changes;
- 7 row: 5 tbsp. b / nakida, additive, 5 tbsp. b / nakida;
- 9 row: 6 tbsp. b / nakida, additive, 6 tbsp. b / nakida;
- 13 row: 2 tbsp. b / nakida, 4 decreases;
- 14 row: 1 tbsp. b / nakida, 1 decrease. Fill the feet and tighten them.

Ears
The ears are knitted from 2 air loops: pull out 4 tbsp. b / nakida, in the second row, double the number of columns, add 4 more columns in the 3rd row.

Sew all the details neatly, making sure that they are symmetrical, glue or sew on the eyes, nose. The bear is ready.


Photo amigurumi for beginners


Today we will talk about a very popular modern trend of knitting toys - amigurumi! The founders of this art are our eastern neighbors - the Japanese. Translated from Japanese, amigurumi means "knitted-wrapped". To understand all the intricacies of this "wrapped" case will help the review article "Cross", which contains all the necessary information on making amigurumi for novice needlewomen and craftswomen with experience!
So, amigurumi is the Japanese art of knitting or crocheting all kinds of small animals, men, as well as inanimate objects (cakes, handbags, etc.).


Crochet Ice Cream
The most popular and most common are crocheted amigurushki. Initially, these "little inches" reflected the heroes of popular Japanese cartoons, but over time, the needlewomen of the land of the rising sun began to knit animals, household items, and much more. Soon, thanks to the Internet, amigurumi conquered the whole world! Lovely toys carry a special oriental philosophy of goodness and beauty!


