There are no unimportant elements in wedding decor. Attention should be paid to all the little things in preparation. If the holiday is going to be held in a certain style, you need to subordinate all the attributes to this particular theme. And even wedding champagne bottles, which traditionally stand out among other alcohol, should be decorated in the same color scheme with other elements. The easiest way is to order a ready-made champagne outfit. But remember how much you still have to spend, and try decorating the bottles with your own hands. This way you can not only save money, but also create a unique design of wedding champagne that will ideally fit into the theme of the holiday.
DIY wedding champagne bottles in white and green tones
Only, at first glance, it seems that decorating bottles without possessing certain skills is difficult. Get to know detailed master classes and such doubts will disappear.
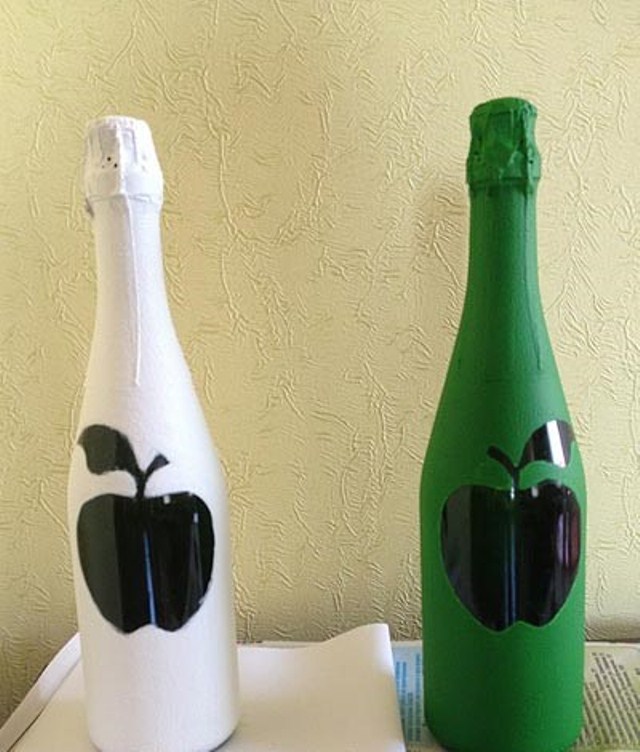
We offer to decorate wedding champagne with your own hands for a holiday in white and green shades. This decor is also perfect for a green apple wedding.
Choose green champagne bottles, which is necessary for the base of the main symbol - an apple.
To decorate bottles, you need to stock up on material:
- white acrylic primer;
- white and light green acrylic paint;
- decorative white and green roses - fabric or made of polymer clay;
- beads with a diameter of 3 mm pearl and green;
- satin green ribbon 25 mm wide;
- green tulle.
To work, you will also need an available tool:
- flat brushes with bristles # 12 and # 20;
- round padded foam brush;
- hot glue gun;
- tweezers.
Additionally, you will need glue and regular alcohol. When preparing the workplace, do not forget to lay out cotton pads, a few napkins and paper towels or newspapers.

To begin with, we completely clean the bottles of industrial labels.
This is easy to do if you put them in a soapy solution for half an hour. After that, it will be enough to walk with a sponge to remove all the paper and glue. It remains to rinse the container under running water.
We wipe them dry and proceed to degreasing the surface. We will process the glass with cotton pads dipped in alcohol.
Now you can start painting. But before applying the primer, you need to make the foundation of the future "green apple". To do this, find a suitable picture with the image of an apple.

You can use ready-made template: Copy the picture to your computer and print to your printer.
Cut out the finished image of the apple along the contours. It remains to moisten it with plain water with back side and attach to the bottle.

Before applying the base paint, the glass must be primed. We will do this with white acrylic primer. Please note that the primer must be suitable for working on glass, as not all materials are suitable for this.
It is best to use a flat brush to apply primer to glass.
Advice! Apply the primer in one direction.
After the first layer has dried, you can cover the bottles with the base a couple more times. This is important when working with glass.

When the material is completely dry, proceed to work with paints.
Since the outline of the apple has already been outlined, the template can be removed at this stage.
If the sticker will not peel off well, use a regular blade.
If you wish, you can paint the champagne bottles in one color. But for a wedding, it's better to make them multi-colored. In our case, we will paint one container in a snow-white color, the second in a bright green.

You can choose the suitable shades yourself and even color range.
To apply acrylic paints, we need a brush with foam rubber in the form of a round pad.
But even if you haven't found such a tool, don't be discouraged. Take regular foam rubber or cut a piece of a dishwashing sponge.

Advice! Apply acrylic paint by touching the foam rubber to the surface. Do not smudge or rub the paint.
In total, paint the bottle 3 to 5 times to get a uniform and dense surface.

The paint on the bottles should dry completely.
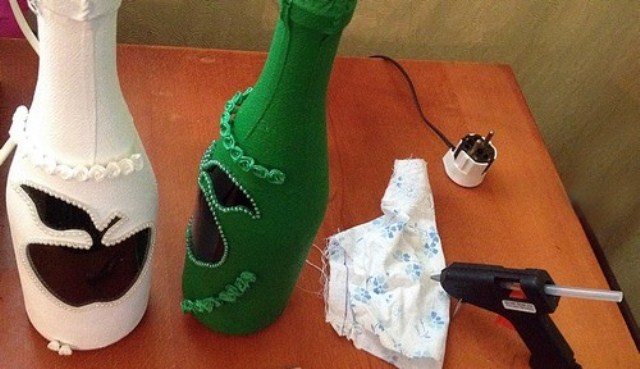
Only after complete drying do we start decorating wedding champagne with our own hands. We start by decorating the contours of the apple with beads.

Carefully remove excess paint from the very base of the apple with a blade. But the contour will still remain sloppy. Therefore, it is better to trim it with beads in the color of the bottle.
The glue of the beads will be the "Crystal" moment glue, which does not leave marks and streaks on the surface. We apply the glue with a pistol and immediately glue the bead, which is better to take with tweezers.
Position the beads so that the holes are overlapped by adjacent beads. Don't be afraid to be wrong. You can remove an incorrectly fitted bead at any time. In this way, we process the entire contour of the apple.
Now let's start decorating the bottle with roses. Pick up ready-made satin flowers in the store.

By the way, decorative flowers are easy to make yourself from a satin ribbon.
If you wish, you can decorate the bottle with ready-made petals and flowers made of polymer clay.
How to lay out a pattern of roses, imagine yourself.
In our case, the flowers are glued in the form of decorative trim above the apple and along the bottom of the bottle.
As well as beads, roses can be peeled off and transferred to the desired place if they are not properly positioned.
In this case, it is better to apply the glue to the base of the flower itself and attach it to the painted surface of the bottle with tweezers.

It remains to tie the ready-made wedding champagne with a satin ribbon in the form of a bow. If you wish, you can place tulle under the ribbon, which will give a more festive look to the wedding "bulls".
A beautiful pair of champagne bottles are ready for the holiday.
It is ideal for a spring or apple wedding, as well as a celebration in white and green colors.
If decorating the bottles did not cause any difficulties, decorate the wedding glasses using the same technique, which will perfectly complement the composition.
DIY wedding champagne bottle decoration in gold tones
If the prospect of working with acrylic paints does not cause much delight, then it is better to get acquainted with a simpler technique with the use of paints in aerosol cans.
The next master class is dedicated to DIY decoration wedding bottles champagne for a golden or fall wedding.
We buy two bottles of champagne of any kind and manufacturer. You can even take drinks different kind... The main thing is that the bottles are of the same type externally.
From the tool we only need a thermal gun and tweezers. But for materials you will have to go to a specialized store for needlewomen. There you will need to purchase satin fabric champagne color in size 30 * 350 and peach color in size 40 * 250. You will also need 1 m of peach satin ribbon and 15 cm - champagne color. Purchase white beads of various sizes there.
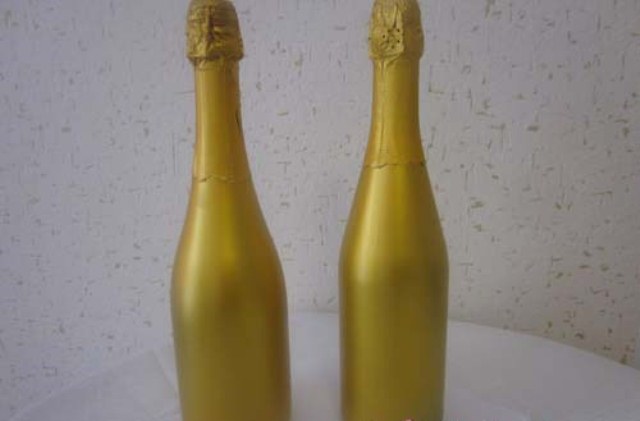
We purchase paint for coloring bottles golden color in an aerosol can.
Before decorating the bottles, we remove the factory labels. This can be done with soapy water or a utility knife.

After that, degrease the glass by wiping it with alcohol. When the alcohol evaporates, we start coloring.
Shake the aerosol can vigorously. We place a container with paint at a distance of 40 cm from the surface to be treated. We begin to spray the golden solution, scrolling gently through the bottle itself.
Keep in mind that when working with an aerosol, paint drops will scatter to the sides. Better to work outside or cover your work surface with newspapers. You also need to build a wall behind the work surface out of cardboard so as not to paint the walls.
After the first staining, leave the bottles to dry for 15 minutes.
In total, you will need to repeat the staining at least 4 times. Leave the fully painted bottles to dry for 1 - 1.5 hours.
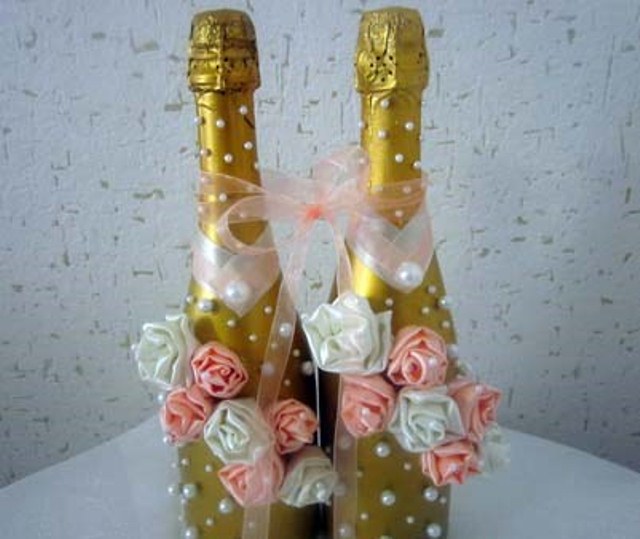
In the meantime, let's start making decorative roses. To do this, cut the fabric cuts into long strips 5 cm wide.As a result, you should get 8 peach-colored strips 25 cm long and 6 champagne-colored strips 35 cm long.
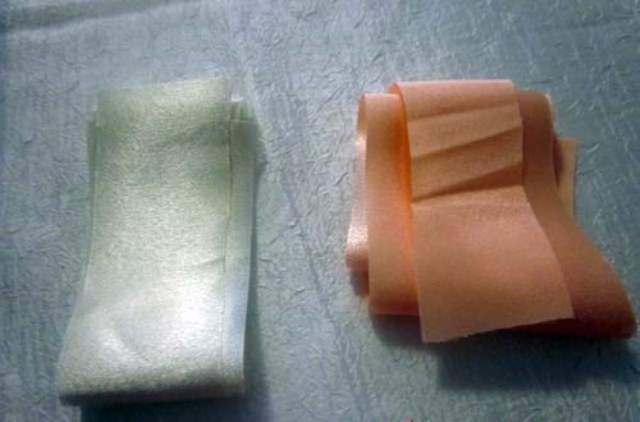
The edges of the ribbons obtained are fired with a lighted candle to prevent the threads from falling off.

Each strip must be folded in half and connected securely. They can be easily sewn on a typewriter or simply sewn by hand. It will be easier for someone to use a thermal gun.
We begin to form roses from voluminous ribbons. First, we twist the edge and attach it with glue.

We continue to twist the fabric, remembering to process the edge of the base with glue. Using this method, we twist the entire strip.

As a result, you should get 8 peach roses and 6 more voluminous light ones.

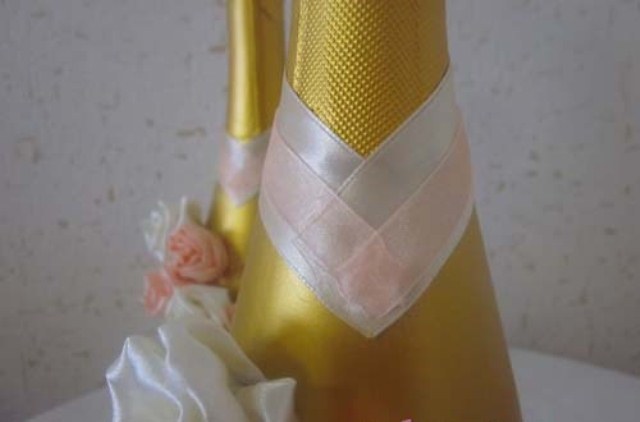
We start decorating dried bottles by gluing tapes. First, glue a wide light satin ribbon at an angle, as shown in the figure. Above it you need to attach a narrower peach one.
In this way, defects and irregularities in the foil edge can be closed.

Now you can proceed to fixing the roses themselves. To do this, apply glue to the base of the flower and attach it to the surface of the bottle in the right place.

Think in what order and at what angle to place all the buds.
Let's move on to decorating the bottle with beads.

Scatter them over the entire empty surface, over the neck.

Place small balls on some of the buds and a large bead on the joint of the ribbons on the neck.

Our wedding champagne is ready.
If desired, the bottles can be tied with a light transparent bow.
To match the golden bottles, you can arrange glasses, pads for rings. This design of wedding paraphernalia will perfectly fit into a peach, gold or fall wedding.
But even if a different color scheme is chosen for the holiday, you can easily replace the gold with a suitable shade, as well as choose contrasting or shading ribbons for roses.
DIY wedding champagne: photo of decorated bottles
More ideas for decorating wedding bottles using different coloring techniques can be seen in the gallery. Keep in mind that you can paint both the bottles for the newlyweds and the rest of the champagne for guests.
You can cover wedding bottles with aerosol and acrylic paints, silver and gold, broken Christmas toys and glitters.
On top you can decorate with ribbons, bows, satin and polymer flowers, petals, tulle and lace.
Imagine, and you will definitely get exclusive wedding bottles that fit perfectly into the wedding concept and emphasize the individuality and creativity of the couple.
Video: decorating wedding champagne bottles with your own hands with glitter
The general design concept of the celebration largely determines how to paint a champagne bottle for a wedding, so that it organically fits into the style, becomes a spectacular decoration and is remembered as an original design solution.
The options for work largely depend on the thematic focus: for modern styles high-tech and color weddings that emphasize status; metallic luster is great; shabby chic or provence require soft tones, ostentatious aging in conjunction with decoupage; country, hawaii, vintage - contrast and brightness. In all styles, matching the image of the bride and groom is appropriate.
To apply a thin pattern to glass, it is advisable to choose an alcohol-based paint - it will last longer on such material.
 However, painting can be done with any other non-toxic compound used by artists or builders.
For this purpose, the following paints are used:
- acrylic;
- water-based;
- stained glass;
- aerosol.
The durable coating formed by the acrylic compound is durable and allows you to attach decorative elements to it or cover the created reliefs from applied elements (napkins, threads, grains, clay).
By purchasing a white base paint and a set of pigments, they get the opportunity to combine, create smooth color transitions and halftones. Water-based compositions for internal work dry quickly, they are good to use in such cases:
- for coloring the bases while preserving their texture - twine, threads, ribbons are wound on the bottle, an applique is made of paper or fabric;
- freshly painted glass is rolled in decorative chips;
- spread glitter over the base layer and open with varnish.

The color palette for water emulsion is not limited. From stained glass paints, a non-fired type is chosen, before working with which heat treatment of a bottle filled with wine is not required.
This option for self-painting wedding bottles requires starting preparation in advance, since the product dries from 3 to 5 days. Stained glass formulations form a transparent coating that gives a striking stained glass effect.
Paint from a spray can (aerosol) forms a uniform thin film that allows you to maintain the elegance of the shape, to avoid the appearance of a noticeable difference between the painted fragment and clean glass.
It is with these compounds that the gold, pearlescent, or silver coating of wedding bottles is made.
Here is one of the options for decorating a wedding champagne bottle:
Spray paint is the only type that does not use a brush or swab.
To indicate the boundaries of the processed fragment, it is pasted over with adhesive tape.... Weightless drawing with spray paint makes it easy and quick to decorate in the same style as beautifully, a vase for a bouquet, on.

The effectiveness of the use of aerosols gives rise to amateur solutions in decorating bottles with their own hands.
An example of an almost instantaneous change appearance vessels with champagne - apply a layer of hairspray from a balloon, distribute glitter on it, cover with another layer of varnish.
How to paint wedding bottles with your own hands - a master class
It is better for a novice designer of wedding champagne bottles to first get acquainted with a master class on the chosen design style.
The general rules for the sequence of operations for decorating glass containers can be summarized as follows: 
- In most cases, when working with paints, the stickers from the bottle must be removed - they are washed off with warm water, the glass is degreased with acetone or alcohol. The foil can be left on the neck, although some concepts prefer to expose the wire and cork.
- The use of thick paints gives a matte effect to ceramics and allows you to apply texture patterns to them, which are conveniently applied with a foam swab. Apply liquid paints with a brush. Aerosol spraying is best done in 2 passes, without bringing the can close to the surface to be treated (to avoid drips).
- The effect of sophistication, aristocratic minimalism can be achieved by careful selection of the color of a single-layer coating and 1 - 2 overlaid elements, which are fixed with a glue gun. As a decoration, you can take pearl beads and laconic lace ribbons. Instead of verbose poetic wishes - confine yourself to a monogram made up of capital letters of the names of the newlyweds. If you keep this bottle as a souvenir, then it can be opened for any wedding anniversary or other family celebration.
- Multi-layer compositions are applied in this order: allow the base layer to dry, cover selected areas with glue and sprinkle with glitter. After removing the excess that is not fixed on the sticky surface, repeat the operation in those places where there were gaps. After that, it remains to decorate the bottle with ribbons, beads, rhinestones.
- Relief or writing under a layer of paint can be made from paper, acrylic, or liquid nails. To perform the reverse task, first, a picture / letters from self-adhesive are glued onto the glass, and after painting they are carefully removed. The surface of the bottle looks beautiful, which was densely sprinkled with small crystals (the freshly painted one was rolled in a tray with Epson's salt) and covered with a layer of acrylic paint.
- Aerosol painting requires covering the adjacent surfaces with film or paper, protecting hands, respiratory organs and face from the vapors of the sprayed composition. These precautions are not comparable in cost to the resulting effect of the process.

For such a thin layer of paint, the bottle is completely stripped of stickers and foil. Metallic coatings make the right impression if they are superimposed on 1 (maximum - 2) contrasting bright color.
How to decorate a painted champagne bottle - fashionable options
 Wedding champagne bottles with exclusive molding from polymer clay are gaining popularity. An ensemble of rose buds of different sizes under a protective layer of glossy gel is itself a work of art and does not require bright coloring in natural shades.
For greater solemnity, one-color beads reflecting light rays are included in it.
You can use a glue gun to make flower buds from satin ribbons and attach them ready-made anywhere on the bottle and set of glasses.

To make the fabric look natural on the painted surface, additional details from threads or braid are added to the created composition.
The finished drawings, on an almost invisible base, are placed on the champagne bottle using paper napkins... Fragments of thin paper with a pattern are glued in place and opened with a glossy gel. The thickness of the napkin practically does not differ from the paint layer.
A creative solution in the design of bottles for a themed wedding was the use of stencils, with the help of which, after applying the main image, you can make an elegant frame with a brush.
This video will show you several options for champagne decor for a wedding:
You should not overload the bottle of champagne with decorative details - you need to remember that for completeness of the composition, it is better to distribute secondary and background elements around the place of its installation. The groom should be able to comfortably take this masterpiece in his hands, uncork and fill the glasses without significantly losing the appearance of the bottle.
A beautiful and original wedding table decor is very important at a wedding. Why is it so important to decorate the table with a pair of original decorated champagne bottles? As a rule, the bride and groom decorate wedding bottles with their own hands. And this champagne is not touched throughout the entire celebration.
- The first bottle is kept for the wedding anniversary.
- The second is opened when the firstborn is born.

There are many ways to decorate champagne. We will sound a few of them, the master class proposed below will help us figure it out.
Whichever decor option you choose, first you need to remove the label from the bottles and prepare the surface.
To do this, put the bottles in a saucepan or basin, pour warm water and add dishwashing detergent there. We wait 30 minutes and then carefully remove the label. Wipe dry and degrease with acetone or alcohol.
The easiest option: light lace decoration. This work does not require large costs and efforts. All you need is lace, beads, spray paint, glue, and a couple of satin ribbons.

An unusual option is to decorate the bottle with flower petals. Do-it-yourself artificial flowers are also suitable here.

The traditional decoration option is to wrap narrow ribbons around the bottle. Ribbon decor can be supplemented with beads, rhinestones, lace, polymer clay and satin flowers.

An original solution for those who love exotic and Chinese cuisine. Suitable for those who sew well.

Touching and cute polymer clay roses are definitely suitable for. If making clay flowers is a challenge for you, these roses can be purchased at a craft store.

This master class will help you decorate champagne bottles and glasses in the same style at no extra cost. You can take absolutely any color to your taste. Of course, the bride and groom must be in solidarity in their choice. wedding decorations.
For work you will need:
- Champagne - 2 bottles
- White spray paint in a can - 1 piece.
- Satin ribbons white and lilac - 2 meters each.
- Double-sided adhesive tape.
- Beads.
- Polymer clay flowers.
- Glass contour.
- Stationery glue.
- Clay Moment.
Wash off the stickers from the bottles with warm water and a sponge. Degrease the surface with alcohol or acetone. We are waiting for it to dry. Next, we glue paper squares; after painting, clean glass should remain in these places. Can be decorated with butterflies or whatever.

We take a can of white paint (you can choose a golden, silver color), paint the glass from a distance of 20-30 cm. We paint at least 3 times, after each time we wait for it to dry.

Carefully remove the squares of paper. If the glue sticks, scrape off the glass with sandpaper. Unfilled squares and stripes remain.

On a clean glass with glue. Moment glue the flowers.

We paint the flowers and the bottle with a contour on the glass.

We glue the beads onto the white paint. If the beads are large, use a knife and hammer to split them into two halves. Glue the halves too.

At the end of the work, we tie the bottle satin ribbons, we begin to weave from the neck. To keep our ribbon in place, just in case, fasten it with double-sided tape every 5 cm. We tie the ribbons with a knot and a bow.

So the decor of wedding champagne bottles is ready. This is how ribbon bows should look.

Classic wedding decor takes more time and skill than the previous one. But if you try, everything will work out for you. We will make champagne and the same.

For work you will need:
- White inlay - 10.5 meters.
- Black binding - 8 meters.
- Glue Moment (preferably a pencil).
- Nylon bow - 3 meters.
- Lace - 10 centimeters.
- Rhinestones.
Champagne for a wedding can be decorated with a satin ribbon or colored trim. These are all sold in craft stores.
Use a tape, it stretches better than tape, it will be more convenient for you to stick it on the bottle. The Moment glue stick is best suited for these purposes.

Remove the labels, leaving gold foil on the neck. Cut off a piece of lace and glue it.

Draw a vertical line across the bottle of soap. This will make it easier for us to work. Next, we begin to decorate with a white inlay. The first turn was glued, then grease the glass with glue, slightly touching the previous row.

You need to glue, slightly pulling the strip. After each turn, cut the strip along our marked line. We have pasted over most of the champagne.


We need to decorate the work further, make a skirt for the bride. Take a wide white ribbon, divide it into 3 parts and connect its edges. Use a lighter or soldering iron. Sewing on our 3 skirts and trying on a bottle of champagne. We tighten the thread.

Distribute the fluffy skirt evenly. We glue the frills at a distance of 1.5-2 cm.

At the end, we will arrange the neck: glue rhinestones on a narrow golden ribbon

This decor is similar to the previous one. The only difference: we make the upper turns white and the rest are black. Decorate with a butterfly made from a piece of black satin ribbon.

Glue rhinestones on top of the butterfly. Three rhinestones will simulate buttons. We glue a piece of black bike - this will be a pocket with a white handkerchief.


A wedding is a day when a boy and a girl, a man and a woman change their status. Strangers enter the door of the registry office, and the closest ones come out: husband and wife. There will still be a lot of things ahead: both joyful and sad. And today the wedding is the Birthday of the Family.

Many traditions are associated with wedding celebrations: the bride should not see herself reflected in the mirror in full wedding decoration, the bride's ransom, a loaf of salt on a towel, broken glasses. A rare wedding is complete without stealing the bride, drinking champagne from a shoe, throwing a garter, and a bridal bouquet. Even the exchange of rings has its own sacred meaning. It is also customary to leave bottles of champagne at a wedding that no one opens. And at the end of the feast they are taken home.
Decorated bottle of champagne on the wedding table

Even 30 years ago, champagne for a wedding was simply put on the table. The most luxurious decoration for the wedding was bottles of dark green glass, which were tied with a satin ribbon, and a large bow was made. After all, "getting" the champagne was already good luck.
The bride and bridesmaids are pretending to be scared of the cotton from the cork flown out, but they drink champagne with pleasure, the hops from it are light, and the mood is good.
On the modern wedding young and guests are served champagne from simple, unadorned bottles. But throughout the entire banquet, there is a pair of decorated champagne on the table. On the first anniversary, the husband and wife drink one of them. Together with light champagne, a good wedding mood returns. The second is drunk when the husband and wife become mom and dad - for the birth of their first child.
What kind of bottles for the wedding are not prepared by the organizers! And vodka with photographs of young people, and a thousand-star cognac called "Severe Father-in-Law", but still we must not forget that the drink for the wedding is champagne.
Decorating a bottle of champagne for a wedding

There are many ways to decorate a bottle with your own hands.
Simple ways to decorate:
A common action before starting work is to remove the stickers and labels with your own hands.
For this you need:
- foam sponge;
- wire sponge;
- a bowl of warm water;
- alcohol;
- napkin.
Using a sponge dipped in warm water, moisten all decals. Wait 5-10 minutes, swipe with a damp sponge again. Typically, the paper labels then easily "come off" from the glass. If there are fragments of glue and labels, then rub them with a metal sponge. After removing the stickers, wipe dry with a cloth. Wipe with a swab soaked in any alcohol-based liquid and let dry.
Simple wedding champagne bottle decoration
Equipment:
- ready-made stickers.
This is the easiest way to decorate champagne with your own hands.
In the wedding salon, buy ready-made stickers for champagne, when choosing, be guided by the main color scheme of the banquet hall. Remove them from the cardboard base and carefully stick them onto the bottle. Self-adhesive stickers. This method is indispensable if in the wedding bustle they simply forgot about this element of the celebration, and there is simply no time left for the complex decor of the bottles. A lot of time is always allotted for the preparation of wedding decorations, but the beauty of these works is seen precisely in the little things.
Yin Yang style champagne bottle decoration
Equipment:
- satin ribbons 1-1.5 cm wide, black and white;
- PVA glue;
- brush;
- some white lace or organza.
Apply glue to a bottle prepared by our own hands with a brush. Then we press the end of the tape at the bottom with one hand, and with the other we begin to untwist the roll of tape, winding it in a circle with a small "overlap" (so that the edge of the upper layer goes by 1-2 mm onto the lower layer). You can glue the tape evenly or slightly at an angle, obliquely. We decorate one bottle with a white ribbon, the second with a black one. From a small amount of lace or white organza, you can make a "veil" for a white bottle-bride.
The decor is very simple and laconic, a budget option, because bottles for a wedding do not have to be ordered from eminent designers. The more props and decorations are made for the wedding with their own hands, the more pleasant it will be for the young - it will become clear that they were preparing for the celebration especially carefully, that is, they spent not only money and time, but also invested their own labor. This design option is suitable for those who have a little time to prepare for the wedding, but certainly want to do something with their own hands. After all, this is how the traditions of a young family are born to interact with each other, to act as one team.
Decorating a bottle of champagne with decoupage elements
Equipment:
- a roll of white three-layer paper;
- PVA glue;
- brush;
- spray paint can of gold color;
- any not wide ribbon of golden or yellow color;
Divide gently with your own hands toilet paper into layers. Lubricate the surface of the bottle with enough glue, wrap the bottle in one layer with one of three layers of paper up to the neck. Gently but firmly press the paper against the glass. Leave to dry. From the glue, the paper will begin to "bulge" a little and create a fancy relief, "skin effect". So a bottle with a label from "the darkest and wettest cellars of Burgundy" will get to the wedding. After completely dry, again grease the surface with glue and wrap the bottle with a second layer of paper. Leave to dry completely. Do the same with the third layer.
After complete drying, wrap the neck with the rest of the paper and fix it on it (so as not to get paint). Spraying paint from a can with your own hands, cover the paper with the first layer of paint, let it dry, repeat the painting one or two more times. This way of decorating creates the effect of natural leather cases. After completely dry, remove the protective paper and tie a bow on the neck to your liking. You can also take silver paint. This is an allusion to the long-term nature of the marriage - the desire to live up to golden age or to invite family and friends to a wedding called silver.
Master class on decorating a bottle of champagne for a wedding

If time permits, and most importantly, there is a desire to arrange everything professionally, but with your own hands, you need to undergo training from real masters. It's great if you find the opportunity to walk together. A good reason to learn how to achieve your goal, creating the basis for future family well-being with your own hands. People with handicraft skills willingly conduct master classes. Real masters work in a variety of techniques. This is how you can decorate bottles in the traditional style of "bride and groom" in a variety of ways:
- crocheting "costumes";
- creation of genre compositions from textile fabrics, ribbons, lace;
- decorating natural materials: dried flowers, cereals, pasta;
- decoupage;
- mixed techniques: for example, decorating with nylon with decoupage elements;
- the use of photographic equipment;
- case bags;
You may have to attend several classes to complete your work. Before proceeding with the design of a bottle of champagne, you will have to undergo training on empty bottles.
In order to save time, you can also take video lessons. But a sense of proportion is important in everything. Do-it-yourself bottles should look stylish and appropriate on the wedding table, match in style with the design of the hall and table. All decor and decorations for the wedding should be in good harmony with each other.


And so, at the family council, it was decided not just to run off to the registry office and not just "walk to the wedding" for the guests, but to hold a beautiful celebration. You need to prepare for it very seriously. After all, everything that happens will be recorded by photos and videos. Both children and grandchildren will watch it. You will also watch and revise it. And in 1 year, and in 5, 25, 50 years - on its silver and gold anniversary! And if everything works out, then in 75 years you will see yourself young and remember with a smile how you decorated champagne with your own hands!


