If earlier only the classic three-strand braid was popular among women, now there are a huge variety of varieties. Photo from step by step instructions braids can be found on the Internet, so even complex techniques are suitable for beginners. The hairstyle and its variations are not only beautiful, but also practical, comfortable and appropriate in any situation.
Before starting work, the head is lubricated with a special agent that facilitates combing. Divide the entire mass of hair into three parts. The right strand is superimposed on the middle one and is in the middle. The left is superimposed on the middle (right) and also appears in the middle. In this sequence, continue until the hair is braided to the end.
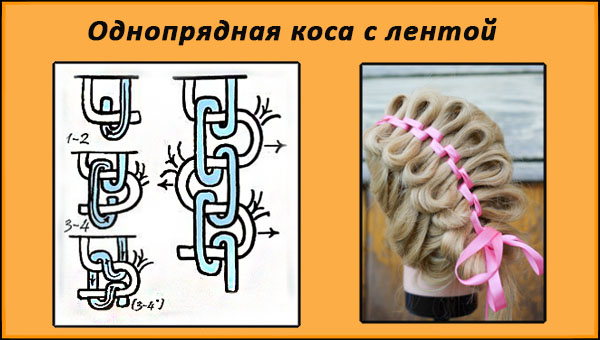
How to braid a braid with ribbons
The principle of weaving with ribbons is the same as for a regular braid, with the only difference that in this case a ribbon is added and the work begins not on the right side, but on the left.
This is done like this:
- The hair is divided into three parts and a ribbon is tied into the middle part.
- The left curl is placed on the middle one and, passing it under the ribbon, is laid on the right strand.
- The tape is passed under the middle strand and laid between the 2nd and 3rd.
- According to this scheme, they are braided to the end and tied with an elastic band or ribbon.
- The links relax a little to give the hair a delicacy and lightness.
French braid
Weaving french braid available even for beginners, if you follow the step-by-step photo steps in the following sequence:

Danish braid
To weave this braid, the curls must be soft and obedient, therefore, immediately before starting, they are lightly lubricated with conditioner and sprinkled with water. If at first it is difficult to understand the technique, then you can learn from step-by-step photos for beginners. It is better to do this hairstyle on a head that was washed 1-2 days ago, otherwise the hairstyle will not hold and will quickly disintegrate. 
Work begins from the top of the head. Take a strand and divide it into three parts. The bottom line is that during weaving, the curls are not superimposed on top, as usual, but under the bottom. Sometimes this technique is also called "reverse French braid". At the end of the links, the hairstyles can be slightly relaxed to add volume and secured with varnish.
"Fishtail" step by step with a photo

How to braid a braid with elastic bands
There are two options for using rubber bands:
- With a throw-over.
Tie a tail (of any height) and divide it into 4 equal parts. The two extreme ones are connected together from above above the middle ones, and an elastic band is tied on them. Next, the lower curls are divided into 2 parts and connected from above, and also tied with an elastic band. The hair that was on top will now be on the bottom. And so on until everything is woven. 
- With threading.
Tie the tail and separate the top and bottom. An elastic band is put on top, stepping back from the one that holds the tail, a few centimeters. The lower strand is passed through the upper one, pulled up and also tied with an elastic band. The one that turned out to be below is passed through the top, tied with an elastic band.
And then on the same principle. At the end, you can loosen up the loops of the braid, adding fluffiness to the hairstyle. The main thing is to tie elastic bands at the same distance and do not forget to tighten them every time after the curls are pulled up.
Braid twist or harness
This hairstyle is uncomplicated, so it's easy to do it yourself.
- A high or low tail is tied.
- Divide into 2 (or 3) parts.
- Twist each into a tourniquet, winding it around a finger. It is important - it is necessary to twist in one direction, otherwise nothing will work.
- They intertwine the plaits together.
Weaving "Waterfall" for medium hair
Weaving braids (a step-by-step photo for beginners will help you understand the technique, and quickly master the creation of even a complex modification) can be carried out using the "Waterfall" technique. 
The "Waterfall" braid can be:
- four-strand;
- multi-row;
- around the head;
- volumetric.
Four-strand:
Braided in a straight or side parting. Separate 4 strands on the left side. The countdown begins from the face. The second is the thinnest, the rest are the same in volume. The 1st is carried out under the 2nd and over the 3rd, and the 4th - under the 3rd and over the 2nd.
Then a pick-up is made - a small number of curls from the total mass are attached to the extreme strand. Next, the 2nd is carried out over the 3rd, under the 4th.
 Weaving a braid of four strands suits any hair color
 The first curl is removed to the side. Replace it with a small amount of hair from the total mass, which is taken from the bottom, and carried out under the 3rd, over the 2nd curl. This is followed by the same combination with the addition of strands, but not only from below, but also from above. And so on according to the scheme.
Multi-row braid "Waterfall"
It is woven in a similar pattern, but in several rows. It should be noted that if there are several rows, then you should start at the level of the upper point of the ear.

The braids should run symmetrically relative to each other.
- Around the head. It is woven in the same way, but from one temple to another. You can finish with the classic version or leave it loose.
- Volumetric. To add volume to the hairstyle, the braids are pulled out, moving from end to beginning, holding it with your hand. Fix with varnish.
Braid waterfall
The hairstyle "waterfall of braids" is woven according to the same principle as the option just considered, with the only difference that those the strands that are left and fall freely are braided into thin classic braids.
 Weaving braids waterfall with pigtails step by step with a photo for beginners
 Four-strand braid

Five-strand braid
From five strands, you can braid a classic or French, Danish or checkerboard braid using a ribbon. Countdown starts from the left. You should consider the basis of weaving a five-strand hairstyle, which is standard for all varieties (depending on the variety, additional steps are added to the main steps). 
- Stage 1 - the first 3 strands are crossed in the same way as when creating a classic look - the 1st is placed on the 2nd and passed under the 3rd, it turns out to be between the 2nd and 3rd.
- Stage 2 - put the 5th on top of the 4th and skip under the 1st.
- Stage 3 - 2nd over 3rd, under 5th.
- Stage 4 - 4th under 5th, over 1st and under 2nd.
- Continue starting from the first stage.
At first, you can tie a tail at the back of your head and weave from its mass.
French bezel
This styling is done on different lengths, even for a short one.
- Hair is divided horizontally into 2 parts. One will be braided, and the second will remain loose and collected in a tail.
- Start from one ear to the other. The principle is the same as for a regular French braid, i.e. with picking up a lock.
- Secure with an elastic band or invisibility, tucking the hair inward from the opposite side. Fix with varnish.
French braid of four strands

Braid in braid: master class

French spirals for long hair
- The basis is harnesses, laid in a special way.
- The division occurs in such a way that the letter V is formed on the crown of the head, i.e. the parting is done from the temple to the crown and from the crown to the opposite temple.
- The selected area is shifted to the left and the tourniquet is twisted clockwise.
- On the left, they take a strand, put it on the main one, twist it a little around it and twist it into a tourniquet together with it.
- They take a strand on the right side and repeat the above steps, but put it not on top of the main bundle, but under it. At the end, twist and stab with an invisible one.
- The main thing is not to forget that the hair should be constantly shifted from side to side.
Mermaid braid
A romantic, light and airy look looks spectacular on both thin and thick curls and can be combined with any image.
- They take curls from the temples and connect them at the back of the head.
- At the junction, they begin to weave a regular braid, making picks from time to time on both sides.
- With such grabs, you can braid to the end, or you can limit yourself to a small amount and then braid a regular braid.
Braid heart
- Parting is done vertically in the center. One part is fixed with a hair clip so that it does not interfere.
- On the side on which the work will be carried out, they make a semicircular parting from the crown to the temple, using a thin comb.
- The lower curls are also pinned.


- The work starts from the point at which the 2 partings intersect. Weaving technique - French braid. Weaving strands are taken from the top of the head.
- Having reached the area behind the ear, they continue to weave along French technology, but additional curls are already taken from the middle and bottom. As a result, a small tail remains, which is temporarily fixed with an elastic band.
- On the other hand, repeat the previous steps.
- After the braids are the same length, they are tied together and braided in the middle using the same technique.
Scythe-snake for girls
Parting is done on the side. A strand is separated in front middle length and begin to weave the French purl braid, picking up the strands only from the side of the forehead. It should run parallel to him. 
Then the weaving is turned in the other direction and continues according to the same technique, only now the curls are picked up from the opposite side. The braids should be parallel to each other. At the end, you can leave a ponytail or braid to the end.
There will be no unexplored moments in creating beautiful hairstyles if you study the techniques of weaving braids using step-by-step photos and detailed instructions suitable for beginners.
This hairstyle looks good on hair of any length. Despite the fact that the technique is already sufficient: these are three-, four- and five-strand braids, the “waterfall” technique, French and Danish braids, braids with elastic bands, a snake. The options can be combined with each other, and then there will be even more opportunities for changing the image.
Video about braiding technique
Braiding:
Fishtail braid:
Ladies having long hair always look luxurious. And how many amazing hairstyles can be created on their heads. As a rule, all kinds of braids are the basis of many hairdressing masterpieces. Below are several simple, but beautiful hairstyles with braids for long hair, which you can create yourself at home.
An excellent hairstyle with two braids for everyday wear - and the hair does not interfere, and it looks beautiful and neat, and it will not be difficult to do it yourself. Suitable for all ages.

- Comb your hair well, divide it in half with an even parting from the middle of the forehead to the base of the neck, remove one half to the side and secure.
- Using the other half of the hair, braid, moving from the face to the neck (take three small strands, weaving the braid, putting the extreme ones one by one under the central one, each time adding new hair).
- Pull the braid to the end of the hair length, leaving the tip as small as possible and attach an elastic band.

- Loosen the other half of your hair and do the same on it.
- Fluff each braid along its entire length, stretching each lobule.
- Twist the braids around each other, laying over the head and fixing each turn with a hairpin.
- Hide the ends of the braids and straighten the knot.
Very beautiful, which is woven from five strands. Can be paired with a ponytail or braided to the end. Will look great on long hair.

It is woven as if two braids are being braided at the same time. Alternately, first the right three strands, then the left three strands. Moreover, the central strand is involved in weaving both braids. Before starting, it is recommended that you familiarize yourself with the diagram below.

More details:
- Grab a not very small strand of hair on the crown of the head and divide it into five equal parts.
- For convenience, it is better to conventionally designate the strands as two left (first and second), central (third) and two right (fourth and fifth).
- You need to take the left strands and the central one (the right ones are clamped in a fist).
- Put the first strand on the second, and under it the third (since the strands have changed places, the one that turned out to be in the center is considered the third, and the extreme first).
- Now we pinch the left strands into a fist, weave with the right strands and the central one.
- The fifth strand must be placed under the fourth, and then there the third (central).

- It turns out weaving two ordinary Dutch braids at the same time and in turn. For the first braid, use the first, second and third strands. For the second braid, use the fifth, fourth and third strands.
- Next, we again squeeze the right strands into a fist and continue with the left and central ones.
- We put strand No. 1 under No. 2 and add an additional strand of loose hair there.
- Then we put strand number 3 under them.
- Clamp the left strands into a fist and use the right ones.
- No. 5 under No. 4, there is an additional one, then under them No. 3.
- Use this pattern to braid until you run out of free hair.
- Collect all the strands into one tight ponytail.
- Fluff the outer slices.

Awesome hairstyle. Owners of long hair are lucky, because they can create such beauty on their heads on their own or with the help of a friend.

- It is necessary to separate a strand of medium-sized hair at the forehead, twist it into a knot and remove it for a while, stabbing it with a clip.
- Then, under it, you need to separate another strand of hair of approximately the same size as the first one and spray it with water so that it does not frizz when weaving.
- Divide it into three parts and start weaving a regular braid.
- On the second weave, separate a thin strand from the extreme strand and remove it to the side (it is better to fasten it with a hair clip or pinch it in the teeth).
- Continue braiding, also removing the strand from the opposite side.
- Make another weave, and on the next one again separate the thin strand from the extreme strand and swap with the one that is clamped (lower the first, and raise and clamp the second).

- Continue braiding and do the same on the other side.
- Then again the same actions on both sides.
- At this stage and further, every two, three weaves, it is necessary to pull these small strands along the edges so as to separate them from the main braid.
- You should end up with something like a half chain on both sides of the center braid.
- In the same way, reach about shoulder level.

- Lower the strand that remains on top.
- Braid it into a regular pigtail.
- During weaving, it is periodically necessary to strongly stretch its slices, and only from one side.
- Braid to the very bottom, not forgetting to pull the braid segments on one side.
- Twist the braid at the back of the head (from the outer circle to the inner one), forming a rose.
- The extended side should remain on the edge, and not touched - on the inside.
- Place the tip of the braid in the center and secure the entire flower with several hairpins.
- Straighten your hair.

An ideal hairstyle with braids for long hair so that beauties can walk with loose hair, but at the same time the curls do not go into the face and look voluminous, beautiful and neat.

- Separate a strand of hair at the crown and tie with a silicone rubber band in a ponytail.
- Gently pull small strands out of it to create volume on the crown.
- At the forehead, separate a thin but wide strand to make bangs.
- Behind it, grab another strand, divide it in two and begin to weave a spikelet, alternating thin extreme strands from one half to the other.

- Braid the spikelet to the shoulder and pull it off with a transparent rubber band.
- Leave a small strand on the opposite side of the face, take the next one and braid a spikelet again (the spikelets should be equal in width).
- Wrap the spikelets back and throw them over the tail, securing well on both sides with hairpins.
- The ends of the spikelets must be wrapped on each side under the tail and also stabbed.
- Take the tail, throw it up and hook it with a crocodile.
- Tie the ends of the spikelets together with an elastic band. This will create another tail (# 2).
- Lower the first tail and divide it into two parts, between which draw and throw tail # 2 up.
- Tie the halves of the first tail together.

- Lower the second tail from above, divide it in half, draw the first in the middle and throw it up.
- Tie the halves of the second with an elastic band.
- Do the same manipulations with the tails to the very bottom.
- Fluff up the elastic braid by pulling its segments.
- Put the bangs behind the ear and stab it with invisibility.
- Fix the whole hairstyle.

Simple to perform, but original and incredible pretty haircut combining a bow, braid and fishtail. This charming combination is best done on long hair.

- Separate a rather thick strand at the crown of the head and braid a regular braid from it approximately to the level of the ears.
- Then finish braiding with a fishtail.
- Both the braid and the fishtail must be fluffed during weaving.
- Separate a small, but not too thin strand on each side of the face.
- Tie a bow from these strands, like from a simple ribbon.
- Fix the bow knot with at least two pins.

To create this hairstyle with braids, you need to have long hair. For those with medium hair, they can use false strands to lengthen them. The hairstyle is quite simple to perform, but it looks great and is suitable for any occasion.

- We comb the hair so that the parting is on the side, and one part of the hair is larger than the other.
- We separate for the most part two small strands near the parting and begin to weave a spikelet, constantly reporting new strands of hair from the free mass into it.
- You need to weave along the face to the lower earlobe.
- Stretch the spikelet along the way for splendor.

- Having reached the ear, you need to stop adding strands to the spikelet, and braid a little more the usual way(so that it reaches the middle of the base of the neck).
- Tie together in the center of the neck with a small strand of loose hair.
- The hairstyle can already be left in this form, or you can continue weaving.

- The part of the hair that is collected in the tail must be twisted into a bundle around its axis so that a flower is obtained.
- Then wrap the remaining hair in the same way.
- Stick the studs around the entire circumference of the flower.

Long hair for a hairdresser is like a blank sheet of paper for an artist. Enough combs, a couple of rubber bands, a little imagination and the masterpiece is ready!

In this article, you will get acquainted with the basic tricks of braiding with a step by step photo.
After reading it, you will be able to independently create both everyday simple and the most sophisticated and extraordinary designer hairstyles.


Weaving braids step by step photo: varieties
The braid is not only one of the most feminine but also practical hairstyles. With braided hair, you can safely walk through the whole day without the fear of getting tousled. Moreover, such a hairstyle is quite versatile and looks natural and harmonious both in a business setting and at a youth party.


There are several main types of braiding:
- classic Russian;
- European: Swiss, Greek, English, Dutch and the famous French weaving;
- eastern: braids (side braids), ropes, threads, braids, zizi, curly, rastas, etc.; the last three types can be used for short hair;
- design: " french waterfall", Braids of knots, Lino Russo," basket "," dragon "," fish tail "," eight ", etc.
The best way to master any of the techniques is to watch video tutorials on the topic or study pictures of step-by-step braiding. Moreover, for any of these weaves, you can use not only your own hair, but also overhead strands or hairpieces. Their color can either be combined with your own hair color, or contrast with it: the main thing is not to use more than three colors at the same time.


Advice! V Lately The so-called careless styling is very popular, which can be used for any type of weaving. But even in this case, the strands should be pulled together evenly and not get out of the general style. Otherwise, the hairstyle will just look sloppy.
Classic braids
The traditional Russian braid has long been a frequent guest on many famous catwalks: the Valentino fashion house, theatrical shows of Victor & Rolf, Emerson, etc. Today it is presented in various variations: from weaving on the back of the head, sides or crown to creating the most intricate hairstyles out of two and more braids. However, to master even such complex types of braiding with the help of step by step photos not difficult.


The traditional Russian braid consists of three equal strands, which are intertwined alternately. It can be not only smooth, but also voluminous, slightly tousled, multicolored, asymmetrical, or used in combination with other types of hairstyles. In this case, the hair can be divided into a straight or oblique asymmetrical parting or not at all. The density of the weave and the number of strands used can also vary.
One of the varieties of the Russian braid is weaving "spikelet": a technique that allows you to achieve volume and splendor of the hairstyle. In this case, only two strands are used with the sequential addition of new ones. The order in which they are added can be different. However, in order for the hairstyle to look neat, the thickness of each new strand added must be the same.


Advice! Perfectly smooth braids look too strict, so you should allow individual strands to knock out a little.
Straight from Europe
Designers distinguish between several options for weaving that came to us from Europe:
- Swiss braid: braided according to the Russian principle, but before that, each of the strands is twisted into a tight braid, due to which the hairstyle looks more voluminous; this kind of weave goes well with any style and looks great as with jeans or open summer dress and with a business or cocktail suit; the step-by-step weaving of such braids for medium hair or hair of the maximum length can be seen below;
- French weaving: unlike the "spikelet", the strands are not woven one on top of the other, but are laid inward; the braid begins with a small bun, divided into 3 main strands, with the gradual addition of additional ones every 2-3 cm so that at the end of the weaving all the hair is collected; strands can be taken from one or two sides; weaving can be direct (towards yourself) or reverse (from yourself); start from the top of the head or run over the entire head in the form of a wreath;


- English: its only difference from the Russian version is that weaving begins with a "horse" tail, fixed at the back of the head or closer to the crown; a similar braiding for long hair is shown in a step-by-step photo;
- Dutch: braid "inside out"; the braided strands do not hide inside the hair, but rise above them;
- Greek: a combination of smooth hair and a braid that resembles a headband that runs all over the head; in this case, three small strands are taken closer to the parting, the rest of the hair is stabbed for a while; small strands are gradually added in a circle, with the help of which such a braid rim is firmly held on the head; There may be two braids, in which case they start from two sides of the parting, and then split into one at the back of the head.


Advice! Stylists advise to make a small bouffant at the roots before weaving. It will make your hair more voluminous and your hairstyle more feminine. This technique is especially relevant when creating evening hairstyles.
Oriental tales
A distinctive feature of such hairstyles is intricate shapes and the presence of large, conspicuous decorations:
- plaits (Sinhalese braids or twisted braids): hair is divided into two equal strands, each of which is twisted in one direction; then both strands cross and twist in the opposite direction; harnesses can be used in combination with loose strands, tail, side braids, etc.;

- braids-ropes: a side parting is made on the hair, and weaving (twisting two small strands) begins on the side where there is more hair; when passing such a braid around the head, new small strands are added; at the level of the back of the head, it intertwines with the bulk of the hair in the direction opposite to the main weaving;
- Afro-braids (braids): many small braids weaving from the back of the head to the temples; you can dissolve them freely, create one or more thick braids out of them, make a tail out of them, twist them into a shell, etc.;


- zizi: a variety of braids, ultra-fine artificial hair braids created using machine braiding; are woven into each individual strand of their own hair;
- curly: the method is similar to zizi, but the curls are twisted into a tight spiral; can be used for building.
With the help of step-by-step photos for beginners, braiding can be mastered quite quickly. The main thing is patience and utmost attentiveness.


Advice! Unraveling small braids is quite problematic. To facilitate this procedure, before creating a hairstyle, the hair should be thoroughly rinsed with not an ordinary shampoo, but a cleansing shampoo, and then apply any high-quality balm on it.
Modern design techniques used in weaving
V last years braid hairstyles received the most unexpected renditions. However, any design techniques are, in fact, improved ethnic versions of the Russian, European and Eastern versions:
- "French waterfall": resembles the usual one or two braids, starting at the temples and ending at the back of the head; however, each lower strand is released to "free float" and falls freely on the back. The hairstyle can have all kinds of variations: be asymmetrical, go over any part of the head, sag, etc. Can be used even on short hair;


- braid of knots: two strands are connected together using a series of knots; at the same time, both part of the hair can be intertwined (one or two small knots are used as a kind of decoration), and their entire volume;
- Lino Russo: a combination of knots and spikelet technique. After each knot, new hairs are added to the already selected strands; for such a hairstyle, the hair should be cut evenly and be the same along the entire length;
- "Snake": the usual French braid is not located along one line, but wriggles over the entire surface of the head; may have 2-3 or more reversals;
- "Basket": part of the hair at the crown is gathered into a high ponytail, then a regular French braid is woven from the temple, alternately adding a strand of ponytail and loose hair;

- weaving "cornrow": classic Afro-braids are located all over the head in the form of a geometric pattern that resembles rows of corn (from the English corn - corn and row - a row); to obtain such a pattern, each miniature braid is woven in the manner of a classic French braid.
Advice!To facilitate braiding, when creating a hairstyle from braids, you can use any styling means: foam, varnish or gel.


Braiding for short hair
Thanks to improved weaving methods and the availability of modern fixation tools, you can decorate yourself with braids even with short hair:
- "Headband": two braids are braided at the temples, and then fastened with hairpins at the back of the head;
- parting from braids: a plexus of side strands located on one or both sides of the face;
- bangs with a double oblique: the upper part of the face is framed by two small braids;
- a pigtail around the head: it can be located in any part of it, run over the entire head, or located to the left, right of the face, or braided only at the back of the head;
- "French bangs": long bangs can be removed to one side in the form of a French braid; since in case short hair the hairs will invariably stick out on the sides, you should beat and tousle the rest of the head of hair so that it looks as organic as possible;
- a combination of punk style and a French braid: some of the curls are combed in the form of a mohawk; the side strands are braided.
It is customary to wear long luxurious hair loose only on holidays and especially solemn occasions. And on weekdays, they can be laid and braided in a variety of braids, which have always been in fashion and currently do not want to give up their crown positions. In the hands of a professional master, long hair is transformed into a true work of art. But even on ordinary days it is possible when using simple weaves create especially original hairstyles.
Face shape and choice of styling options for braids
People's faces have a wide variety of shapes, so experts divide them into 5 main categories. This classification helps make-up artists, stylists and professional hairdressers find the most appropriate looks for each face type.
From the point of view of classical beauty, the oval face shape is considered the most correct, and therefore all types of hairstyles or styling are selected so as to try to visually bring the face shape closer to the oval, while hiding the shortcomings of women and girls.
Experienced stylists, taking into account the various shapes of the face, suggest choosing the following options for weaving hairstyles:
The most daring experiments with braiding are allowed when oval face... On thick curls, the most various variations and models of braids.
- For girls with a round face, it is most rational to use weaving starting above the crown of the head. This will give the face more expressiveness, visually lengthening it. The braid is braided over the entire length of the hair, only a small ponytail or knot is left at the bottom.

- The most smooth lines are used to visually smooth out the angular shape of a square face. First, a braid is braided over the entire head, the traditionally braided tip of the braid remains on the side or behind. Braids braided with the indicated options visually eliminate excessive angularity of the face, smoothly bending around its contours.
- For girls who have triangular shape face, you should use techniques that visually increase its volume below. Stylists recommend letting go of long bangs, then you can start braiding from the back of the head in the classical way or to one side.
Girls with rectangular face its shape should be visually shortened, while smoothing out the angularity of the face. It is advisable not to use long, traditionally straight braids here. Such voluminous weaves as a voluminous spikelet braided over the entire head or a French braid will look wonderful. The face is visually shortened due to the elongated bangs. Choosing a hairstyle in this case will be much easier.
Daily Braids Hairstyles - Basic Weaves
Really diversify jewelry from long braids will help mastering different options weaving - this will allow you to create original and elegant hairstyles for every day.

In certain cases - a spikelet, an openwork weaving, a French braid - to create an unusual hairstyle, a rather only element is a braid. Sometimes, with the help of braids, as an additional element, you can create very interesting styling:
- The classic option is to divide the hair into 3 parts that are uniform in volume. Then the right strand of hair is moved to the center, between the middle and left strands. Thus, the right strand becomes the center. The left strand of hair is moved between the right and middle, this process is repeated until a certain length, then a small ponytail is left at the end. You can decorate a classic braid with an elegant elastic band or a bow.

- Fishtail - unlike the classic version, only 2 strands are used here. The pigtail comes out voluminous due to thin strands. The thinner the strands are taken, the more gorgeous the hairstyle looks!
The hair is collected in a low bun and divided in half. A thin strand is separated from the right side from the inside and moves to the left. Thin strands of uniform volume are always laid on top of the main strand. The strand on the left, respectively, moves with another thin strand to the right.

Weaving continues with alternating shifting from different halves of thin strands, while the two main strands always remain in the hands. A free tail remains at the end, secured with an elegant elastic band or ribbon.
- French braid - this model differs from the traditional version in that the hair begins to braid, starting from the very top of the head.
Divide the hair into three equal parts, move the right strand to the center, adding to it a thin strand of loose hair on the right. The same action is performed with the left strand - it is thrown over the middle strand, a new thin strand on the left is added to it. French braiding is repeated over the entire length of the hair and ends with a classic braid or ponytail.

The French weave option allows you to create the most fantastic hairstyles. Tightly pulled small strands create a thin, neat braid. In the coming season, slight negligence is relevant, so fashionistas should take this moment into account.
If bulky strands are added during braiding, then the braids turn out to be quite thick, creating the effect of thick chic hair.
- Air braids are one of the options for French weaving. The result of this weaving is a visually airy and weightless structure on the head of a fashionista.
Creating an openwork-airy model, you should take 3 small strands on the back of the head, intertwining them with classic weaving twice. Then take a strand of the same size from the right temple, move it to the lateral extreme part. The same is repeated on the left side - on the left side, a new strand is attached from the left temple. Weaving continues to the end, with the constant addition of additional strands from the temples. Air-laced styling is fixed with a beautiful elastic band.
- Rope - This option helps you create trendy and stylish hairstyles pretty quickly. Styling "Rope" looks advantageous, neatly and firmly holding long hair throughout the day. The styling of this weave is simple and accessible to any girl.

They make a tail high on the top of the head, divide it in half into two parts. Each of the 2 strands is twisted clockwise to end up with a twisted rope-like weaving. Each tip is secured with small rubber bands.
Then they begin to twist both pigtails together, already counterclockwise. An important condition for this type of weaving is a rather strong tension on the strand and tight twisting of the "ropes".
Separately protruding hairs are additionally treated with gel and smoothed. This styling retains its attractive appearance for a long time. The hairstyle is secured with an elastic band.
- Double back braid - weaving such a voluminous original braid is somewhat more difficult than conventional styling.
To get this extraordinary beautiful option all hair should be divided into 2 equal parts, mentally numbering them. Each of the two parts is gradually divided into three more. The braid is not woven in the classic version, but on the contrary - downward.
Each of the woven "reverse" braids is fixed with thin multi-colored elastic bands, to give additional volume, the braids are carefully pulled out and fastened at the bottom with an elegant ribbon or elastic band.
To give yourself flawless appearance you should master the basics of weaving simple braids, of which any of the most original hairstyles consists. With a little imagination and invention, you can freely create great styling, creating a wonderful mood for the whole day!
Braiding patterns with ribbons:


Detailed master classes for weaving braids
We offer you 20 options for fashionable, but at the same time simple hairstyles with weaving elements.


Scythe
If you think that a classic braid is too trivial for a summer walk, we suggest some fairly simple ones, but stylish options, which will be a great alternative to the traditional hairstyle.Option 1
First, part on one side and start braiding from the opposite temple. Move diagonally, weaving strands from the crown and forehead. As a result, you will get a stylish asymmetrical and not at all hot summer hairstyle.Option 2
This is a very simple and quick technique that will help refine the classic braid a bit. First of all, tie a not too tight tail with a thin, inconspicuous elastic band. Make a gap over the elastic in your hair and thread the ponytail through it. Then, braid your hair with any technique you like. Thus, a simple everyday hairstyle is ready.
Option 3
This hairstyle looks great on long hair. First, tie a not too tight tail on the side. Make a gap over the elastic and pass all your hair through it. Relax a few strands to add volume. Just below, tie another elastic band and repeat all the steps again. The number of sections depends on
Option 4
To get such a sloppy but stylish braid, you need to wind up hair light waves and do a bouffant on the top of the head. Then braid the braid using whatever technique you are familiar with. When the braid is ready, pull it in different directions to add volume. At the end, divide the hair into two parts, tie it in a knot and secure it with an invisible hair on the inside.
Option 5
Separate one side strand at each temple (above the level of the eyebrows). Braid them. Grab a curl next to each braid and secure them at the back of the head with an elastic band or hair clip.Repeat the steps, separating the strands near the ears. Braid them, grab adjacent curls and secure at the back of your head. The rest of the hair can be left loose or braided.

Option 6
Part your hair with a side part. Separate the lock at the ear and braid with any technique. Don't braid too tight. Secure the end of the braid with a transparent elastic band. Release the strands from the braid to add volume. The final touch: spray the hair with varnish. This option will look best on curly hair... If you have straight curls, spend a couple of minutes curling with your curling iron.
Option 7
Part the side. Part the strand at the parting and start braiding, grabbing the hair that frames your face. Use any technique. When you reach your neck, change your braiding technique and weave the remaining hair into the main braid. When you're finished braiding, slide the elastic over the end of the braid. Release the strands, which will make the hairstyle seem more luxuriant. Finally, spray the hair with varnish.In the photo below you can see the combination of a simple braid and a fishtail. It looks very impressive.

Option 8
A quick and easy hairstyle that even a first grader can handle. Despite all the ease of weaving, the end result is styling that others will find extremely difficult.So, divide your hair into three equal sections. We braid one braid from each part, the ends of which we fix with small elastic bands. Now we take one braid and roll it up into a ball. We fasten it with hairpins at the base of the back of the head. We make balls from the remaining braids.
This hairstyle has only one drawback: the true Rapunzel will have to tinker, braiding their curls. But the owners of medium length hair will cope with braiding in a matter of minutes.

Option 9
An inverted braid seems extraordinarily difficult, but in reality everything is very simple. The braiding technique is surprisingly simple and with its help you will create a unique hairstyle in a couple of minutes.First level: separate one strand above the forehead and make a ponytail. To prevent the ends of your hair from interfering with your work, wrap the ponytail at the top of your head and secure it with a clip.
Second level: grabbing the side curls, we make a second tail. At the same time, we retreat a little from the first tail. Now we remove the clip. We divide the first tail into two halves, between which we draw the second tail. We put the tip of the second tail up and fasten it with a clip. We leave the ends of the first tail at the bottom.
Third level: grab a strand a little lower, connect it to the free ends (from the first tail). We make the third tail. Remove the clip, divide the ends of the second tail into two halves and pass the third tail between them. We fasten the third tail with a clip on the back of the head. We leave the ends of the second tail at the bottom.
We repeat the steps as needed. When finished braiding, secure the end with an elastic band. The final touch: gently release the strands, starting with the very first. The higher the strand, the more volume we give it. It is not necessary to braid your hair all the way - the hairstyle will look gorgeous even with three levels.

If you are looking for a simple but original summer hairstyle, an unusual ponytail will be a great option, both for everyday life and for an evening walk.
Option 1
To do this hairstyle, first twist the hair at the ends a little. Tie the tail with a thin elastic band. Make a gap in your hair and thread the ponytail through it. If necessary, curl your hair a little more or use your fingers to separate curls to add volume.
Option 2
For this hairstyle, the hair should be straight, so use a flat iron if necessary. Then, divide your hair into two layers: top and bottom. Gather the top layer of hair with a thin elastic band at the back of the head on either side of the head. From the bottom layer, weave a braid on the opposite side. The thickness of the braid depends on your personal wishes. Ponytail the elastic around the tail and secure the end with a small hairpin.
Option 3
To create a more elegant ponytail, you will need hair foam or wax. Part it evenly (center or side, whichever suits you best) and gather your hair on one side. Apply foam to them and divide into two equal strands. And then just tie a knot twice in a row. Secure with a thin invisible elastic band directly under the knot, and twist the ends of the hair a little or make a light bouffant.
Option 4
To make such a stylish ponytail, which is perfect for any kind of summer events, you will need a curling iron or iron, hairspray, invisibility and a little time. First, curl your hair at the ends. Then divide them into 4 parts: at the back of the head, at the crown and on both sides at the temple, and tie them with elastic bands so that they do not mix with each other. Take the hair from the crown and comb it a little from the inside, and then twist it with a flagella and secure it with invisible ones. Repeat with the hair at the temples. When the hairstyle is ready, sprinkle it with varnish, for reliability.
Option 5
Very romantic summer hairstyle. To do it, part your hair in two along the parting line. Braid on both sides of the braids, which converge from the temples at the back of the head. Tie them together with a thin elastic band. Then separate a thin strand from the tail and braid. Wrap an elastic band with it and secure with an invisible inner side. Comb the tail a little with a comb or curl it with a curling iron.
Option 6
The ponytail is one of the most popular and versatile hairstyle trends in the world. This option is very fast and original. First, curl your hair at the ends and then part it in two. From the hair at the top of your head, start to weave a loose braid, weaving all the strands into it along the forehead line to reveal your face. The braid should end at the back of your head, and then lift up the rest of your hair and pull it together with a thin elastic band. To hide the elastic, you can wrap a strand of hair around it and secure it with an invisible inner side.
Option 7
Another lightweight and quick way how to make an elegant ponytail. Curl the ends of the hair to create light waves. Then divide them in two. Comb the hair on the crown a little and tie it high with a thin elastic band. Gather the rest of the hair a little lower and also tie with an elastic band. To create more volume at the top of your hair, loosen up a few strands at the crown.
Option 8
This is a great way to turn an ordinary tail into a original hairstyle... Tie all of your hair into a ponytail at the back of your head. Separate a small strand and wrap around the elastic to hide it, and secure with an invisible inner side. Then tie another elastic band just below. Make a gap in the resulting sections and run your hair through it. Tie another elastic band just below and repeat the procedure. The number of sections directly depends on the length of your hair. To make the tips look natural, twist them a little with a curling iron or iron.
Option 9
Divide your hair into 3 sections (center and 2 side sections). Secure each section with a rubber band if you are doing your own hair. This will prevent your hair from tangling. Roll the center strand into a rope and wrap it around the side ponytail on the right. Separate one curl from the left strand. Roll it into a tourniquet and wrap the right tail. We also wrap the remains of the left strand into a bundle and wrap the tail around it. We fix the hair with an elastic band.This hairstyle has several advantages. Firstly, we do not need to observe clear symmetry (uneven strands give a chaotic gloss). Secondly, the absence of parting allows you to mask some defects: unpainted roots, dandruff, or too thin hair.

Hair band made of ... hair
This is the easiest and most original way to replace a regular headband and remove hair from your face on a hot day.Option 1
First, part your hair in two. Gather the hair at the back of the head with an elastic band so that it does not interfere, and proceed to the strands at the front of the face. Part on either side and start braiding, weaving strands into it along the forehead. When the “headband” is ready, let go of the hair at the back of the head and enjoy the original hairstyle.Option 2
Part a small section of hair at the neck and braid it into a thin braid. Wrap it around your head and secure it with an invisible one on the opposite side. This hairstyle looks great on curly hair.
Option 3
Part it evenly and separate two strands from both sides of the head. Weave them into pigtails, not too tight, and tie at the ends with invisible elastic bands. Connect them together at the back of the head and fasten them with invisible ones.
Option 4
Having separated the strand in the area of the bangs, we make a fleece. Separate one curl near the ear on the right and form a flagellum, twisting the hair away from us. Secure the end with a transparent rubber band. Take the invisibility and fasten the tourniquet at the back of the head, closer to the left side.We repeat the actions on the opposite side: we separate the strand at the ear; we form a flagellum; we fix the tip with an elastic band. We put the second flagellum under the first one and fasten it invisibly.

Hairstyle in 30 seconds
If you are running out of time and you are in a hurry to an event where you need to be smart, these options are for you!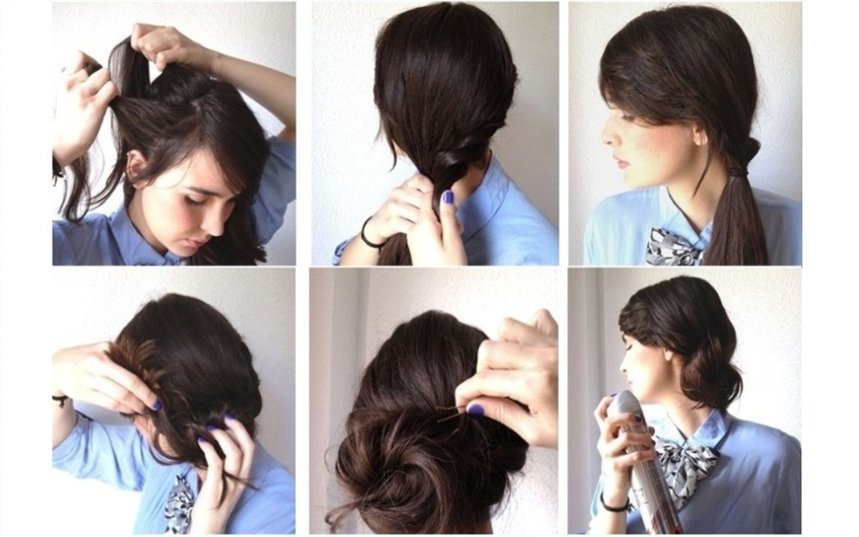
Option 4
Divide your hair into three sections. The average should be larger than the rest. Weave from it volumetric braid and fold into a knot using bobby pins or hairpins. Roll the strand that is on the left into a bundle and run around the knot counterclockwise (bottom). Wrap the strand that remains on the right around the hair in a clockwise direction (through the top). Secure with invisibility or sprinkle with varnish.
Option 5
To do this hairstyle, you need hairspray, invisibility and a little time to practice. First, fluff your hair with your hands to get good volume, and coat generously with varnish. Then, gather your hair together and wrap it inward to form a shell. Secure your hair with invisibility. You can leave a few loose strands to add some subtle casual hairstyle.
Option 6
This is a very easy way to make a nape knot. First, tie the ponytail and divide it into two equal strands. Twist each strand clockwise with a tourniquet. Then start weaving the strands together (counterclockwise). Tie the tourniquet at the end with an elastic band and fold it into a knot at the back of the head, securing it with hairpins.
Option 7
Tie the ponytail at the back of your head, not too high. Make a gap above the elastic and pull your hair into it. Then, gently roll up the tail with a shell and secure with a hair clip or other accessory.
Option 8
To make a hair bow, you need a thin elastic band, invisible ones and 1 minute of time. First, tie a knot high on the crown of your head and divide it in two. Skip the tip of the tail in the middle and secure with an invisible back. This hairstyle is also called "Lady Gaga style bow".
Option 9
This hairstyle will take longer than the previous ones. You will need a foam donut and hairpins. Tie a high ponytail, put a "donut" on it and hide the hair under it one strand at a time, securing it with hairpins for reliability. At the end, the hairstyle can be decorated with a bow or other accessories.
Option 10
Curly "donuts" look much more interesting than ordinary round pieces if you like bunches of ballerinas. These "donuts" can be bought in specialized stores or ordered online. The technique of execution does not differ at all from the classical options. Hair must be plugged behind the "donut".
Option 11
Pull your hair into a ponytail high at the crown. Divide the tail into two halves, wrapping each with a flagellum. Now fold the harness around the elastic. We twist them tightly and in opposite directions (left - to the right, right - to the left). Secure the hairstyle with invisible hair and fix with varnish.
Option 12
Part your hair in half. Take the first strand, separate the curl at the forehead. We twist the curl away from ourselves, starting at the forehead and ending behind the ear. We tie the first ponytail low at the back of the head. We do the same with the second half of the hair. And now it remains to twist the bagels. Ready!
Perhaps the most easy way to escape the heat in summer and at the same time create an exquisite hairstyle - this is a Greek headband.
Option 1
Slip the Greek headband over the crown of your head and thread small strands of hair under the elastic. You will have a perfect hairstyle in just a few minutes.
Option 2
This is a more complex example of how you can use the Greek rim. You will need two headbands for this hairstyle. Slip one under your hair, and then back the back of your head. The second - put it on the crown and wrap the strands under it. Voila!
"Malvinka"
One of the fastest and cutest hairstyles we know from an early age, thanks to Malvina, a girl with blue hair. The main difference between this hairstyle: the hair is loose, the upper strands are pinned high at the back of the head.Option 1
A great way to diversify your look if your hair is barely touching your shoulders.Separate the strand over the bangs and floss. We put a roller under the lock and fix it. Velcro curlers can be used as a roller. They stick better to the hair. We grab the side curls and (together with the combed strand) we fix them on the back of the head with an elastic band. Using any thin object, stretch the hair a little from above, giving it volume. A Chinese stick or an ordinary hairpin will do. It is better to pull the strands with your fingers on long hair, but not on short.

Option 2
Separate one strand at each temple (above the ear) and secure them to the back of the head with an elastic band. Under the first strand, we grab a curl, draw it over the tail and start it behind the first strand. We repeat from the opposite side: we grab a curl, hold it over the tail and start it under the lock. We connect the ends of all four curls with an elastic band. It turns out a pretty heart.
Option 3
Using a hair straightener, curl the ends on a few side strands. Separate one strand at the top of the head and comb it into a bouffant. To keep the strand in place, spray it with hairspray. Having styled the combed strand, pin the hair with a barrette, making a "malvinka". Ready!A great option for a romantic date, going to the theater and even for a wedding.

Option 4
Grab a wide strand (from forehead to ear) at each temple. Secure the strands at the back of the head with an elastic band, masking it with a thin curl. Randomly, in no particular order, braid a pair of fine braids. For more bloopers, you can curl the ends of your hair a little.
Option 5
Separate a strand at each temple and make two flagella (turning the strands away from you). Connect the flagella at the back of the head by tying them with an elastic band. From the loose ends of the plait, braid using your favorite technique. For example, ala "fish tail".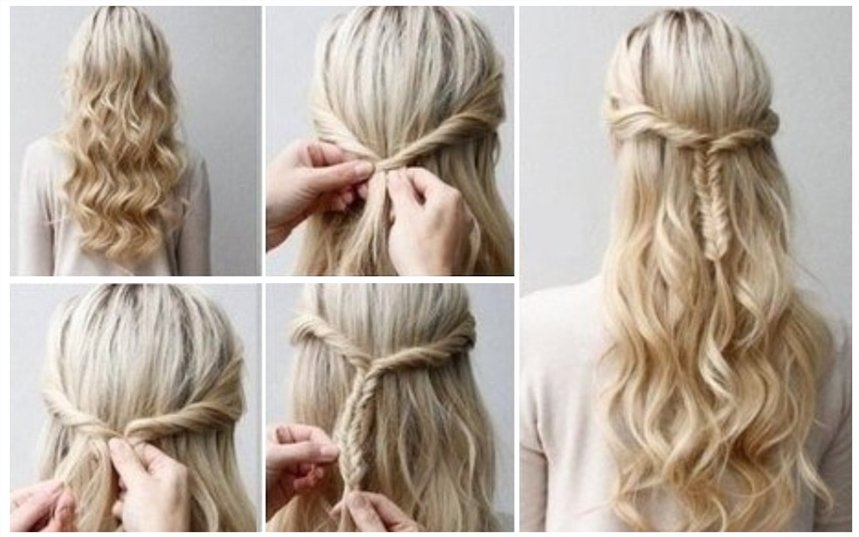
Emphasis on accessories
With the help of ribbons and scarves, you can turn even the most ordinary ponytail into a work of art. Someone might think that hair with a scarf resembles a collective farm style. And he will be wrong! It is fashionable and beautiful - even Hollywood stars flaunt in branded scarves skillfully tied to their hair. In summer, a scarf will protect you from the scorching rays of the sun. It also has other advantages: with the help of a well-laid scarf, you can hide hair imperfections, regrown roots, gray hair or a rare parting.Option 1
Loose and comb your hair. Tie a knot around the middle of the scarf. It can be a regular or decorative knot, according to your taste. Place the scarf over your forehead (so that the knot is slightly sideways). Tie a double knot at the back of your head and hide the ends of the scarf behind the base of the fabric.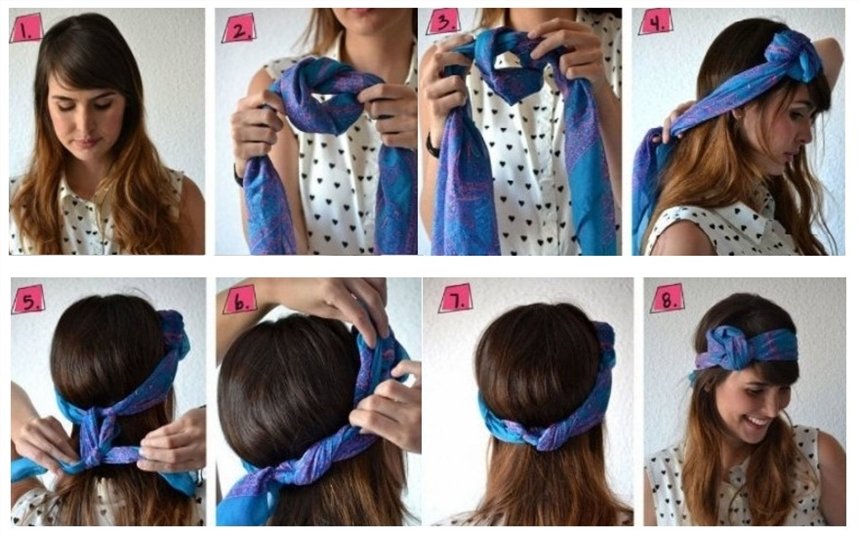
Option 2
Love fashionable images pin-up style? Then you will like this option.Divide your hair into two sections: back (crown and nape) and front (forehead). Pull your hair back into a bun You can pre-braid it in a braid to give your hair a hold. Twist the hair in front into a tourniquet, put it in a bagel and secure with invisible ones. A final touch: tie a cute scarf or shawl over your head.

Option 3
Another great version of the image of "pin-up girls". Create long bangs by separating a section over the center of your forehead. Collect the rest of the hair in one or more tails (the ends of which are curled with a curling iron). The most important stage is the formation of the bangs. It is the large bangs that are one of the distinctive features of this style. We wind the front strand on the curling iron. Give it the desired shape and spray with varnish. Behind the bangs we tie a small polka-dot handkerchief with a bow.
Option 4
The popularity of The Great Gatsby rekindled interest in 1920s American culture. And, of course, this interest has not bypassed the world of fashion. Ladies of that era, going to a party, preferred short hair, and long curls were removed under a flashy headband. However, the headband was also worn on short hair. In addition, the hair was often curled. If you love visiting Mafia clubs or jazz bars, then retro styling will come in handy. Let's take a look at one of the ways to create this hairstyle.Comb your hair to the side and wear a glamorous headband. We pass the hair through the bezel - strand by strand. Voila! We advise owners of short hair to smooth the curls with gel and (where can we do without it?) Put on a headband!

Among these hairstyles, you are guaranteed to pick up several for yourself


