Despite the fact that this attribute is wonderful in itself, many craftswomen want to additionally decorate it. How to do this delicately and tastefully will be shown to us in her master class by the craftswoman Natalya Pashchuk. This is what she writes in the preface to her master class: “The St. George ribbon has become for us a symbol of the bright holiday of Victory and an obligatory attribute May holidays... Today we will make a ribbon of St. George, made in the form of a brooch and decorated with a sprig of the tricolor of the Russian flag. It will be a wonderful gift for relatives and friends, especially our dear grandparents, who survived this terrible war and gave us a bright and joyful Victory Day. " 
Tools and materials:
- George Ribbon
- satin ribbon 5 cm wide - white, blue and red,
- rhinestones with a diameter of 3 mm,
- small pin
- Instruments:
- scissors,
- glue gun,
- lighter,
- tweezers
So, let's begin. St. George's ribbon is decorated with a stylized twig made in the ancient Japanese technique of kanzashi, and for work we need sharp (this is important) scissors, a thermal gun with a thin nose, an automatic lighter or a candle - a tablet.

How to decorate a St. George ribbon with your own hands
Step number 1. From a satin ribbon, cut squares with a side of five centimeters - three white squares, two blue and two red.

Step number 2. The branch consists of leaves, which are performed in almost the same way. Fold the square in half diagonally. 
Step number 3. Now again in half. It is very convenient to use tweezers in work. 
Step number 4. We fold our part again and we get such a drop, we intercept it with tweezers, stepping back a little from the edge. 
Step # 5. Cut off the corner, leaving about one millimeter at the tweezers. 
Step 6 Burn the cut over the flame of a lighter or candle. In this case, it is important to process the part with the tip of the flame, where the most heat, due to this, the tape melts and "sticks together". 
Step 7. Now we clamp the leaf with tweezers along the fold. 
Step number 8. Cut off the tape, stepping back about a millimeter from the tweezers - the width (or rather the height) of the leaf is about a centimeter. 
Step 9. Straighten the petal and singe the cut - we have got such a drop. 
Step 10 The first leaf is ready. 
Step number 11. Therefore, we make two more white leaves according to the same principle. In order for the twig to look beautiful and neat, it is necessary that the paired leaves have folds on the outside. 
Step 12 Now we make two more blue leaves. 
Step 13 And two red ones, in total we got seven leaves. 
Step 14. We begin to collect the twig, apply a drop of hot glue to the inner lower corner of the leaf with a heat gun. 
Step 15. Glue the second leaf and press it tightly with tweezers for a minute. 
Step 16. Carefully push the leaves apart, drip a drop of glue between them and glue the central leaf of the twig. 
Step 17. We also glue two blue leaves. 
Step 18 We spread them apart and glue in the white top of the branch. 
Step number 19. We do the same with red leaves - this is a twig we got. 
Step 20. Now we cut off the St. George's ribbon about 20 cm long, while cutting the corners at 45 degrees and singe the cuts with a lighter. 
Step 21. We retreat from the cut 5-6 cm and apply a strip of hot glue. 
Step 22. We glue the second end of the ribbon, so that a neat loop is obtained. 
How to attach a St.George ribbon
Step 23. Now we need to attach the fastener, for this we cut off about one centimeter from the St.George ribbon. 
Step 24. Thread a small pin through the ribbon and place it on the table with a clasp. 
Step 25. Apply hot glue to the surface of the ribbon. 
Step number 26. And press tightly to seamy side of our brooch - where the front side will be, and where the seamy side (that is, how the loop of the St.George ribbon will lie) is to your taste. 
Step number 27. It remains to glue our twig, for this we apply hot glue to the wrong side. 
Step number 28. And glue it on front side brooches. 
Step # 29 It remains to decorate the twig with rhinestones or half-beads - apply a drop of glue to the junction of the leaves and glue the rhinestone with tweezers. George Ribbon ready.
Of course, you can make such a decoration in a different, stricter color scheme.  Now you know
Natalia Pashchuk specially for the site: Good idea http: // site
Did you like this master class? PLEASE share with your friends using the buttons below.
A worthy decoration for anyone national holiday in our country, undoubtedly, is the St. George ribbon. This respect and patriotism is worn by both adults and children. The jewelry is sold in many stores, and for needlewomen the handmade St. George ribbon will become a real source of pride.
Preparation for work
Before heading to the store for necessary materials or to find the necessary blanks in the bins, it is recommended to decide on the type of decoration and the technique in which it will be performed. The simplest, but at the same time original version there will be a do-it-yourself St.George ribbon made in the style of kanzashi. This technique allows you to embody any fantasy of the craftswoman and make an exquisite patriotic brooch, hair clip and even a bracelet from scrap materials. But we will consider the option of making a classic brooch in the kanzashi style.

To create a unique jewelry, you will need the following tools:
- scissors;
- ruler;
- needle and thread;
- candle or lighter;
- pencil or marker;
- tweezers;
- glue gun.
If all the tools are available, then there will be no problems with making a St. George ribbon with your own hands. But if there is no glue gun in the home arsenal of the craftswoman, you can use any polymer glue.
Purchase of material
Before heading to the store for materials, you should consider how to decorate the middle of your brooch. If there are no skills in making kanzashi jewelry, it is better to opt for a beautiful bead and a half-bead. But experienced craftswomen who like needlework can professionally decorate the St.George ribbon with their own hands: make a flower, spikelet or other decorative element from satin ribbons.
So, to make jewelry you will need:
- satin St. George ribbon 2.5-6 cm wide;
- large bead (half-bead) or decorative center;
- metal base for a brooch.
For those who want to turn their product into a real masterpiece, you can purchase beads of the corresponding colors. From it you can weave an original decor for the center or decorate the edges of the ribbon.
Getting started
At the first stage of creating with your own hands the St.George ribbon of kanzash, you should prepare 5 pieces of tape of 7 cm.To do this, carefully measure the segments and cut them very evenly. Otherwise, the material will begin to crumble, and the flower petals will not be the same. We light a candle or lighter and singe the edges of the blanks. In this case, it is better to use tweezers to avoid injury and burns.
We take the segment with the wrong side to us, form a right angle. Then we lower the second edge, clearly superimposing it on the first. It turns out a petal with a sharp top edge. Next, fold it in half to the wrong side, aligning the edges. From below, fix the resulting fold with tweezers and turn the edges inside out. We solder the lower part of the finished petal over the fire. We make 4 more blanks in the same way.

Assembling the decoration
Take the remaining piece of tape 25 cm long, fold and process the edges. Each side should be sealed with fire, having previously cut off the middle part to get the so-called "flag". Even for those who do not know how to make a St. George ribbon, this operation will not cause problems.
We lay out the ribbon on the table wrong side up, bend the side edges, laying them crosswise. In this case, the edges of the tape can be leveled one length, or the choice can be stopped at their non-symmetrical arrangement. We sew the resulting loop from the ribbon in the center and immediately sew on the metal base for the brooch. After the thread, we glue it in order to avoid unforeseen situations when wearing.
We go to the finish line
At this stage of work, we already have two main elements of decoration ready: a flower and a base with fasteners. We connect them with glue and press them at the junction until they dry. Thus, a self-made St.George ribbon only needs decoration. We glue a bead or any beautiful center in the center of the flower and enjoy the beauty of our creation.

Even for novice needlewomen, the process of creating a St.George ribbon with their own hands will take no more than 20 minutes. And the unusual strict decoration will become not only a symbol of patriotism, but also a source of pride for its owner.
On Victory Day, in small towns, remote villages, megalopolises of our Motherland, you can see thousands of people, on whose chest flaunts the symbol of courage and heroism of Russian soldiers and officers - the St. George ribbon. This is not just a tribute to fashion, it is a respectful admiration for the memory of the fighters who defended Russia.
The St. George ribbon is a two-color element of the award of the Order of St. George, established in the 18th century by Empress Catherine II for the courage and services of soldiers to the Fatherland. For the first time, St. George's bows appeared on the May streets of our country in 2005 and since then have become an integral part of the celebrations in honor of Victory Day.
Flower from the St.George ribbon with your own hands
Every year on May 9, Russians go out to a festive parade, jokes on clothes with an orange and black ribbon. If you want to have a personal symbol of connection with heroic ancestors, make a flower from a traditional ribbon, decorating it with decorative elements to your liking.
Materials and tools for work
- A piece of St. George's ribbon, about a meter. Sold in handicraft departments.
- Moment glue or hot glue gun. Grips quickly, holds tight.
- Metal pin clasp. You can take from an old brooch or buy in household goods.
- Small things for decoration: shiny beads, buttons, badges.
- Matches or lighter, scissors.
Flower making process
You will make a flower from a St. George ribbon quickly if you follow our advice.
- Cut seven 5 x 2.5 cm rectangles from the ribbon - these are the petals of the future flower.
- Bend the corners of the rectangle on the wider side to form a triangle. Fold this shape in half again.
- Unfold the part with the fold up and fold the bottom corner to the fold. Do the same on the reverse side.
- Light a match and melt the ribbon cuts. This will hold the sides of the petal together and prevent them from falling apart. Spread out the part.
- Fasten all the petals in a circle with glue, forming a flower. Attach a bead or button in the middle of the rim.

Making the base for the flower
Take a ribbon with a length of 25 cm, fold it, crossing the strips of fabric. Fasten the fold and glue the resulting flower on top. Flip the workpiece over and pin the pin. Do not forget to cut off the edges of the tape with a bird.
For reliability, you can cut out a circle from black felt, less than a flower by 1 cm, and glue petals on it. And then fasten the resulting brooch with a pistol on the St.George ribbon.


Flower-medallion from the St.George ribbon
Take 40 cm of tape and cut it in half. Using a needle, cast one piece of tape per thread. Pull it with an accordion, form an unblown tulip. Fold the remaining tape in two and sew the bud to it. Secure the locket with a pin to your clothing.


Flower-brooch from the St.George ribbon
And this way of making an attribute is even easier. You will need: a two-color ribbon, a thick sheet of paper, scissors, thread with a needle, a button, a clasp.
Cut a circle out of paper the size of a future flower. Sew the tape - 20 cm by hand in the middle, assemble it in small assemblies, glue it on a circle in the shape of a flower. Insert an army button in the middle. Glue the brooch to the material. Attach the clasp to the back of the ribbon.


Decorate a buttonhole, a bouquet of carnations, a handbag, a car with such cute flowers. Or present your craft to any elderly person you meet on the street, congratulating him on the holiday and wishing him good health.
For the first time, the St. George ribbon to encourage the courage and bravery of soldiers was established by Catherine II during the Russian-Turkish war. Many years have passed since then, and more than one war has passed, but the St. George ribbon is still a symbol of courage, courage and fortitude. And today this insignia has another, no less important symbolism - a manifestation of deep respect and gratitude to all those who made the victory over fascism a reality. But, like any other symbolic sign, the St. George ribbon must be worn correctly. In our today's article, we will tell you how to tie a St.George ribbon correctly and beautifully.
How to wear a St. George ribbon on May 9?
There are several options for how to wear a St. George ribbon on Victory Day. The first and easiest way is to fold the ribbon in half and make a loop. You can also fasten the tape to your outerwear by folding it in the form of the Latin letter V, which symbolizes victory. You can also wear a zipper-shaped ribbon that resembles an inverted I. Other simple and spectacular ways tying St. George's ribbon on May 9 are waiting for you further.

How to tie a St. George ribbon correctly - step by step instructions
This is a very simple method, for which you will need a ribbon itself and a regular pin. If desired, instead of a pin, a ribbon tied with this method can be sewn to outerwear.

Necessary materials:
- St. George Ribbon
- pin
Step-by-step instructions on how to tie the St.George ribbon correctly:
- Lay the tape horizontally on a flat surface.

- Fingers right hand we fix the middle, and with our left hand we take the right edge of the tape.

- We fix the edge with our fingers approximately in the middle of the tape.

- We hold the edge and take the opposite one.

- We start it in the middle of the tape.

- Overlap the first end of the ribbon and straighten the middle a little to make a small bow. We fix the edges of the ribbon with a pin.

Diy ribbon brooch from St.George ribbon by May 9, master class with photo
The next method will require a little creativity and a little time from you. But on the other hand, your St. George ribbon, or rather, a real brooch in the form of a five-pointed star, will surely attract the admiring glances of others.

Required materials for a brooch from a St. George ribbon:
- rep tape (width 2.5 cm, length 1 m)
- scissors
- glue gun
- brooch (clasp)
- felt base (circle with a diameter of 6 cm)
- decor for the middle (button, bead, pearl)
- tweezers
- candle
Step-by-step instructions for making a brooch from a St. George ribbon:
- Cut off a piece 11 cm long from the tape. Fold it in half and form a small loop on top.

- We clamp the workpiece with tweezers at the base, cut off the uneven edges.

- We burn the edges of the workpiece over an open candle fire.

- For a brooch, we need 5 such blanks.

- We form a star from the blanks. We glue them together.


- Glue the decor to the middle of the star.

- Cut off another piece about 10-15 cm long from the tape. Fold it in half and cut off the ends.

- We fix the resulting tail with glue. We also glue a felt base with a fastener to it.


- Finally, glue the star and tail together. Our original brooch from the St. George ribbon is ready!

How to tie a bow from a St. George ribbon with your own hands - step by step instructions
The bow is one of the most popular forms for wearing the St. George ribbon on Victory Day. Therefore, in addition to the first method described above, we suggest that you master another variation of a simple bow.

Required materials for the bow:
- St. George Ribbon
- thread or elastic
Step-by-step instructions on how to tie a bow from a St.George ribbon:

You can watch even more ideas and ways on how to tie a St. George ribbon on May 9 in the video tutorial below.
In this master class, we will make kanzashi jewelry for the St.George ribbon. For work, you can use more thin ribbons or fabric, but it is more convenient to try and train on wide satin ribbons.
To connect the parts, we will use hot glue (you can sew or use glue moment).
Option 1: Simple round kanzashi petal.
1. Cut squares from an orange satin ribbon. We will make 7-8 round petals from them.
2. Fold the square diagonally.
3. Then we bend the corners of the triangle to the top as shown in the photo.
4. It is more convenient (for a beginner) to do it in turn.
5. First, weld one side over the fire.
6. And then the second is similar.
7. This is how it should turn out.
8. Fold the resulting part in half, that is, with the corners back.
9. Cut off the corners.
10.Solder the bottom cuts separately.

Front and back view of the petal ...

We make the required number of petals. For a flower you need 7-8 pieces. You can fold it the way I did it, or you can do it in any other way. I fix it with a hot glue gun.
We fix it with hot glue on a small circle of dense black felt so that the flower does not bend in the center, we attach any suitable decoration in the middle.

We fix it on the St.George ribbon and fix the brooch base with hot glue.


Option 2: double round kanzashi petal.
In addition, you will need: sharp scissors, a candle, a small piece of black felt, a brooch base, an ornament for the middle and a St. George's ribbon.
We use hot glue to connect the parts (you can sew or use glue moment).
2. Fold them diagonally and lay them on top of each other as shown in the photo. For convenience, you can use a needle.
3. Bend the side corners to the lower corner (shown by arrows). It is more convenient to take turns.
4. First one.
5. We seal the seam on the candle.
6. Then the second is similar.
I seal the seams, it seems more convenient to me. If you only solder the corners, then pre-process the edges of the squares on the candle.

7. Fold the resulting part in half, that is, with the corners back. You can solder the base of the petal on the candle a little.
8. Cut off the corners.
9. Solder the bottom cuts separately. 
Front and back view of the petal ...
If you solder the lower cuts together, you get another version of the petal, but, in my opinion, no less interesting.

We connect 7 petals together on a small circle of felt, decorate the middle.
We fasten the St. George ribbon and the brooch base ...


Option 3: A simple, sharp kanzashi petal.
Materials: satin ribbon 4-5 cm wide.
1. Cut the squares from the satin ribbon. We start making sharp petals.
2. Fold the square diagonally.
3. Let's add it up again.
4. Connect the corners again.

5. Weld the base of the petal well.
6. Cut off the corner.
7. We process the cut on fire.

Front and back view of the petal ...

In a similar way, we make the required number of petals of the desired color.
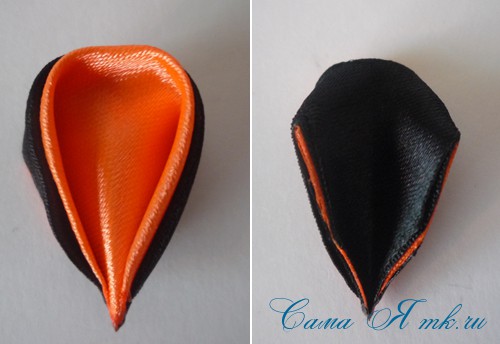
Option 4: Double sharp kanzashi petal.
Materials: satin ribbon 4-5 cm wide in two colors.
Additionally you will need: sharp scissors, a candle, a base brooch, any jewelry and a St. George ribbon.
1. Cut off two squares of different colors from the satin ribbon.
2. Fold them diagonally and lay them on top of each other as shown in the photo.
3. Draw each corner in turn to the opposite corner of the resulting figure.
4. Here's what you should get.

5. Fold to the middle and weld the base of the petal well so that it does not disintegrate.
6.Cut off the corner.
7. We process the cut on fire.

This is what the finished double petal looks like.

We make the required number of petals. Can be folded "spikelet" or in any other way. I fix it with a hot glue gun.
We fix it on the St.George ribbon and fasten the brooch base.


Option 5: Triple sharp kanzashi petal.
A triple kanzashi petal can be made in two ways: combine single and double petals, or solder each petal to the previous one in turn. In the second case, the petal will be smoother.

Or each petal separately ...

We make the required number of petals, sew or assemble with hot glue ...


An original decoration for clothes for you or as a gift for Victory Day for family and friends is ready!
Create with pleasure!
I was glad to help!