And then came the brightest holiday of the year - Christmas! We are always looking forward to this holiday and not only to tell fortunes on Christmas Eve, but also to rejoice about the birth of the Savior.
Christmas is always associated with angels. On this holiday, they descend from heaven to convey the good news to us. And at the same time, they are our protectors from the dark forces. And it is on Christmastide (from January 6 to January 19) that any evil spirits are most active. Therefore, in every house there must be an angel figurine that will protect you.

Now there are a lot of ready-made figurines, postcards, toys - choose any!

.jpg)

But for a long time, it is customary to make angels with your own hands. Decorated the house with such angels or New Year's beauty- spruce and presented to their loved ones. When we make a piece of jewelry or a gift with our own hands, we put a piece of our soul into them - such crafts will only delight us and become the most expensive!
An angel can be made from any material: paper, fabric, beads, threads, sweets, even.

ANGEL-CHARM.
But first of all, an angel is a talisman and on Christmastide is a very urgent protection! Incense or a cross is put into such dolls. An angel decorated with white feathers or down looks very delicate.
.jpg)
Charms are mainly made from fabric and thread... The fabric should be taken in white and bright colors, because an angel is a light spirit. So, for the amulet-angel you will need:
- fabric (white light burlap or any other with large weaving looks best);
- threads (to match the fabric);
- silver thread (halo and belt);
- cotton wool or other filler (even scraps of fabric will do);
- Christmas mood!
(1).jpg)
We cut out a square of the required size from the fabric, make a fringe around the edges.
.jpg)
We form a ball from the filler, measure the center of the square and lay it on the fabric.
.jpg)
Then, fold the fabric in the middle, make the head of an angel, fix it with a thread. All edges of the fabric should be the same length.
.jpg)
Let's get down to hands. We turn the opposite corners inward, then again we bend both corners to the middle. We tie it up with a thread.
.jpg)
.jpg)
From the fabric that remains, we form the wings and the skirt of the angel. The body and head of the figurine are decorated with silver braid. The angel dress can be made in two versions, as you like.
.jpg)
.jpg)
There is a similar version of the amulet doll, in which only wings are made (without arms). From tape or satin fabric making additional wings.
.jpg)
.jpg)
.jpg)
.jpg)
Such an angel can be wrapped in transparent paper and presented to guests when they bring you or eat.
FABRIC and FELT.
I present to you another angel made of fabric, with which you can decorate a Christmas tree or window for the Christmas holidays.

For such an angel, you need to prepare:
- two types of fabric;
- felt (for the wings and head of the figure);
- gold braid (narrow and wide);
- button to match one of the fabric (felt star);
- scissors, pencil, thread, black and red marker, glue gun (or superglue);
- good mood!

Cut out two identical circles from the fabric, sew them together and turn them inside out.
We glue the hole, with the edges inward.

We wrap parts of the circle, forming a collar for the angel. At the junction, we connect the parts with a button or a star (glue it).

For the face, you will need circles made of felt, which we paint with markers (eyes and cheeks). Halo is a wide ribbon.

Wings - we cut out felt hearts, sew them with threads and glue a narrow ribbon in the form of a loop between them.

We glue all the parts together and we get a cheerful angel!

PAPER ANGELS.
Look very airy angels made of paper. They will even "flutter" from your every move.


All that is needed for such an angel is to enlarge the diagram to fill the entire computer screen, attach paper, redraw the diagram and cut it out. Or print it out on a printer.


If you know how to work with paper quilling style, then such angels are beautiful in their own way!


KNITTED ANGELS.
They look very gentle and airy angels crocheted ... Only such angels will take time, so knit them in advance.


.jpg)
.jpg)

ANGELS from BEADS and PAETOK.
For lovers beading, angel theme also will not pass by.


.jpg)


PASTA.
Well, if you have absolutely nothing at hand, then angels can be made from pasta! Glue pasta of different shapes together, paint with spray paint.

.jpg)

.jpeg)


.jpeg)

WOODEN DISKS.
From improvised means, for example cotton pads, you get snow-white angels... These gentle and simple angels are perfect for decoration New Year's gifts or Christmas dishes.
.jpg)


For such angels, take any cotton pads, toothpicks, beads and glitter (best mixed with glue).


ICE ANGELS.
Now they have become fashionable ice sculptures of angels... They decorate the streets on holidays and are carved from a whole block of ice.


But we will do it much easier. When you are, freeze the ice angels yourself and hang them on the trees - it will be very original decoration!


And making angels out of ice is very simple. Take soap molds or any other silicone angel molds.


Fill with water, put the loop tape inside and send to the freezer. As soon as the water freezes, our decoration is ready!
SWEET ANGELS.
Of course, for those with a sweet tooth, you can bake angel-shaped cookies or candy canes.
Cookies are baked and decorated like any other, only in the shape of an angel.


We make sweet angels from caramel according to the same scheme and recipe as.

We take the forms of angels, for lollipops or soap making and pour in multi-colored caramel.

.jpg)

These lollipops are great for a baby gift. And if you decide to decorate the room with them, then after pouring the caramel, put the ribbon in it.
You can just put them on the table in a glass, but instead of a ribbon, put a stick (toothpick) or a New Year's cane in liquid syrup.
I have described to you just a small part of making Christmas angels ... You can choose any for yourself!
Happy New Years and Happy New Years!
Playing with dolls, the child learns the world learns to communicate with people. Therefore, it is not surprising that among the many toys, it is dolls that occupy the highest level of popularity. Homemade toys are filled with special energy and love. Angel dolls are usually given for birthdays, attached to a crib so that they protect the baby from envious people. It is not difficult to make such a protector; it is enough to stock up on fabric, yarn and crochet.
There are many ways to make angel dolls. Each of them is individual and beautiful in its own way. The toy is made of any material: nylon, brocade, tulle and organza, and synthetic winterizer or cotton wool can serve as a filler.
The Tilda doll is not exactly a child's toy; it can revive a boring interior with it. Sewing such a model is very simple. To do this, use a monochromatic material of pastel colors. The pupa is distinguished by its long limbs and a small head. Dress the toy in chintz fabrics and felt.
Another version of the toy is made of filled gauze. The doll is dressed in bright calico dresses.

Christmas angels made of felt are in a hurry to fulfill all children's wishes. Their outfit is decorated with pearls. The wings are made of real feathers.

Angel doll pattern
Any pattern is initially printed, transferred to the fabric and cut out.
Tilda the little angel has a soul of her own. She is naive, romantic, somewhat comical and sweet.


The felt angel is filled with padding polyester and decorated with bead eyes.


The funny little angel "Manyunya" will become an original gift for Valentine's Day. Its pattern can be increased to the desired size.


Knitwear for dolls white angel
The material for the doll's base plays no less important role than the selection of fabrics for her clothes. The body of the toy can be made of any fabric, but the model from Polartec-one-sided fleece or doll jersey looks more impressive.
The second material differs in density, so a thin look is taken for the head, and the arms, torso and legs are made from a base with a density of 250 g.
The faces of the pupae are made of double-sided bodily knitwear, and both sides of the material are used in the work.

The smooth cooler is particularly thin and elastic. Distinctive feature material is that it stretches only in width.

Fleece, Polartec and eco-velor are used to put toys on the body. Turkish fleece is inferior in quality to Polish. The Turkish base is too stretched and has pellets over time. The Polish brand keeps its shape well and has an even front side... The material is distinguished by its density: 210 gr and 280 gr. The most popular is baked milk-colored fleece.

According to the application of fibers, one-sided and two-sided microfleece are distinguished. Both types are used in the manufacture of dolls.

Doll white angel, photo with explanation
Of course, the image of an angel must be white and pure. Let's try to make a doll out of fluffy white wool.
For a small pupa, wool is prepared, 50 cm long. Fold it in half. Tie a knot in the center and pull gently at the ends. Then the wool is folded in half again. Just below the knot, they grab it with a folded thread and tighten the knot. Thus, outline the neck of the toy.
 Take two more pieces of wool, 12 cm long. Place one on top of the other.
Dividing the threads of the body in half, insert blanks for the arms between them. They move them under the head and outline the neck with a golden thread.
 Wrap the thread across the front, over the right shoulder and transfer to the back. Repeat fixation on the left side and pass twice along the waist. The end of the thread is tied at the back. Hands stretch slightly, bend the tip up and tie with a piece of golden thread.

To make a halo, small multi-colored beads are strung on a thread and a circle is formed from them. Placing the jewelry on the head, secure it with white cotton thread.
You can decorate the skirt with multi-colored threads with loose ends.

Angel wings for a doll, how to make
Wings for dolls will be made of wire-based organza, feathers and even pieces of fabric.
Feather wings
The wing pattern is printed and cut out.

Wire is passed along the top and bottom edges. Then the template is applied to the non-woven fabric and 4 identical blanks are cut out.

Wire is passed at the upper and lower ends of the non-woven blanks. It should run inside the wings.

Both sides of the wings are covered with feathers. They are attached with glue.


For realism, the wings are folded slightly.

Wings from pieces of coarse calico
The template of the wings is transferred to the fabric, cut out and stitched along the seam. Leave a small hole for filling with padding polyester.

The coarse calico is torn into strips 2 cm wide, folded in half and stitched with two seams, stepping back from the fold of 0.5 mm. Cut flat into pieces (8-9 cm) and cut off at each corner.

Fabric feathers are sewn along the edge on both sides. It is desirable that the tips are of different sizes.

Then proceed to short feathers. The chintz is torn into strips and cut into 2 cm pieces.

They pass through the fabric with a basting stitch, pull the thread a little and sew it to the wing. They work until the entire space is filled.

For naturalness, the wings are combed with a brush.
The color of the wings can be adjusted with acrylic paints, in a 1: 1 ratio with PVA glue.

Doll Christmas angel, photo with explanation
New Year's holidays do not pass without magic and joy. Christmas angels can be a decoration for a green beauty or a gift for loved ones.
The pupa is filled with synthetic fluff, the hair is made of merino wool. Decorate the toy with beads, stars and other golden elements.

The pattern is designed for a model with a height of 9-10 cm.

The details of the pupa are transferred to the fabric. Allowances for seams are left on the head.
The body and wings are sewn along the contour.

The details are cut out, departing from the edge by 2 mm. The edges of the wings are best trimmed with zigzag scissors.
The head is sewn together by making 3 grooves in different places. Small cuts are made on the back and wings.

With the help of a pencil, the pupa is turned inside out, the details are ironed. The angel is stuffed with filler, the holes are closed with a decorative seam.

Eyes, nose and mouth are applied to the face with a pencil. The contours are drawn with acrylic paints.

Ballerinas and panties are sewn from cotton lace. Linen and shoes are sewn to the body and legs.

A dress for an angel can be made satin. Its rear part consists of 1 part, and its front part consists of 2 parts. The edges of the dress are fixed with a cobweb.

The dress is decorated with lace and ribbons. The outfit is fitted to the doll and attached to the body.

The hair of the angel is created from strands of merino wool, which are glued to the head. The hairstyle is formed using stitches. Excess strands are cut off.

A ribbon-rim is sewn around the head. It is decorated with beads. The toy is girded, a bow is formed at the back. It remains to decorate the dress with decorative beads.

Doll angel do it yourself master class, step by step with a photo
The fabric angel doll according to the pattern will be 40 cm tall.
The pattern is printed, the details are cut out. The figure shows which blanks should be several.

The template is attached to the fabric with pins, stitched, leaving room for filling. The head is cut out and only then sewn from the crown. For stuffing, a hole is left at the back of the head. The details are cut out by making wedge-shaped cuts in several places.

Each part is turned inside out and stuffed tightly with padding polyester.
Legs are shaped separately. To give a pose, a wire is inserted into them. Then, step by step, it is filled with filler.


All holes are sewn up. Details will connect.
Start sewing clothes. According to the pattern, the details are cut out and the pantaloons are sewn.
 The bottom of the linen is decorated with lace and beads, the top is pulled together with a thread.

Knee-highs are made of lace, decorated with organza tone. Golfs are sewn in several places to the ankle.

The doll dress will be rectangular gathered around the neck. Its hem should protrude just below the linen. The bottom of the dress is also decorated with organza and beads.

The top of the dress is collected directly on the doll and secured with stitches.

The sleeves are made of strips of fabric. They are also decorated with organza. The collected sleeves are sewn to the dress.

Hair is made from loose iris threads in several stages. The thread is wound on a base, cut into small bundles, divided and sewn to the head.


The nimbus is made of soft wire sheathed with gold nap.

To revive the face of the doll a little, they embroider the eyes and mouth with threads. Blush is made from the dust of a pink slate pencil. They are shaded on the cheeks of the angel.

The wings are made of two-layer viscose napkin or felt. The structure is additionally reinforced with wire.
 The wings are covered with feathers on both sides. The sharp ends are inserted into the base and sewn with a needle.
 The design is put on the doll using a white cord. Now the angel is completely ready.

Doll amulet angel master class
The age of coiled or knotted dolls is more than 3 thousand years. Our ancestors firmly believed that protective dolls guard their home and contribute to the well-being of the family. Initially, pupae were stuffed with straw and cloth, and hair was made from threads and rope.
Motankas were especially revered in families with small children. They were placed in the infant's cradle to protect them from evil eyes and diseases, and they were also given to the child to play with. During the illness, a special doll was created, which was then burned, piously believing that she took all the ailment with her into the fire.
Today, the popularity of motanks is growing every year, because a piece of the craftswoman's soul and her innermost dreams are embedded in it.
Protective doll "Good Herald"
A 10 by 10 cm square of lining fabric is singed over the candle.

A piece of cotton is wrapped in a fabric and tightly wrapped with a thread.


For the hands, one of the corners is folded. 
Fold the end towards the center and fold it along.

The edges of the handle are wrapped several times with golden thread and fixed with a knot. The second palm is performed similarly. It is better not to break the thread, but to skip it inside the figure.

The pupa's belt is intercepted with a golden thread and wrapped around the waist a couple of times. For a skirt, lace is sewn into a tube and put on over the petticoat. You can secure the outfit with stitches.
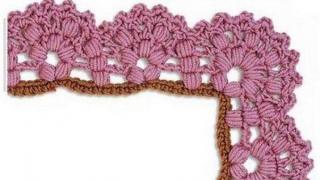
Angel doll crochet, scheme in detail with a description
Knitted angels will be a real decoration for weddings, christenings and Christmas. The diagram is given on a model 8-9 cm in height. They are knitted with Chamomile threads on the basis of a ring, 2 cm in diameter. Here are four knitting options.


 The hair of the angel can be coated with silver paint or tied with silver thread. To give rigidity, the figure is dipped into the composition of water and PVA glue in a 1: 1 ratio.
Tilda doll angel, pattern
Tilda dolls by Norwegian designer Tony Finnanger are especially popular among angels.
For work, you need to take fabric of different colors, fleece for the wings, and padding will serve as a padding polyester.
The doll's clothes are sewn from colorful patches. Old jeans, shawls, pieces of lace, etc. can be used.

For the wings, the fleece is folded in half, sewn along the contour and cut out. The middle is pulled together with a thread and sewn to the back of the doll.

Lol doll snow angel, photo with explanation
Lol Snow Angel has a light brown skin. The beauty's lips are painted with light pink lipstick, and a small mole adorns her face. The little angel has blue eyes and blonde hair twisted into two buns. She wears light blue headphones on her head. The doll is dressed in a lilac sweater with a snowflake, a puffy white waistcoat, a short blue skirt and white boots with a pale yellow sole.

Homemade angel dolls will be a wonderful gift for any occasion. They are very sweet and kind.
Christmas Angel. Master Class
New Year and Christmas holidays are approaching ... Everyone is waiting for magic)))
I want goodness and a piece of magic to come to every house)))
I want to share the tailoring of such an angel who will bring warmth and tenderness to your home.
The pattern is suitable for A4 size, but if desired, you can increase or decrease. It is very simple to do this - on the monitor we make the size larger or smaller, attach a sheet of paper and redraw it. Remember how in childhood pictures were applied to the window?))))
Any fabric for sewing can be used: calico, linen, cotton ... If not the desired color then the fabric can be dyed. Next, the recipe: 5 liters of water, 6-8 tea bags of the cheapest tea and a tablespoon of salt, you can also add a bag of vanilla for the smell. We brew tea well and take out the tea bags. We lower the unfolded fabric into this solution and gently turn it over with a spoon so that it is well painted over and there are no streaks. The longer we hold it, the darker the color will be. Then you need to hang the cloth to dry. You need to hang it by one edge, because there will be a light strip at the fold. I do not dry the fabric completely, but iron it when it is slightly damp, so it is much easier to iron it. We transfer the pattern to the fabric: all the details, except for the front part, are in two folds. Then we sew the details. I do not sweep, and even more so I do not cut out the details, we will cut it out later, when we sew it. Red dots mark places that will not be sewn up when stitched. Namely: the top of the legs, the bottom of the body and the top of the neck, a small area at the top of the handle and in the middle of the back of the head.
When the back of the head has been sewn, we mark it to the front part and sew in a circle. There is no need to leave unprocessed areas, because there is already room for eversion in the back of the head.
Now we cut out our pieces with zigzag scissors. If there are no such, then just close to the line, but in the places of the rounding you need to make notches or cut out with triangles, imitating a zigzag, which is preferable.
Now you need to turn out the parts. Thin handles-legs can be turned out very easily. To do this, you need a tube and a stick. I use a paste from under gel pen and a sushi stick.
We insert the tube into the leg / handle until it stops and push the stickinto a tube... Now we begin to pull the fabric over the stick, like a stocking. It is convenient for me to do this when I rest the tube against something: a table or against myself))) then I have two free hands. Nothing complicated and everything is very fast)))
The bottom of the body should be hemmed with basting stitches.
Now we will acquire an assistant and fill in the details))) For stuffing, you can use holofiber (this is what the pillows are filled with), a synthetic winterizer cut into small pieces, but not cotton wool !!! It gets confused and is not suitable for stuffing toys. I use holofiber - I buy the most common pillows and gut them. We stuff all the details tightly, especially the head !!!
When the legs are stuffed, you need to sew them into the body. There are two ways: straight legs and clubfoot legs. Be sure to make sure that the legs are the same length! When the legs are sewn on, you can stuff the body. We stuff the body tightly, especially in the neck area.
Now we sew all sections with blind stitches.
Now let's paint a little))) I use Decola acrylic paint. It is available in sets and in separate jars. The set is cheaper to buy. First, draw a contour of the future shoes with a pencil, then draw along the contour with paint and fill it. Can reverse side put the dots on the brushes. The paint dries quickly enough.
We cut out panties and sew. The photo shows the sequence with red dots. We turn it out and put it on the doll. You can lay folds to make it "fit"
Moving on to the dress. It’s very simple. The top of the dress is a rectangle of fabric folded in half. The skirt is also a rectangle, but two to three times wider than the top of the dress and the desired length. I used base fabric and lace.
The details need to be processed first. Overlock the top of the dress, folded in half. We will hem the low skirts of the main fabric and also overlock together with lace along the side seams and the upper cut.
Sew the top of the skirt with a large stitch and pull it to the width of the top. Sew together and add a finishing stitch. Sew the back seam. The dress is ready!
Sleeves. The sleeve pattern is made on the basis of the hand pattern, but add a couple of millimeters a).
First, we sew to the middle of the handle from the outside and iron it out b)
Now you need to hem the bottom of the sleeve c)
Fold in half again and sew in a circle d)
Cut out, turn out and put on handles.
We will sew the handles to the body. We need a long needle.
We put on the finished dress for the doll. We sew buttons to the handles.
The principle of sewing is the same as sewing a button to a shirt. Just through the whole body and two at once))) It is best to flash back and forth several times by slightly tightening.
Now we will sew the head. The lower we begin to sew the head to the neck, the more the head will be lowered down. Therefore, we sew on the top of the neck and a little on the sides.
Let's take care of the curls. We need wool for felting (combed tops), wooden skewers, hair foam.
Pour water into a bowl and squeeze out the foam, mix.
We cut the wool to the required length and divide it into separate strands.You can cut 2 different lengths... Those. a piece of wool is one length, the second and third piece is a second length.
We slightly moisten the strand and wrap it tightly on a skewer. We leave to dry. I dry all night.
While the curls are drying, let's do the decor.
For a wreath, cut a circle out of cardboard and wrap it satin ribbon... Do not cut off the remaining tail yet.
We trim the wreath with beads to your taste.
We make a stand. Forgive me professional decoupage masters)))
I cover it with acrylic paint first. When the paint is almost dry, but still sticks a little, put a napkin on top. IMPORTANT: we only need one layer! We level it with our fingers. Cut off the excess napkin. We cover with varnish for decoupage. If there is no special varnish, then so as not to spend money, you can either leave it this way or try to cover it with nail varnish.
When the varnish has dried, drill a hole and insert a stick. We glue the rubber band - we will insert the doll into it.
We sew wings. When turned out, then you can leave them and so, or you can fill them. I leave it like this and sew in a circle with a contrasting thread.
Now let's get to the hairstyle. We remove the curl from the sticks and select the long and short ones. We'll use short ones first.
Now we take a curl, apply it to the head and roll it over. This requires a special needle. There are notches at the tip of such a needle, due to which the wool falls into the head and falls off with the stuffing of the head. When working with the needle, you need to be very careful, because the needle is very long and sharp.
We roll on the first row.
We roll the second and subsequent rows in a checkerboard pattern.
We roll the top of the head in a circle.
We decorate the parting. We put 2 curls in the center, where there should be a future parting and rolled in a straight line. If our rolled curl lies on the left side, then bend it to the right. And also from the opposite side. Here we already lay the curls on the right side (it turns out on top of the rolled ones), roll them end-to-end to the parting and bend them to the left.
So that the curls do not stick out, you can slightly insert the needle into the curl and thus fix it. LiveInternet.ru