Would you like to declare war on winter and, within the framework of the Spring-2018 project, take and make something beautiful, bright, crazy, light, warm? There are still two long weeks before the beginning of the calendar spring, but in fact, apparently, there are still many, many gray, viscous days. It is in your hands to change their color. It is clear that you can hardly decorate the sky and give it a rainbow, but if around you there are many, many bright spots filled with positive, color, warmth, the overall degree of brightness will certainly change upward. The more colors you add to a gray picture, the less space will be left for that same gray.
2. An elegant backpack with a bow

Sometimes a backpack is not a backpack at all. This is a cute and stylish addition to the outfit - blouses with ruffles, flared skirts, knee-highs and sneakers. This is when you want to be a girl-girl, when the world seems like a big chocolate candy, and the people around are all beautiful and adorable, like marshmallows. If you know this mood, follow the link and see how to tie a cute, cute backpack with a bow!
3. Discreet two-tone backpack

Have a real woman- thousands of different moods, and there are millions of shades in it! For each of them, it would not hurt to pick up your handbag, bag, backpack. Well, if not for everyone, then at least for ten or twenty main ones. Look at this backpack - it is austere and informal at the same time, catchy but very discreet. Do you need one?
4. Simple backpack bag

Don't like strict lines? Hate conventions? Prefer simplicity and lack of clear forms? Do you think that a backpack should be roomy and comfortable in the first place, and everything else - deeply secondary? Here's a great boho backpack idea for you that spits convention and accentuates your rebellious spirit.
How to crochet a backpack to make it original? You need to start with the selection of yarn and style. You can crochet not only a children's, but also an adult accessory.
Yarn selection
A backpack is a convenient and practical accessory. It can be made of any material. The backpack has become a fashionable trend, crocheted... How to choose the right yarn for him:
- Acrylic has a wide range of colors and is easy to knit.
- Cotton is ideal for making a summer accessory; it is practical in the heat.
- allows you to create an interesting texture of a backpack, washable.
It is important that the thread is strong enough and not thin. This will keep the accessory in shape.
Simple master class
Crocheting a backpack from knitted yarn can be done quickly enough. First you need to prepare materials:
- yarn;
- suitable hook.
Knitting process:
- We start by creating the bottom. We collect 3 air loops, close in a ring and knit 6 single crochet in a circle. Further, in each row, we distribute 6 increments evenly. We tie the bottom up to 25 cm in diameter.
- We begin to make the sides of the backpack. We knit in a circle without increments with single crochet columns at least 30 cm in height.
- Next, we make holes for the ties: * 5 single crochet, 5 air loops * - repeated until the end of the row.
- The last row is tied with a "crustacean step".
- The tie is a chain of air loops of the required length.

Even a beginner can crochet a knitted backpack. The accessory can be decorated with decorative elements or buttons.
Children's backpack
Bright and beautiful accessory any girl will like it. How to create a crocheted baby backpack?
- To begin with, select yarn of several shades and a hook.
- Then the bottom is knitted with single crochet columns. It can be round or oval.
- The walls of the backpack are made with the chosen pattern at least 25 cm in height.
- The top of the bag is tied with single crochet posts.
- A valve is created in the middle of one side. To do this, attach a thread and knit 20 rows in rotary rows.
- Straps are made separately. To do this, dial 8 single crochet and knit in rotary rows 30 cm long. Sew on to the backpack.

The children's backpack is decorated with flowers. You can also embroider the face of any animal.
Knitted backpack
When choosing yarn for bags, the main thing is that it keeps its shape. How to crochet a backpack?
- The bottom is formed first. To do this, make 2 air loops, in the second knit 6 single crochet columns and close in a circle. Increases are made in each row. The bottom should be at least 20 cm in diameter.
- To go to the sides of the backpack, one row is knitted without increments for the back loops. Then we move up 25 cm.
- Next, you need to tie the valve. To do this, dial 6 single crochet into the ring and tighten. A semicircle is knitted in rotary rows, increments are made in each row. The flap is then sewn onto the backpack. A large button is sewn on, a loop is made.
- The straps are made of the required width and length with single crochet posts.
The backpack, knitted from knitted yarn, holds its shape well, it can be washed even in a washing machine.
Needlewomen in search of new ideas are inspired by the works of other masters. To understand how to crochet a backpack, it is enough to know the basic principles of creating things from yarn.

% of ideas that will help you choose not only the color, but also the appearance of the accessory:
- A backpack in the shape of an animal is perfect for a child. First, the bag itself is knitted, and then a cute face is formed. The most popular are: bunny, teddy bear, kitty and dog.
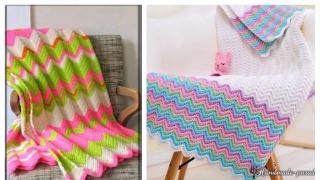
- For the summertime, you can make a rainbow backpack. Having picked up all seven shades, they knit alternately in rows. Decorate with a flower or a beautiful button.
- The ladybug will not only attract attention, but also cheer you up. Such a backpack will appeal not only to children, but also to teenagers.
- An accessory made of floral motifs will become incredibly beautiful and cute. It can be linked in any color scheme. Pink shades are suitable for cute girls, bright colors are suitable for brave and active people.
- Backpack "zebra". Such an accessory will suit any outfit, as it will be knitted from threads of two classic colors - white and black.
A backpack is such a thing that almost every person has. It can become not only a roomy bag, but also a cute accessory that complements the style of clothing.
A backpack is a constant companion of the traveler. It doesn't matter whether it is a hike or a walk around the city. It is a bag for small things and household items, which is collected and tightened at the top. They wear a backpack behind their backs, attaching it to their shoulders with straps. Execute it from different materials, the strength of which depends on the purpose of the product. Consider ideas on how to crochet a backpack. Of course, this option is more suitable for the city than for a hike.
Stylish backpack, crochet
This model of a backpack is made of beige linen thread and trimmed with wooden beads.
Besides the original appearance the product is very convenient with many small pockets.
Thanks to the wide shoulder straps, it is a pleasure to carry the backpack behind your back.
So for work we need:
- 500 g beige linen yarn,
- hook number 2,
- 5 wooden buttons with a diameter of 2 cm,
- 1 wooden button with a diameter of 2.8 cm,
- as well as 4 wooden beads.
Please note that we will knit with a thread folded in half.
We start from the bottom of the bag. We collect a chain of 50 air stitches, after which we knit 25 rows of a pillar. without a crochet. Then, we tie the bottom with 2 rows of pillar. without a crochet, we make a "rulik". To complete it, you need the last row of pillars. bend to the wrong side without crochet, pull the loop on front side and knit with a chain stitch, connecting 2 rows to each other. In this case, it is important that the thread is on the wrong side.
We pass on to the execution of the sides. We will do them in the transverse direction. We collect 60 air loops in a chain, of which we knit 25 r. pillar. without a crochet. This will be the part of the backpack that is attached to the back. Then we make a "rulik" as described above and perform another 25 rubles. for the side of the product. Again we make a "rulik", we knit another 55 rubles. This will be the front of the backpack. We carry out one more "roll", we knit 25 r for the second side. Then again "rulik" and 30 rubles. the second part of the back. At the end of the work, cut the thread.
We collect all the parts into a single product using side seams. In this case, we tie the edge of the lower part to 1 pillar. without a crochet, using a chain stitch, we connect it to the bottom and front side.
We tie the upper edge with two rows of a pillar. without a crochet. Then, we make 1 more row, leave a 25 pillar in the center of the back. without a crochet for an inner pocket. Above these columns, we collect a chain of air loops and perform 1 row, alternating 3 columns. without crochet with 3 air stitches. After that, we make 8 rows in a circle, a pillar. without a crochet, we finish work.
Now let's move on to knitting pockets. We will have four of them - 1 inner, 1 large invoice, and 2 small side ones.
For the inner pocket, we knit a square pillar. without a crochet measuring 10 cm by 10 cm. Then we attach it to the inside of the backpack using a chain stitch.
For a large pocket, cast on 12 stitches and knit 16 rows, as shown in the diagram. We tie it in a circle in two rows of a pillar. without a crochet, we make a "rulik". We tie the edges of the three sides with 4 pillars. without a crochet.
To make a small pocket, we cast on a chain of 19 stitches, and then we carry out 6 rapports according to the scheme. Then we make a "wheel" and strapping like in a big pocket.
Sew the small pockets to the side parts, and the large one to the center of the front.
We pass on to the execution of the valve. We dial 43 air. pet., we knit according to the scheme of 10 rows. Then we make a steering wheel on all sides, and where the valve will connect to the backpack, we tie the pillar in 3 rows. without a crochet.
We sew buttonholes with one thread fold. The loop for a large pocket consists of 3 air. loops, and for a small one - from 1. Along the lower edge of the valve, you should also make a loop. Then we sew on the buttons.
The backpack is almost ready. It remains to tie the straps. For them, we collect 150 air loops and tie a pillar in a circle with 3 rows. without a crochet. Rounding off the corners is done with 1 pillar. without a crochet. The other strap is done in the same way. When knitting is finished, sew the straps to the backpack, and attach 1 bead to their ends.
We fold the thread in 4 additions and knit a cord 1.5 meters long with air loops. Then we thread it through the holes, and attach the beads to the edges.
We knit a backpack from knitted yarn: video master class
Crochet backpack for young women of fashion
Knitted backpack looks stylish and elegant. He is sure to please the modern teenager.
For work you need to prepare:
- 120g black acrylic yarn
- 50g raspberry,
- 40g pink yarn,
- 1 button.
- And also hooks No. 1.5; 4; 6.
We start from the bottom. We will knit it with melange thread. To do this, you need to wind 1 thread of each color into a flagellum. We take hook number 6 and we collect 29 air loops. We knit according to scheme 1.
For the upper part, we collect 90 air. loops of melange thread, crochet No. 6 according to scheme 2. At a height of 25 cm we finish the work.
Let's move on to knitting the valve. We take a black thread in 2 additions with a hook number 4, we collect 25 air. loops.
We knit in a single crochet with a solid canvas, and upon reaching a length of 7 cm, we begin to decrease from 2 sides. In every second row, after 1 edge loop, remove 3 times 1 loop each. We tie the edges with a single crochet.
For a flower we take a raspberry thread with a hook No. 1.5. We knit according to scheme 3.
Black thread in 2 additions with hook # 4 will knit straps. To do this, we collect a chain of 7 air loops and knit 1.5 meters with a half-column.
The final stage is assembly. Sew the upper part and connect it to the bottom with a black thread in 2 additions in this way: 1 row of a single crochet + 1 row of a crustacean step. Then we sew on the valve. With a black thread in 2 additions and crochet number 4 we make a lace. We collect a chain of 100 air. pet., and then we stretch it into the loops of the upper row of the product. Sew on the button and straps. We attach the center of the strap at the top of the backpack, and the edges at the corners of the bottom.
The backpack is ready, all that remains is to moisten, straighten and dry it.
Knitted yarn backpack: video instruction
https://youtu.be/0WFo_GVy6wc
Glamorous backpack for a year old
Little crumbs, having barely learned to walk, are already copying everything that mom does. We propose to knit a small backpack so that the baby at such a young age feels like an adult.
The size of the finished product is 15 cm by 20 cm
For work we need:
- 100g pink yarn,
- the remains of yarn of other colors.
- And also, hook number 3.
We will knit with crochet stitches along the sirloin mesh.
First, we make the back and front wall. We collect 45 loops for each of them and knit to a height of 20 cm.For the side part, we collect 10 air loops, and then we perform 55 r. double crochet.
Sew the front and back parts to the side, tie the top with a single crochet. On the back, from the upper loops, we knit straps of 30 cm each, and then we fasten them from the bottom of the product. For the lace, we collect a chain of 70 air. loops, after which we stretch it into the holes in the upper part of the backpack. We make flowers according to the schemes and decorate the front of the product with them.
This is how you can crochet a fashion accessory for women of any age. Patience and inspiration to you, dear needlewomen!
Children's backpack: video mk for beginners
Selection of schemes

For any girl crochet the backpack will become a favorite item in your everyday wardrobe. A spacious and comfortable bag will be the keeper of textbooks and notebooks, cosmetics, cute feminine things and little secrets.

To knit such a backpack, you will need only 300 g of strong woolen yarn, a hook number 3.5, a lace 75 cm long and a ribbon for decoration.

The work begins by creating an oval bottom. A chain of 26 stitches will be the basis for knitting circular rows with increments in an easy pattern. Only 4 rows are performed, and 72 s / n columns are obtained around the circumference. Next, a row is knitted to go to the walls of the backpack, for this the hook clings to the back wall of each loop of the base and a neat beginning of the main part is obtained.


Simple b / n columns are used to make circular rows to a height of 42 cm. The length of the backpack can be increased for the growth of the future owner by knitting additional circular rows. Next, one row is knitted with small holes through which an elastic tightening cord will be passed.
The lid of the backpack with a nice white finish, straps of the required length and a pendant loop are separately knitted. All the details are sewn to the backpack and the roomy bag for everyday trips is ready.
Crochet backpack from knitted yarn
Crocheted backpacks made of knitted yarn came into use and delighted all fashionistas.


These soft, voluminous threads made it possible to create a wide variety of models that became the real pride of their young owners. Knitting of knitted backpacks began with the choice of a suitable yarn and thick hooks No. 8-10. According to the scheme, the needlewomen knitted an oval or round bottom, and then made a transitional row to the main part of a fashionable backpack. To do this, they hooked onto the back wall of the base loops, and received a neat side separating the bottom from the sides of the backpack.
And how needlewomen knit a beautiful backpack from two-color yarn, she will show a short video lesson with a detailed description of the process and useful tips along the way.
Ribbon Backpack
It's no secret that Spaghetti ribbon yarn is now at the height of fashion, so you should hurry up and knit for yourself or your friends as a gift original backpack from a multi-colored ribbon.

For work, you need 2-3 bobbins of yarn different colors, hook number 8 and rings for which the handles will cling.

Knitting of the model begins with the first loop of the Amigurumi, into which 4 stitches are knitted. Next, circular rows are performed with a change in the color of the thread and additional loops in each next row. For the bottom, you need to knit only 8 rows and in the last one you should get 64 b / n columns.
In the first transitional row on the main part of the backpack, it is important to knit two rings into the canvas, to which the future straps of the handbag will be tied. A needlewoman, according to her taste, can choose a drawing for her fashionable little thing. It is necessary to sketch a colored jacquard on a piece of paper in a box, which is then carefully, counting the loops, transferred to the canvas of a bright backpack.
Note to novice craftswomen! When making a jacquard pattern, non-working threads are not cut, but are pulled at work and hidden inside the b / n columns. The result is a beautiful multi-colored and dense product that will serve its skillful mistress for a long time!


The bag of the backpack is knitted to the required height, and then a cord with tassels is made to tighten the upper edge and two handles that will hold a comfortable bag on the back.


As a result of painstaking work, you will get a magnificent model that will become the real pride of a hardworking and fashionable hostess.
Crochet knitted women's backpack
You should not immediately get rid of the leftover yarn, you can crochet a chic women's backpack from them.


A great idea for novice needlewomen demonstrates how to create a fashionable bright handbag with the help of one motive. The diagram is taken from a popular Japanese magazine and clearly shows the combination of 4 different yarn colors in one detail.


First, a monophonic round bottom is made, to which ready-made motifs are tied in a checkerboard pattern. The bag is pulled together with a knitted cord, and the lid and handles give the fashionable backpack a finished look.
Crochet backpack
For knitting tight men's backpack You will need thick merino yarn, a # 8 hook and a large snap hook for fastening.


First, according to the scheme, a rectangular bottom measuring 8 by 15 cm is knitted.Then the work goes to circular rows and the main bag is performed with embossed s / n columns to a height of 20-25 cm.It is advisable to strengthen the main part with a gasket, and then tie a hinged cover and sew an impressive carbine.
It remains to make two strong handles and a suspension loop. For them, you can use contrasting yarn, tie cords 3-4 cm wide, or sew handles from a piece of unnecessary leather. It is imperative to stretch a lace through the main part so that the bag can be pulled together and give the backpack a nice oval shape.
Children's backpack: universal model for boys and girls
Popular Japanese knitting magazines give craftswomen easy and understandable patterns for beautiful needlework. The next issue of the publication presents to knitters a universal model of a backpack that will suit both boys and girls. A wonderful bag in the shape of a charming Amigurumi bear has three compartments with locks. The head, abdomen and back are spacious pockets where you can put accessories for classes, breakfasts, a telephone and all sorts of important children's little things.

All the details of the teddy bear are performed separately according to the presented schemes and then assembled into a single cute toy. The handles add comfort to the backpack, and the cute details in the form of a bow and buttons will make the teddy bear a real gentleman.


And one more scheme from a Japanese magazine, created especially for little princesses. The figure clearly demonstrates how to knit a round bottom, and then smoothly transition to the openwork bag of the backpack. A cap is made of contrasting threads according to a separate scheme, and white straps for socks are knitted with ordinary s / n columns.


If desired, the needlewoman can knit additional decorations in the form of leaves, flowers and give a new handbag for a child a bright, unique personality.
Crochet school backpack
Needlewomen will be able to independently make a roomy school backpack for children or adolescents. To do this, you need 2 colors of solid yarn and a hook number 3. According to the scheme, you first need to make an oval bottom, and then transfer the work to knitting high vertical sides.


The backpack will look much more impressive if you take a contrasting yarn and knit an original two-tone pattern. The needlewomen can choose from two schemes that will help create an interesting and at first glance complex pattern. In conclusion, it remains to complete the lid of the backpack, which is knitted in a circle, complement the bag with a pull cord and dark straps. It is imperative to add a lining to the inner surface of the backpack, then the thing will be durable and will serve its skillful mistress for a very long time.


Fashionable bag for every day
A stylish bag, as in the photo, will turn out if you knit a bag from simple floral motifs.


For work, you need 2 colors of yarn of the same quality and hook number 3. First, an oval bottom is knitted according to the scheme, and then yellow and purple hexagonal motifs are performed. Color gamut The needlewoman can choose to her taste, for example, contrasting black and white, but the colors shown in the photo are always in trend and are now at the height of fashion.
Ready-made motives according to the assembly scheme are collected into a single canvas. Colored oblique lines are obtained, which give the model a unique style and bright originality.

The backpack is complemented by comfortable shoulder straps and a twisted cord that will tighten the bag and turn the bag into a closed shoulder bag.
And one more original bag model, connected from separate motives. According to schemes A and B, square and triangular fragments are knitted, which are then connected according to the drawing into a single whole. Comfortable long straps hang the backpack behind your back and keep your hands free while traveling.


Backpack "Ball": video tutorial for beginner needlewomen

In a short and interesting video, a master class is presented that will teach craftswomen how to knit a backpack for a boy in the form of a ball. The step-by-step work is accompanied by photographs and detailed explanations of the progress of the work. It remains to stock up on two-color yarn, tools and, together with the needlewoman, create an original and stylish thing for your beloved baby.
Backpack for baby doll
Craftswoman Oksana Lifenko in her author's blog presented a fashionable satchel knitted for a baby doll. The needlewoman writes that she first made the oval bottom with simple single columns, and then tied the main part, straps and the lid with convex columns.


White trim along the contour and small wooden details gave a special charm to the model. Under a stylish handbag, the craftswoman decided to knit a short jacket and put on fashionable jeans on the doll.
Stylish backpack "Cow"
The original knit of the shoulder bag transforms the item into a trendy backpack with spots like a ladybug. Stylish black and white sack will go well with any set of clothes, suitable for wearing both in cold and warm seasons.


The size of the bag is 28 by 31 cm, the yarn consumption is small, only 200 g of white and 150 g of black cotton yarn, the hook will do No. 3.5-4, and for the fastener you will need one large wooden button. Simple pattern shows that the backpack consists of two parts:
- The front part is knitted from rows 1 to 54. A chain of 56 air loops + 1 rise is recruited and straight and reverse rows are performed with a change in the color of the thread. The thread that is not in work passes on the seamy side and hides between the b / n columns.
- The back part starts from the edge of the first part and is knitted according to the pattern from rows 1 to 73. In row 51, loops are skipped on both parts to make holes for a long tie cord.
Both parts are sewn together on the sides with black thread, the lid is also tied with dark yarn and must be supplemented with a buttonhole. In conclusion, straps 70 cm long are sewn to the backpack, which are knitted with ordinary b / n columns. The result will certainly appeal to all needlewomen, the finished handbag looks very impressive due to the fashionable colors in the form of cowhide.
Backpack "Colorful cat"
A soft, bright, cute cat, as in the picture, will be obtained from the remains of yarn of different colors and textures. Traditionally, work begins with knitting an oval bottom. A chain of 20 air loops is typed, and 8 circular rows with increments are knitted, the width of the finished part is only 12 cm.


Next, the work moves on to knitting a colored sack. Simple s / n columns are used to make circular rows with a change of thread to a height of 40-42 cm. In the penultimate row, air loops are knitted through which a long pulling cord will be pulled.


Separately, the muzzle of a cat with white ears is knitted, it will serve as a cover for a backpack and decorate a cheerful children's handbag. The valve is preliminarily made 30 loops wide and 8 rows long, and then a ready-made cat's face is sewn to it.
The last details are knitted shoulder straps with buttons. They are knitted from chains with a length of 100 stitches with a strapping in a circle and sewn to the top of the backpack. The lower ends of the straps are fastened with buttons, which are attached to two additional flaps at the bottom of the backpack.


As a result, you will get a fashionable bright thing that will appeal to both boys and girls, and will definitely decorate stylish image young modern teenager.
Children's backpack "Bear Winnie the Pooh"
An excellent bear backpack will be made from high-quality acrylic yarn, taken in 2 additions. Crochet # 3.5 is used to make a central chain of 20-25 loops and then an oval bottom is made in circular rows with increments.


The second strap is also knitted, and then it is connected to the first into a single canvas, which is sewn to the top of the backpack using a needle and thread.
This is followed by the most important part of the work - knitting a pretty face of Winnie the Pooh. It consists of several parts: a large light circle with ears, a second dark circle under the eyes and a third small circle to which the nose and mouth are sewn. Before sewing to the base, all details are stuffed with a soft filler.


The teddy bear muzzle can also serve as an additional section. To do this, the loops between the ears do not close, and you get a tight pocket for your phone or other important trifles. It is advisable to reinforce the backpack with an inner lining and add one small flap as a fastener to the top of the child's backpack.
Bag-piggy bank "Cockerel"
The idea for creating the Rooster's piggy bank is presented on her author's page by the needlewoman Nadezhda Volkova. Craftswomen can take the idea into service and create their own exclusive toy, slightly altering it for a backpack or a fashionable handbag.
A cute and lightweight crochet backpack for babies. Useful for a walk 🙂
Welcome to my knitting blog! Prepared detailed description knitting baby backpack... Knits pretty quickly, you can please your baby with a convenient accessory
I knitted it a long time ago, two years ago, in August 2015, then showed it in the article "". For anyone interested, see the description, there the bag is also closed with a valve.
But, for the handle on the bag, a beautiful braided "pigtail" was used. I showed how to weave such handles from cords in two parts. You might also want to decorate your backpack with such interesting handles instead of shoulder straps.
So, since then, all "hands did not reach" to collect the description of the backpack together, and put it on the blog. Finally, we managed to finish the work started, please use it!
If somewhere you notice errors, inaccuracies in the description of the backpack, tell me, I will correct everything. Still, a lot of time has passed, I could have made a mistake somewhere, I apologize in advance.
Description of knitting a backpack
Dimensions (edit)
- Backpack: 24 × 24 cm, bottom 17 × 8 cm, valve height 15 cm.
- Straps: length 104 cm each, width 5 cm.
- Bow: 11 × 7cm.
I draw your attention to the fact that the backpack turns out to be so textured, plump for two reasons:
1) thanks to thick threads, which, in addition to everything, are springy by themselves, so to speak, dense, but light. So the choice of yarn matters.
2) due to the fact that rows of single crochets with columns with crochets alternate in the walls of the backpack. It seems like a trifle, but experience shows that such a simple technique allows you to compact the canvas.

What it took for the backpack:
- Yarn: weight, economy class, half-woolen (sold in frames) in three colors - yellow (approx. 150 gr.), Pink (approx. 15-20 gr.), Blue (approx. 25-30 gr.).
I wrote in detail about such yarn. It shows samples of yarn, how it looks in the hanks. And also in the article and in the comments to it, examples of products from it are shown.
My backpack is knitted in one thread. The total consumption of yarn is about 200 grams, that is, the weight of the finished backpack (with a bow and shoulder straps) is 186 grams.
- Hook number 4.5.
- Button - 1 pc.
- Factory marker or regular pin to mark the start of rows.
- Ruler (for measuring the size of straps, threads for fringes).
- Sewing needle (for sewing on buttons and straps).
- Scissors - for cutting off the ends of the threads.
Designations
P - loop.
VP - air loop.
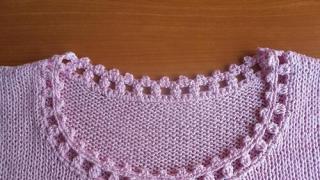
Half loop (also called “wall”): front / back walls of the hinges.
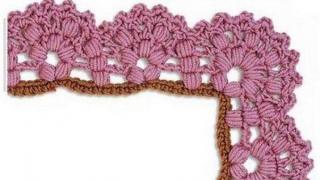
"Shell" - knit * СБН, 3 СНН, СБН * in the “arch” from 2 VP of the previous row.
SS - connecting column.
SBN (SBN) - single crochet.
TSbN - a triple single crochet, i.e. we knit three sbn in one loop.
PSBN - half-column without crochet.
Until K.R. - to the end of the row.
Explanations on knitting a backpack
- The backpack is tied round. The transition in the rows was performed "in a spiral", at the beginning of each row immediately knitting the next column into the 1st loop of the next row - without lifting loops and connecting posts.
- Knitting starts from the bottom, which is knitted according to the pattern (see below). The backpack is knitted quite simply, but it is IMPORTANT to tie the bottom correctly. The size of the backpack and its shape will depend on this. Therefore, it is better not to rush to move on to knitting the walls of the backpack until the bottom of the desired shape is neatly and correctly connected.
- In the diagram for the bottom of the backpack, knitting starts from the middle line, consisting of a "chain" of air loops. This "chain" is tied round with single crochet stitches. At the same time, uniform additions are made from both ends of the "chain" - in order to obtain an oval rounding of the bottom corners.
A row is considered complete when the "chain" is completely tied on both sides (in one direction and the other), i.e. when knitted a full circle, returning to the beginning of the row.

Beginning of work
So let's get started. With yellow yarn, I am typing a "chain" of 15 VPs. This is the central (middle) row of the bottom.

♦ I grab the posts by both half-loops (by both sides of the loops).
♦ I mark the beginning with a pin marker so as not to get confused in the rows.
1 p: 15СБН (one in each loop of the "chain"). Having reached the edge of the "chain", I knit in the 15th loop of TSbN. Moved to the opposite side of the "chain", "mirrored" tied up to c.r. 15СБН (of which the first one will be knitted in the same, 15th p., In which the TSBN was knitted). I finished the row by knitting TSbN in the last p. = 36 p.
So, knitted in the first row: twice * 15СБН + 3-th column * = 36 p.
2 p: 16СБН, in the next, 17th p. Knit TSBN, in the 18th p. - one RLS, in the 19th p. - TSBN. On the opposite side, knit "mirrored": the next 16СБН, in the next p. TSBN, then in the next p. - one RLS, in the last p. TSBN = 44 p.
Knitted in the 2nd row: twice * 16СБН + 3-th column + 1СБН + 3-th column * = 46 p.
3 p: 17СБН, in the next paragraph of the 3rd RLS, then three RLS - one in each RLS, in the next. p. again 3-rd sc. On the opposite side we knit "mirror-like": 17СБН, in the next item TSBN, then three СБН - one in each СБН, in the last item of the 3rd СБН = 50 items.
In the 3rd row: twice * 17СБН + 3-rd column + 3СБН + 3-rd column * = 52 p.
4 p: 1СБН, in the next item TSBN (this will be 18,19,20), then knit five STBN - one in each STBN (21,22,23,24,25), in the next item again TSBN (26 , 27.28). Opposite side: 17СБН (i.e. up to the 45th loop inclusive), in the next, 46th p. Triple СБН (46,47,48), then five СБН - one in each СБН (49,50,51 , 52.53 p), in the last p. TSBN = 56 p.
In the 4th row: twice * 17СБН + 3th column + 5СБН + 3th column * = 56 p.
5 p: 18СБН, in the next p. TSBN (this will be 19.20.21 p), then 7СБН - one in each StBN (22,23,24,25,26,27,28,29,30), in the next item TSBN (31,32,33). We go to the opposite side: 18СБН (that is, up to the 51st loop inclusive), in the next, 52nd st., Knit TSBN (52.53.54), then 9СБН - one in each STBN (55.56, 57.58.59.60.61.62.63 p), in the last p.triple RLS = 64 p.
In the 5th row: twice * 18СБН + 3th column + 9СБН + 3th column * = 64 p.
So, if I was not mistaken anywhere in the calculation, now I have 64 p in the bottom. The bottom size is 17 × 8 cm.

BACKPACK WALLS
I continue to knit the sides of the backpack - round, now without additions. I reset the account (that is, the rows report starts anew). Again I use the marker at the beginning of the first row of the sides of the backpack to mark the beginning of the rows.
Starting from the second row, I knit without lifting loops, i.e. in a spiral.
2 p: STBN to c.r.
♦ Then I knit, alternating two rows of crochets and single crochets. This is necessary to give strength to the sides of the backpack. If you knit only with single crochet, the fabric can "mow". It may also be too dense. And, conversely, if you knit only CCH, the fabric will be softish, loose.
I continue, alternating every two rows of st. with nak. and Art. without nak. So:
in 3-4, 7-8, 11-12, 15-16, 19-2 rows of CCH;
in 5-6, 9-10, 13-14, 17-18, 21 rows of the STBN.

I finished knitting the sides of the backpack, now I will knit a valve - a closure for the backpack. The ranks continue to count.

The valve on the backpack will not be connected in a circular manner, but in return rows with decreases, i.e. at the end of each row I knit the loops together, reducing their number. After that, I turn around - I go in the opposite direction.
22 p: 1 VP, 26СБН.
23 p: 1 VP, 22SBN.
24 p: 2 VP, 22 CCH.
25 p: straight 2 VP, 22 CCH.
26 - 27 rows: VP, 22SBN.
28 p: 2 VP, 20 CCH.
29 p: 2 VP, 20 CCH.
30 p: VP, 18SBN.
31 r: VP, 16SBN.
32 p: 2 VP, 14 CCH.
33 r: VP, 12SBN.
The semi-oval valve is ready, I do not cut the thread. Then you need to tie it with yarn color pink shell pattern. The row count has been reset.

Valve LINING
In order for the first row of pink color not to leave sloppy "marks", I first tied the valve with yellow yarn.
1 p: turned in the opposite direction, walked with a yellow thread along the edge loops of the valve and the RLS backpack. I cut off the yellow thread, fixed the end and hid it. She continued tying the valve with pink thread.
2 p: 46 StBN.
3 p: VP, 1SBN, then: * 2VP, skip 2 loops, STBN * - repeat from * to * three times. Next * 3VP, skip two, StBN *, then ** 2VP, skip 2, StBN **
4 p: VP, in the "arch" of 2 VP of the previous row, knit * STBN, 3SSN, STBN * - From * to * - to c.r.

The cover valve is ready. She cut off the thread, hid the tip in the canvas.

It remains to prepare the straps. With blue yarn, I collect a "chain" of 5 VP, and I knit:
1 p: VP, 5SBN.
2 p: VP, 5SBN.
3 - 77 pp: 2 VP, 5 CCH.
Graduated again from Art. without nak .:
78 - 79 RR: VP, StBN.

I cut the thread, tied the second strap in the same way.
BRUSH-fringe for shoulder straps
She cut off 120 cm threads - 2 pink and 2 blue. I folded it several times with a skeleton 20 cm long. I passed it through the strap one by one, at the same time grabbing the back of the bag. Tied it in a knot, cut off the ends of the brushes.
I sewed the straps on the back of the backpack - next to the flap and at the base of the backpack.

It remains to decorate the backpack with a flower. I scored 10 VP with the same blue yarn, I crochet No. 4.5:
1 p: 2 VP, 10 PSSN behind the back walls of the loops.
2-10 pp: 2 VP, 10 PSSN - behind the front walls of the loops.
You will get a rectangular canvas. Cutting off a small thread, pulled the flower in the center. Attached to the backpack by stretching the ends of the thread on seamy side, there fastening to the knot. She cut off about a meter of pink thread, wound it in a skein, wrapped a flower and tightened it.
Finally, I sewed a button to the backpack at a level that allows the flap to be fastened through the hole in its border.
On this, the backpack for the baby is ready. Hopefully the description was clear. I will be glad to see your incarnations. I wish you all easy knitting!
Best regards, Saule Vagapova
Seal