Pleasant trifles hand-made, most often become the main factors in creating home comfort. Many of them are not difficult to make - enough sleight of hand, a little imagination and creative inspiration.
Interesting things, collected in our photo selection, not only delight the eye, but also make life even more pleasant. Rather, let's get down to a review of fascinating things with our own hands.
Stone rug
Let your interior be one step closer to nature. This cute DIY coarse pebble rug is a vibrant natural decor - a great alternative to the traditional entrance rug.

Gold accent mug
Have you been dreaming of transforming your favorite mug for a long time? Stop postponing your plans for later. Get a special spray with golden paint and start creating soon. There can be many design options - create for health or follow original example on the picture.
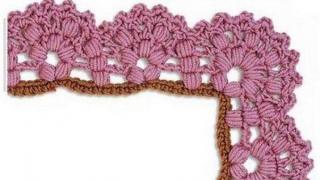
Lace lampshade
You will hardly find the resemblance of this lace lampshade in any store, because such a masterpiece is the result of handicraft and craftsmanship. The essence of the work is shown in the photo.

Paper cut: evening city on the shelf
The real magic in your home is not difficult at all. This spectacular lantern in the shape of a fairytale castle is cut out of paper. Even your child can do this technique.

For crafts, prepare the following materials:
- thick paper;
- scissors, pencil, ruler, eraser, breadboard knife, glue stick;
- Christmas garland (preferably on batteries).
- a shelf for a picture (always with a side that will hold the picture).


We fold the edge of the layout to place it on the shelf. We put a garland on the bottom and light the lights. Fairytale castle backlit ready!

Kitchen organizer
Kitchen gadgets, made with love by you, look much more interesting than store counterparts. With them, the atmosphere around is filled with a special warm atmosphere and coziness. Even such a simple organizer for cutlery, made of tin cans, will give the interior a certain personality and charm.

Mirror frame
Get creative with your dressing table. Instead of a boring classic mirror, you can hang something more original over it, for example, a mirror with an openwork frame made of cardboard. Believe me, such a do-it-yourself masterpiece looks much more sophisticated than a store counterpart.

Urban plot from cable
Add a touch of unpredictability to your own interior. A long black cable, randomly lying around a white wall, can turn into an original minimalist urban plot against its background.

Vintage photo frame
An antique picture frame and simple wooden clothespins are great materials for creating a unique vintage style photo frame with a creative touch.

Charging point in the box
If you are one of those who have accumulated a lot of chargers, we have for you a great solution for an aesthetic and at the same time functional storage box. She not only visually decorates the room and keeps all the devices in order, but also charges them on the spot!

Book with kisses
A creative surprise for a loved one - a mini-book with kisses. Leafing through the pages, there are more and more hearts.

An accessory for toast lovers
Here is such a cute toast you can sew yourself. Nice present for the occasion.

Shoes with cats
Add a little more bright colors into your daily routine. Old ballet flats can be transformed in an original way by embellishing socks with adorable cat faces.

And you will need just a little: plain ballet flats, a brush, black and white paint, a white marker, masking tape. Further, everything is according to the instructions in the photo.


Soulful winter accessory
Homemade decorative skates will once again remind you of the winter fairy tale and relaxation on the ice rink.

If you want to do the same, then prepare large pins, felt, cardboard, woolen thread for laces, hot glue, a marker and a tapestry needle.


A little humor on a rainy day
Comic covers on rubber galoshes will certainly not allow you to be sad in rainy, cloudy weather.

Adorable spiny hedgehog
A sewn hedgehog made of yarn can also have needles, just not their own, but sewing ones.
 Funny abstraction
Feel like an abstract artist by building vibrant emojis from different miniature figurines.

Cute kittens made of cardboard for storing threads

Handmade stamp collection


Children's handbag-bunny
Why buy accessories for a child if you can make them yourself. A bag for a girl with a hare face looks very original.

Ice cream garland
Create a summer mood by tying a garland of this season's most popular delicacy - the ice cream cone.

Homemade leather notebook

Stylish hanger
Loops made of leather ribbons nailed to the wall are an extraordinary minimalist hanger or shelf for books, magazines and other trifles.


Magic vase
A magical atmosphere in the house can be created with the help of simple beautiful things, such as this vase.


Rhinestone bracelet


Decorative letters for the refrigerator or children's board
Learning alphabet letters are a great idea for home decor. You only need a little bit of golden paint.


Convenient headphone clip

Spectacular shimmer
Candles with golden and silver shimmer will add a bit of palatialness to the interior. This beauty can be done at home using old candles and aluminum tape.

Donut bracelet
Young fans of Homer Simpson will love this glorious donut bracelet. Here you only need a bright nail polish and a plastic children's bracelet, then you just have to dream up with glaze.


Not boring clothes
A simple hat will transform your everyday style dramatically. It is enough to sew a few bright flowers along its edge.


Notched T-shirt

Watercolor sweatshirt

Beach pareo dress

Headband

Braided scarf

A simple white T-shirt will be more stylish if you sew a neat pocket with an interesting print to it.

More ideas for DIY crafts are presented in the following selection of photos.


As you can see, in order to please yourself and your loved ones, you do not need to spend a lot of effort and money. Your desire, creativity and inspiration can work wonders. And the result of hand-made work cannot be compared with purchased accessories and other store items.
Do you like to do needlework? Tell us about your favorite creative masterpieces.
An empty wall can be decorated with a beautiful painting made of buttons. For this you will need:
- Solid color fabric to match the wall
- Multi-colored buttons
- 4 bars for making a stretcher
- Stapler with staples
- Oilcloth for work
Stages of work:
We cover the workplace with oilcloth

Step 1. Prepare the stretcher. We determine what size the picture will be. We select the blocks of the same thickness and saw off the corners at 45 degrees, connect the adjacent blocks and fasten them with a stapler.
Step 2. Apply the "Butterfly" pattern to the fabric. If you know how to draw, then it will not be difficult. The butterfly can be placed strictly in the center, or it can be tilted to simulate flight. If you do not have the talent of an artist, you can use a ready-made drawing and transfer it using tracing paper to fabric.
Step 3. Fill in the butterfly with buttons. We select buttons by color and size for "coloring" the picture. To create an interesting pattern, you need to take buttons of various colors, sizes and various materials made of them. Even incompatible colors and materials will look organic in the butterfly pattern. First, lay the buttons on the fabric inside the outline of the design. When all the buttons are in place, we begin to glue them to the fabric. We leave work to dry
Step 4. Pull the fabric over the stretcher. To do this, put a ready-made stretcher on the fabric, bend the fabric and fix it with a stapler from the inside.

The picture is ready! Instead of a butterfly, you can take any other drawing. Use rhinestones or old beads to fill in the design. If desired, arrange the painting in a frame, bought in a store, or made with your own hands.

Millet, horns and picture frame
The frame for the picture can be made from improvised means or you can decorate the existing old, but not interesting frame with your own decor. We decorate the frame with cereals and pasta. For this we need:
- Frame blank.
- Glue "Titan", "Athlete" or "Master"
- Groats, pasta
- Spray paint
- Finishing varnish

Stages of work:
Step 1. Prepare the frame as the stretcher did. If an old frame is used, then we first clean it with sandpaper from the old varnish.
Step 2. For decoration we use rice or pearl barley. We choose pasta of various shapes: spirals, rings, tubes, snails - everything to your taste. Distribute on the frame for preview. If the pattern suits you, we begin to glue the products to the frame. We apply glue to the frame in small portions and immediately attach the decor. We fill the empty, inaccessible places with cereals. We leave the work to dry.
Step 3. Using a spray can, apply the desired color to the frame, painting over all areas. Dry again.
Step 4. So that the frame can be wiped clean wet wipe, it needs to be treated with a finishing varnish. This will add durability and shine to the product.

One more work has been completed. Place a finished painting or photograph of your family in it. You can decorate the frame with buttons, shells and even pine nuts. A handmade painting in the frame of your own decor will look great over the sofa. Or maybe even decorate the sofa with beautiful pillows?

One is a pillow, two is a pillow, or - there are never too many pillows
Even the most boring sofa can be "amused" by throwing many different pillows and pillows on it. Ready for a makeover?

The work will consist of two, or maybe three stages:
Step 1. Making a pillow. For work, we use ready-made pillows or sew them ourselves. Ready-made pillows without covers and decorations can be bought at wholesale stores. You can make pillows yourself from old large ones. For this he sews from old fabric a pillow case of the desired shape, and fill it with fluff or padding polyester from the old one. Sew up the free edge of the pillowcase. Pillows can be of different shapes and sizes: rectangular, square, triangular, large and small.
Step 2 We sew pillow covers. We use new fabric or available, but of good quality. We select the fabric for the covers to match the environment. You can sew plain covers and decorate them with different decorative elements, or you can sew covers of the same tone, but with different patterns.
Step 3. If, nevertheless, plain covers were sewn, then they need to be decorated. We will decorate with bows and bows. The meaning is this: to sew on the covers of different sizes bows made of contrasting fabric, but close in texture to the fabric of the covers. On one pillow - one large bow in the center, on the other - five small multi-colored bows throughout front side covers, on the third - three small ones in one of the corners of the cover, and so on. If the fabric is dense and does not fray, bows with raw edges will look creative.

The pillows are ready, spread them out on the couch and feel how elegant it has become in the room.

You can decorate pillows in different ways: ribbons, ready-made or homemade applique, leather inserts, lace.

And what else can you do with your own hands to decorate the interior? Here are some examples for getting creative with different materials. From jute thread - a lampshade for a table lamp, from tree branches - a vase or flowerpot for a houseplant, from old wine corks - a frame for a mirror or clock, from construction isolon - flowers, from scraps of fabric - a blanket, from twine - a carpet. And many more different amazingly beautiful items.

Each season has its own design
The design of the room can be updated according to the seasons.
Autumn... Bright, in autumn colors, papier-mâché fruits, laid in a beautiful dish on the dining table, will emphasize the autumn mood. On orange cushions with stencils autumn leaves it will be cozy and warm to sit on the sofa. Homemade products in jars can be lovingly decorated with burlap lids and braided jute braids. Bright garlands and pendants made of dried fruits will decorate the windows, and a gray cloudy autumn day will sparkle with colors.

Winter... Since childhood, snowflakes are glued to the windows, letting the fairy tale into the house. Snowflakes can be not only flat, but also voluminous. On the window, you can depict the whole picture with the help of stencils. On the eve of New Year's fairy tale not only windows are transformed. We paint the prepared bottle of champagne with the help of spot painting on glass with snow patterns. We will make original clothes for bottles from old knitwear, and now Santa Claus and Snegurochka are on the table. Sew napkins for cutlery from the remnants of bright fabric. Dry tree branches are useful for making a candlestick or vase. Decorate the front door with a New Year's wreath

Spring... In the spring they celebrate beautiful holidays- March 8, Easter, May 1. In the design of the room, you can support the idea of \ u200b \ u200bthe holidays. Flowers made using the quilling technique, pillows decorated with flowers using the kanzashi technique, a flower chandelier, a spring wreath above the door, stands for easter eggs from yogurt bottles, bunny pillows, fun flower napkins on the table

Summer... The colors of summer, the scent of the sea, travel impressions will be reflected in the summer design. We will decorate the photo frame with shells, replace the dark blanket on the armchair with a bright patchwork bedspread, multi-colored butterflies will sit on the pillows, weave the floor vase from newspaper tubes... The main thing is more greenery, freshness and imagination.

DIY crafts solve not only a specific problem - a design change. When doing needlework, you are distracted from everyday worries, the mood is uplifted from the anticipation of creating a beautiful object. A little experience and a craft can please not only the author, but become an excellent gift for a friend. If you achieve excellence in one or another type of needlework and create quality work, you can also make money on it.

The work of authorship carries positive energy, it is unique - there will definitely be someone who wants to buy it and decorate your home. Another reason to do needlework is to save money. You don't run to the store for a new purchase, but you create it yourself.
Hand-made products can be of different levels of complexity. Most crafts can be done even by novice craftswomen, since they do not require skills and special tools. However, only experienced needlewomen can handle the manufacture of individual copies.
Old, unnecessary things and various objects at hand can serve as a material for creativity. In addition, you can go to the forest or park and prepare the most different types natural material- branches, moss, dried flowers, dry herbs, stones. This kind of raw material is quite popular today to use in needlework.

Craft ideas
There are a lot of ideas for DIY interior decorations. Every year, designers offer us more and more new decor options. Consider the simplest craft solutions that can be done to decorate the interior.

Hot stand
Have a lot of beer can caps accumulated? Use them to create original hot coasters. This is a necessary thing in the household, since it allows you to protect the surface of the table from the effects of high temperatures.

If you don't have beer caps, use regular river or sea pebbles. This is even better as there is no risk of scratching.

Fancy flower pots
Take your time to get rid of old books. They can be used to make beautiful pots for indoor plants. To do this, you need to open the book and cut a hole in the middle of the required shape. To protect it from moisture, you need to take care of gluing it with cellophane. It remains to cover the ground and plant a flower.

Small vases-magnets will also look spectacular. It is quite possible to decorate the refrigerator with them. The base will be wine bottle corks. They need to gouge a hole for filling the soil and attach a magnet on one side.

Original shelves
Old books will also be useful for creating such original shelves. You only need to purchase corners and screws. As a result - beautiful and stylish decoration walls.

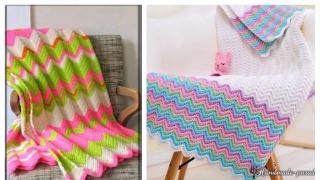
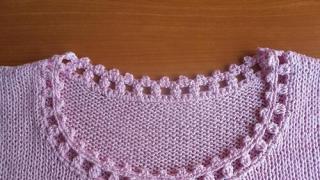
"Warm" crafts
The so-called "warm" crafts add the most coziness and comfort to any environment. It can be crochet or knitting pillows, bedspreads, tablecloths, throws, covers and more. So, one of the most creative ideas is a woolen yarn cover for a DIY mug. In addition to it, you can knit a square napkin, which will act as a hot stand. The color of the thread can be any. But it is better that it be in harmony with color palette kitchen interior.

Homemade souvenirs
Souvenir products have always been expensive. Therefore, it makes sense to figure out how to make a souvenir yourself. Especially products self made always more attractive in appearance. Also, they will not affect the family budget, since improvised means are suitable for their creation. Plush and plastic toys, artificial flowers, herbariums - all this can be used.

Here's a quick master class. Prepare:
- a liter jar with a lid;
- decorative elements;
- multi-colored glitter;
- glue;
- glycerol.

Sequencing:
- Pour 2 tsp into a glass container. shine.
- Fill the jar with water.
- Add glycerin (a few drops).
- Make a composition from decorative elements and attach to the lid with glue.
- Screw the lid on the jar securely, lubricating the threads with glue.

Handmade items from unusual materials
Crafts today can be made from anything. For example, from geographic maps. Such products will appeal to all travel lovers. A globe lamp, a picture map, as well as candles, ceiling lamps, buckets, etc. items depicting continents and oceans - all these things will organically fit into most modern interior styles.

Stones of different textures and sizes are another unique material for crafts. So, silicon stones with holes made by nature itself can be adapted as candlesticks. Such homemade accessories will be appropriate if you have chosen a rustic design for decorating the room. Are you looking for a classic style luminaire? Pour small stones into a glass beaker and place a scented candle inside.

Stones are appropriate for marking indoor plants. It is very convenient and simple. You just need to sign the names of the green "friends" on them.

Another use is playing tic-tac-toe. You can go further and make backgammon, chess, checkers.

Drawing letters on the stones will help your little one learn the alphabet.

Advantages of home crafts
Crafts have the following advantages:
- uniqueness;
- originality;
- special energy;
- low cost.

This article lists just a few DIY options for your home. Engaging in such creativity, it is important to strive not just to copy someone's idea, but to come up with something of your own. This is the only way to get an exclusive decor.
All people want to express themselves, to create something beautiful. We all did crafts for school, kindergarten, or just for ourselves. With your own hands, you can decorate a room, make a unique and interesting gift... Crafts are a great way to spend time together.
What can you create yourself?
In addition, if your crafts are creative and unique, they can become additional income. For some crafts, you need to buy some materials, but for huge amount you only need improvised means, the main thing is the idea!

At home, you can make thousands of crafts, for which you only need imagination and materials at hand. From ordinary and seemingly unnecessary things, you can make works of art that will impress your friends and acquaintances.

Photo interesting crafts probably more than once amazed you with their originality. They can be really useful in the household, or just be a cute trinket in your interior.

New homemade crafts are very popular with creative people of all ages. They help relieve stress and fatigue, creating crafts, you develop perseverance, ingenuity and, of course, your creativity.


On our website you can find a lot of ideas for beautiful crafts that you can do with your own hands, with photos and step by step instructions, they are not difficult to bring to life, you just have to want!

DIY crafts, which we will consider, of varying complexity:
- the first level of difficulty - the craft is simple, perfect for beginners, does not require a lot of time, you can do it with children.
- the second level of difficulty - for this craft you will need more perseverance, attentiveness and accuracy.
- the third level of complexity - you need to spend quite a lot of time on this product, this is painstaking work.

Crafts from bottles
I think every house has an unnecessary bottle. Crafts can be made from glass and plastic bottles.

Butterflies
You will need:
- Plastic bottle
- Scissors
- Marker
- Sequins, beads, rhinestones
- Butterfly patterns

Cut out the middle of the bottle and transfer the butterfly to it. Carefully cut out the butterfly, don't forget about the legs and antennae.

Decorate the butterflies to your liking using nail polishes. After the front is dry, turn the piece over and repeat your pattern on the other side. Glue on rhinestones, sequins and beads.


You're done! Now you can attach the butterfly to curtains or walls, present it to someone.

Vase
To do this, you will need:
- Plastic bottle
- Scissors or utility knife


Mark and cut off the top of the bottle. You should have a tall glass. Cut the top of the cup into strips approximately 5 mm long. It will be more convenient if you make large strips first.

Fold each strip outward, then press firmly against the table. Bend one strip over the next one and pass it under the next two. On the contrary, we fold the second one over two strips and pass it under the third.

Continue doing this, folding the odd strips like the first, and the even ones like the second, until you get to the last three. We fold the remaining strips under each other. You should get a nice pattern.


That's it, you've made a great flower vase!

Decoupage
You can make yourself from a regular waste glass bottle original gift for friends.

You will need:
- Glass bottle without irregularities and labels
- Napkins with the pattern of your choice, three-layer napkins are best
- Acrylic lighter than the selected pattern
- Any product that can be used to degrease the surface (such as alcohol)
- Synthetic brush
- PVA glue
- Scissors
- Acrylic lacquer
- Upper part of the dishwashing sponge

Clean the surface from the label. To do this, pour into a bottle hot water or use a hair dryer, no traces of glue will remain. Rinse the bottle well and degrease it with alcohol, acetone or nail polish remover.

Prime the surface. You don't need to do this, but a plain background will give the product a neat look and make the elements clearer. In order to do this, paint over either the whole bottle or those parts on which there will be a motive.


The paint should be the consistency of liquid sour cream. If the paint is too thick, thin it with a little water. Apply gently to the surface with the top of the sponge. To make the color more saturated, you can cover the product with two or three layers of paint (only after the first layer has dried).

Take three-layer napkins, cut out (the picture will have sharp borders) or carefully tear out (the picture will have fuzzy borders, smoothly blending into the background) the place with the pattern you like. Select the top layer with the pattern, we only need it.

Attach a napkin to the bottle and carefully coat it with PVA glue from the middle to the edge. There should be no wrinkles or air bubbles. It's better to try on an unnecessary bottle first. So glue the entire bottle or places you choose to decorate.


Cover the dried product completely in several layers. acrylic varnish... Your gift is ready!

Crafts from disks
Fishes
You will need:
- Two CDs
- Colored paper
- Scissors
- Glue moment or glue gun

Cut out the tail and mouth fins. Glue the fins to one of the discs along the edges, and glue the other on top. You should end up with something like a sandwich.

Take a colored sheet of A5, collect them with an accordion and insert them into a disc. Glue the eyes to the fish. Ready! You can attach the fish to the wall or attach a string to them and hang them somewhere.

Mosaic "Sea"
You will need:
- Plywood (can be replaced with three-layer cardboard)
- CD and DVD discs
- Slim from disks
- Stationery knife
- Scissors
- Ruler
- Pasaties (or pliers)
- Adhesive (universal polymer works well)
- Paints (gouache or watercolor)
- Stained glass paints
- Orca pattern (can be printed or drawn)

Think about the size of your painting. We are considering an option in which the diameter of the outer circle is 25 cm, and the inner one is 21.5 cm. We draw two circles with the diameter of your choice on cardboard or plywood. The distance between the inner and outer circles will frame your painting.

We draw a killer whale or print it from the Internet. Make sure the template fits the size of your painting. If you printed a template, circle it in the middle and paint over the corresponding places with the desired colors.

We paint over the background with blue paint, the frame can be painted over with black, or you can leave it as it is.

Take a black slim from discs, use a utility knife and a ruler to trace it into pieces. Break them off with pasatizh and glue them on the back of the future killer whale. We do the same with the white disc boxes and glue the belly with them.

Now you can proceed to the "sea". To make the craft neat, we get rid of scratches on the disk. To do this, using a ruler and a clerical knife, draw the disc into two equal parts and break it with a pasatizh.

The disc consists of several layers. We separate one of the transparent layers, cut the remaining layer of plastic with foil like boxes and stick it on the place that we have defined for the sea.

Fill the space between the mosaic fragments with stained glass paints in the colors corresponding to the background. Remember, paints change color slightly after drying.

After the paints have dried, you can proceed to the frame. We glue the edges of the cardboard with napkins.

We cut boxes from discs with films (they are thinner, easily cut with scissors) and glue them in place of the frame. Fill the gaps with stained glass paints.

In order for the picture to be hung, attach it to seamy side fishing line. Your mosaic is ready! It will be a great decoration for the room.

Disco ball
You will need:
- Balloon
- Newspaper
- Paste
- Super glue
- DVDs and CDs
- Fishing line
- Stationery knife
- Pliers
- Ruler

Make a base. To do this, we will use the papier-mâché technique. Put on a balloon inflated to the desired size in about  Din layer pieces of newspaper moistened with water, they should not be too large, otherwise the ball will turn out to be uneven.

On top we apply 6 layers of the same pieces soaked in paste. After that, let the ball dry and pop the ball. With the help of a fishing line, we make a loop, in order to then hang the ball.

We draw the disks with a clerical knife and a ruler into squares and break them with pliers. Super glue the squares to the base.

All is ready! This balloon will be the perfect decoration for any party and will be a great decoration for get-togethers.

Photo of DIY crafts


The idea of making a bouquet of flowers out of paper is very good. For paper crafts, we need to purchase colored paper, cardboard, felt-tip pens, a stationery knife, tape, scissors and PVA glue.
Bouquet of paper
First, you need to make three blanks for each flower, two of which should be the same color, they should have six petals.

Place one blank in front of you, on top of which you glue a circle.

On the mug, first make holes for the eyes and mouth in the form of a smiley.

After gluing the mug with a flower, you need to paint your eyes with a black felt-tip pen, and then bend the petals inward.

The next step is to cut out the stem, which we further attach to the flower, and on the other side of the flower, attach the same blank.
You can also make leaves for a bouquet, which can be made from green paper.

First you need to draw an oval and cut it out, and then use scissors to make notches.

In order for the individual pieces of paper craft to become a single whole, tie the flowers with a ribbon or some other fabric for decorating the bouquet.

Such a bouquet will never fade and will be a great decoration for your home.

Simple crafts from plastic bottles
The simplest crafts for children include crafts from bottles.

For example, you can make a piggy bank from a bottle, for which you only need a marker, a stationery knife, dice (4 pieces), a small bottle, glue and colored paper.

The first step is to cut a straight line, the width of which can be 5 centimeters, and the length of this line should be enough to grip the bottle.


Draw eyes with a marker, and draw nostrils on the bottle cap. Using a clerical knife, cut a hole for coins.

As legs for the pig, you need to attach the dice with glue.
Note!


This craft develops the child's imagination, and is also useful in everyday life.
Ball of threads
The craft can be used as a lampshade for a lamp or simply hung as a decoration.

A ball of threads is made very simply, you will need colored threads, a ball, transparent glue to make it.

First, we need to inflate the balloon and tie its tip so that the air does not come out.

Then inflated balloon it is necessary to wrap with threads, then apply glue to the surface of the ball and wait until it dries.

Note!

Now you need to separate the ball from the threads, to do this, just pierce it with a needle and everything is ready for the craft.

Plasticine gnome and cones
As a simple DIY craft, you can make a gnome. For crafts, you will directly need a pine cone, light-colored plasticine, pieces of fabric, glue and a brush.
First of all, the child should roll a ball out of a piece of plasticine, after which it is necessary to make indentations on the ball using a brush for the nose, eyes and mouth.


At the next stage of our craft, you need to attach the resulting head to the top of the cone.

Then the child should cut a triangle out of the fabric and glue it on the sides, as a result, a cone should be obtained. The cone will play the role of a cap for our character.
Note!


At the end, it is necessary to make mittens from fabric, and then attach them to the cone using plasticine and our gnome from the cone is ready.
Paper bookmark
As a simple craft for kindergarten a paper bookmark is perfect. So that children can make one simple craft they will need a pencil, ruler, colored paper, scissors and glue.

To begin with, children should draw a square measuring 20 by 20 centimeters.

Then divide the resulting square into 4 identical parts using a pencil and a ruler, as a result there will be 4 squares measuring 5 by 5 centimeters.

The second step is to divide the upper right and lower left squares in such a way as to get triangles, that is, you need to draw a line diagonally from the upper corner to the lower corner.

We do not need triangles with the outer side and can be crossed out.

Then it is necessary to cut out a figure from paper without taking into account the crossed out triangles.

The upper triangle needs to be trimmed. If everything is done correctly, then the paper will be in the shape of a diamond, to which two triangles are glued.

The next step is to fold all the triangles in half, and then alternately put them on the tip of the rhombus. You should get a pocket that will fit over the end of the page of the book.

To make the bookmark original, children can be advised to cut some kind of applique from colored paper.

Photo of simple crafts