Friends and readers, greetings. I continue my lessons for beginners. Today we will consider weaving, which also belongs to the main types. For some, the spiral will turn out to be an easy weaving, and for some not very much, questions will arise along the way. The way it was with me, for example. My first work in this technique, as I remember, turned out to be clumsy, because I did not observe the ratio of the angles and the same distance between the tubes.
Spiral weaving is interesting. If you understand the principle, then weaving very quickly turns out. It looks impressive.
Examples:
Spiral weaving
... It is usually used for weaving vases, jugs, floor vases, Christmas wreaths, Christmas trees, and individual parts of crafts.
Weaving principle... All stand-up bases are used as workers, weaving directly by them. One lower tube bends around the upper one and is transferred to the adjacent one, pressed. Accordingly, from the formed pair, the lower one bends around the upper one and goes to the neighboring one above, and so on.
How to start weaving? You can connect the ends of the tubes, then, by bending each of them onto the next adjacent tube, weave in a circle. It turns out a spiral. For example, here's how a Christmas tree is made.
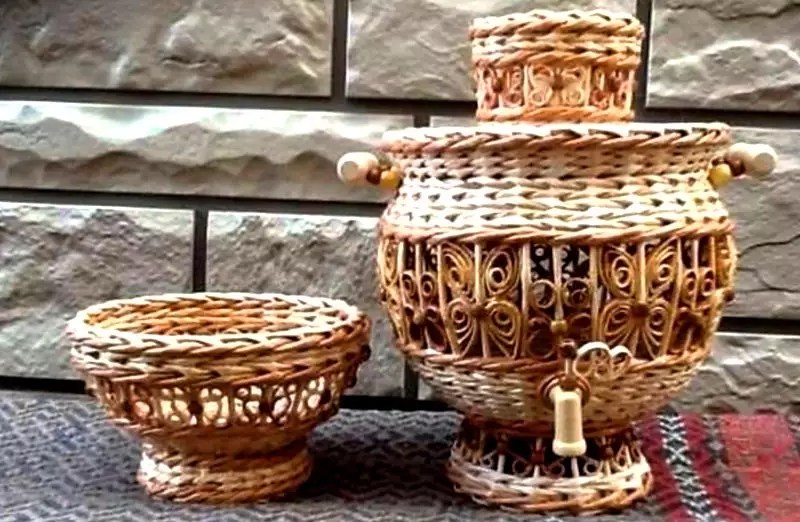
But my blank vase, I still can't decide on the decor, it looks good in this form too. The bottom is made of cardboard. You need to glue the tubes to the cardboard in advance. Better to make a heavy bottom so that the vase does not fall. For example, from plaster.
And we will learn from a specific example - weaving in a spiral jug with handle
... Such a thing will always come in handy on the farm. I use it for watering flowers, it is very convenient and practical.
Let's start? Go! Prepare necessary materials... I used plastic bottle from under the milk. You can use any container, a glass container will work too. It is better to use unpainted tubes for training. Both short and long tubes will be needed. The form is required. The clarity of the silhouette and the accuracy of the product will depend on this in b O to a greater extent. I showed you how to twist the pipes.

Do not take a lot of straws, 3x + an additional fourth will be enough.


A vertical tube is used to create a knot. One end of the tube remains unused for now.

You can fill the jug with water to make the shape heavier.

We hold the shape with our left hand, press it, observe the weaving angle.

Here the tube is set correctly, closer to the shape.


A pattern begins to form. The tightness and flexibility of the tubules is important.

We continue:

We go around the neck shape:


Almost finished:

Some more):

Just a little:

The finish:


Hooray!!! We did it)))

You can cut off all the tubes and make the wicker cover of the jug removable.

I left it like this:

In my opinion, without jambs ... And you, exactly did it?

Now you need a pen! Very durable and reliable.

It is better to use short straws made of office paper.

There are three tubes at the top and bottom of the beginning of the handle. We bend it in half, the length is sufficient. Another extra long one needs to be inserted to form a pattern on the handle. You can do without it. Then we just wind a soft tube around the handle.

Scotch tape is a handy thing and I use it often. I like the paper one.

We reel. The chubby middle is just right for us, the handle will turn out to be curly.

We start winding. The pre-working tube can be extended immediately.

We leave the strip for beauty.

We shape, make the handle tight.
For most women, home is a family nest. And each strives to fill the house with warmth, comfort and beauty. Since ancient times, wickerwork made from tree vines has adorned the homes of our ancestors. But the vine is not suitable for all trees for such purposes.
Currently, for weaving baskets, vases and other crafts, you can use materials at hand - newspapers and magazines. Availability of free time and the necessary raw materials will help you to spend your time interesting and usefully.
Preparation for weaving from newspaper tubes

For weaving from tubes you need:
- newspapers;
- glue;
- knitting needle;
- scissors;
- paints;
- paper clips.
For beginners, weaving is better to watch the process of creating crafts on video. Video tutorials will help you visualize the necessary weaving rules.
The first thing to do is to prepare the right raw materials. The material in our case is newspapers and paper. We cut them into long strips with a width of 5-10 cm, depending on the desired density of the product. You can cut the paper with scissors or use a utility knife.

Note! To determine the direction of the grain of the paper, simply run a few nails along the edge of the sheet. The longitudinal direction does not form irregularities, and with the transverse direction, the cut line will immediately become wavy. When harvesting tubes from newspapers, it is better to use the longitudinal direction.
Then we proceed directly to creating newspaper tubes... Take the cut out strip and put a knitting needle on it. Twist the edge of the strip onto the knitting needle. Grease the edge of the resulting tube with glue and let it dry.

In the same way, it is worth making at least 50 blanks. Their number depends on the complexity and size of the product.

At the preparation stage, it is also worth deciding whether you will paint the tubes before the weaving process or give the necessary color to an already finished craft. For painting, it is better to use acrylic paints or varnishes. After drying, they do not make the surface hard, which is extremely important when weaving. The tubing should be flexible for easy handling and easily conform to the desired shape.
Weaving the bottom from newspaper tubes for beginners
Now you can start the very process of weaving a basket or vase with newspaper tubes. And our MK will help with this! A basket is a unique item that can be used as a storage place pleasant little things and can also become an original gift, made by hand.
Different types of products require different shapes, and, accordingly, different bases.
A square bottom can fit a small basket or wicker box. A wicker box (or a small chest) looks simply amazing in the interior!
We take a strip of cardboard and fold it in half. With the help of a clerical hole punch, it is necessary to make holes for the tubes at a distance of 1-2 cm.
We put pre-prepared newspaper tubes into these holes. Now we take a paper vine and weave it next to the cardboard. Above the first tube, below the second, above the third - this alternation is constantly repeated.

When we come to the extreme newspaper tube, we make a turn around it and continue weaving, but already in reverse side... If the tube is over, then glue the next one to it.

We continue weaving the square bottom to the desired size.
For weaving a round bottom of a basket, a beginner for the first time is better off reading detailed description or study the diagrams.
A round cardboard is needed for the base. Take eight tubes and place them as shown in the image. For convenience, you can fix all this with clothespins.

We take one tube and grasp the four fixed ones.

We fix the tube and again grasp the next four, as shown in the image.


After the first circle is over, we will continue weaving in the same way, only now we grab not four, but two tubes.

We also continue to weave the round bottom of the vase or basket to the desired volume.


We weave step by step from newspaper tubes
After the bottom of your craft is ready, you can safely start weaving the side part. So, let's do it step by step!
Step number 1. The tubes, around which weaving was made, need to be bent to the middle.

For convenience, you can put an item for braiding on the bottom of the basket. The most common glass or cube can serve as such an object.

Step # 2. Weaving the side of the craft continues in the same way as the base. The newspaper tube passes first over one stick, under the second, over the third, etc. If the tube is over, take the next one and continue until the craft reaches the desired height.

Remember! All rows of your weaving must fit snugly together, otherwise your work will be in vain and the craft may fall apart.
Step number 3. When the basket has reached the desired height, use a fold for the edges of the tubes and secure with paper clips.
If you wish, you can insert ribbons or beads between the rows of weaving of your craft to implement your idea. This will add uniqueness and originality to your basket.

Step number 4. If you decide to give a certain color to the basket, but the previously twisted newspaper tubes were not painted, then now is the time to think about it.
For painting, it is better to use acrylic paints and varnishes, as well as an alcohol-based stain. It is better not to use water stain, because the product may lose its shape.

At this stage, you can decorate your product with a wide variety of decor.
Step number 5. Giving rigidity. The most in a simple way PVA glue is used to fix the shape of your craft. They need to completely saturate the basket and let it dry thoroughly.
At your discretion, you can add a handle to the craft or similarly weave a lid and use it as a box or chest.


Video of the weaving process from newspaper tubes
In order to better understand all the intricacies of weaving handicrafts from tubes, you can watch the master class on the video.
Photo of products woven from tubes
DIY crafts have a special charm. They are diverse, as you can see in the photo, they are unique and reflect the inner thinking of their craftswoman. A craft made from newspaper tubes can be a wonderful decoration for your home interior or an original gift. Various decorations and patterns give the fakes an author's chic.


Some experts condescendingly declare that handicraft is something bordering on art. Looking at the masterpieces of our craftswomen, we can say with confidence that such things are the very place in an art gallery, and that this is real creativity. Here is a flight of imagination, exquisite taste and sophisticated technique of performance. Today we will look at weaving from newspaper tubes step by step. New ideas for novice needlewomen, the basics of technology and useful tips- in this material.

In the finished work, it will be difficult to paint over all the weaves with high quality.
Do not use watercolor for painting. It gives a dull color. Gouache or acrylic paint is more suitable. It is worth considering that acrylic cracks after drying, so if you decide to paint with acrylic, treat the finished product. To add color to the work, some craftsmen use spray paint, water-based composition and food colors.
For shine finished work cover with several layers of varnish. In addition to the decorative task, varnish also performs the task of a hardener.

Weaving methods
It is enough for a novice master to master several basic weaving methods. All other options are based on them and will be easy to deal with.
- Spiral weaving. A simple option that even a child can master. The tubes are successively built up and passed through the base in a continuous manner.
- Layered weaving. Two tubes successively bend around the posts so that one passes in front of it, and the other - behind it. This principle is used on cotton fabrics.
- Rope technique. The stripes are intertwined with the racks on the product and with each other.
Mastering these basic techniques will lay the foundation for further experimentation.
For more information on weaving techniques from newspaper tubes, see the video at the end of the article.
Related article:
In the article, we will consider in detail the technology of making flowers from paper with a photograph of each step, as well as others. original crafts that even a beginner can do.
Weaving from newspaper tubes for beginners step by step: different products
After mastering the basic techniques, you can start your first job. Better if it is a basket. This simple option will help you master the technology, and the finished product will certainly come in handy in the household.
How to make a basket of newspaper tubes step by step
To make a basket you will need:
- newspaper tubes;
- base - a pot or jar;
- for the bottom;
- acrylic paint;
The sequence of weaving a basket of newspaper tubes photo:


- Two circles are cut out of cardboard. Newspaper tubes for racks are glued to one of them at an equal distance. From above, the structure is closed with a second circle. Tubes - the racks are bent upwards. A form is inserted inside the frame. The top of the uprights can be secured with a wide elastic band. The frame is ready.
- Weave the walls. To do this, take a tube, fix its edge at the base of one of the racks and begin to weave its circle of racks. When the length of the tube does not allow you to continue weaving, you need to grow the newspaper vine. To do this, the tips must be inserted into each other, after dropping glue onto the junction.
Important! When you twist the tubes, one end is narrower than the other. Accordingly, when connected, the narrow tip is inserted into the wide opening.
- To decorate the edges of the basket, the racks are successively intertwined with the main vine and fixed from the inside with glue.
- The last stage of work is decorating the product. To do this, the basket is completely covered with acrylic paint and two layers acrylic varnish... Then you can decorate the basket with ribbons, beads, braid and other accessories.
Advice! The base of the basket can be made not from cardboard, but from tubes. For this, a flat base is woven, the axes of which become uprights.
In the same sequence, you can make a vase from newspaper tubes:
Secrets of weaving a rooster from newspaper tubes
The rooster is not only a symbol of the year, but also a talisman for the home. In Russian culture, the rooster symbol denotes wealth and well-being in the family.
To weave a talisman, you only need newspaper tubes painted in bright colors.
- It is necessary to create a framework. For strength, you can thread a wire inside the newspaper tube.
- The body of the cock, head, beak and beard are successively braided with colored tubes.
- The tail and legs are performed last. If the braiding is tight enough, the cock can be put on his feet. For additional strength, it is better to varnish the product.
Photo of a cockerel step by step (crafts from newspaper tubes for beginners).
I will introduce you to the method of weaving from newspaper tubes in a circle. I note right away that there are several ways of such weaving.
First, you need to decide on the choice of a product. Second, find a suitable shape. A deep plate, salad bowl can serve as a form. I propose to consider the option of weaving a simple plate, let's call it a biscuit.
So, what we need to prepare for weaving:
- Tubules,
- scissors,
- PVA glue,
- salad bowl
- a three-liter can for a stand and a load.
You can weave from any number of tubes. The more tubes, the stronger the product. I will tell you how to weave from 8 newspaper tubes in a circle.
Dividing the tubes into 2 pieces, lay them out with a lattice, intertwining, as in a canvas. Each side of the square alternates: 2 on the top, 2 on the bottom. Look at the photo.

We take a tube, fold it in half and put it on any pair of tubes.
We carefully look at the order of weaving: we twist with a string around each pair of tubes.

We repeat: we lower the upper tube down, raise the lower one up. So we go through 3 rows.

The main thing is not to get confused in the sequence of movements. As soon as you master this movement, weaving with a string, then everything else will be obtained automatically.


So, after 3 rows, we separate pairs of tubes, and we are already braiding each tube in the same way.
We go through as many rows as necessary for the size of the bottom.
The next step: take the salad bowl, turn it upside down and place the wicker bottom on top. For the convenience of work, you can put a salad bowl on a jar, so the product will be located higher and more convenient to weave.

It is necessary to put a good weight on the wicker bottom so that the product stays on the salad bowl.

Now we braid the walls of the plate - crackers. When working, we try to adhere to the shape of the salad bowl and weave the rows more tightly, so there will be fewer holes!
When we get to the edge of the salad bowl, it is necessary to correctly finish the edge of the product.
We cut the tubes at a distance of at least 3 cm and tuck the ends inward between the tubes of the product. Here, auxiliary tools will come in handy: a screwdriver or a knitting needle, they will help push the ends of the tubes into the rows.

After manufacturing, the rusks should be coated with a dye - water stain with PVA glue. Then, when dry, wood varnish. I usually use a waterborne wood varnish. I cover it twice, with each layer dry. It does not dry out for long. This will give the product strength.

So our braid is ready! I wish you success! For you, below is a video about weaving a round bottom.
In her home, every woman equips her home as comfortably as possible. Today in stores you can buy any items for interior decoration.
At the same time, modern needlewomen have gotten used to using the advice of great-grandmothers, making various masterpieces for interior decoration.

For example, today, products made from wooden vines are very popular, which must be prepared in advance. The vine must also be properly prepared. It is soaked, dried.

But, another method of weaving has also been invented, from newspaper tubes. This is a great option for those who are just getting started with mastery lessons.

It is enough just to make a few attempts, after which it will be difficult to distinguish the work of even a beginner in this business from the work of an experienced craftswoman.

How is the paper vine prepared?
First you need to prepare the necessary material. Plain plain paper will work as well. But, it is quite dense, so it will be difficult to work with it. Ideal is paper used in typography.

As long as there is nothing on it, it will be easy to work, especially when it comes to coloring your fakes. Well, if this is not possible, then stock up on a large number of ordinary newspapers.

With a clerical knife, they are cut into wide strips (about ten centimeters each). It will be very convenient if you cut the newspapers into the longest ribbons.

One strip should be placed near you. Place a thin, long metal object on a sharp corner. For example, a bicycle / knitting needle, on which the fabric should be tightly tied.

Do not be alarmed if one end turns out to be thicker, this happens with some. Nevertheless, the thickness must still be monitored so that the difference is minimal.

You can wet and secure the edge of the strip so that the tube takes shape and cannot unwind. In the same way, it should be wound within fifty tubes. And the exact required amount will be known only from how complex the product you decided to make.

Before proceeding, decide on a paint job. This can be done at a stage while each tube is separate, or a finished product.

It is important to choose the right varnish. If you do not do this, the sticks will be hard and brittle. As a result, the whole appearance... So the best option- acrylic-based varnish used for artistic purposes.

Weave the bottom of the product
Its shape is varied: round, square, rectangular. Start experimenting with a solid-bottomed vase. You will need paper that is quite thick, for example, cardboard, from which you need to cut two circles. It is important that there are exactly two of them.

The thing is that between them it will be necessary to hide the ends of the tubes from your future racks. On the first circles it is necessary to mark with a pencil the marks for fixing the racks.

If you are weaving a vase, there should be a wide distance between the posts. If you choose an oblique type of weaving, you can use a little stack there.

Then the tips should be attached to the marks, and closed in a circle. Also make a bottom-square.

The braided bottom will also look interesting. To test your skills, we recommend weaving a box, basket. Cross the tubes, for example, the fifth and seventh.

Take one and start weaving from the center section, moving in a circular direction, bypassing the main tubes at the top and bottom.

When the tube ends, you should build up the next one. This will give you a circle of the desired diameter.

As for the square bottom, it is very rare in a braided form. 
Watch our photos and videos to get inspired and start creating your own masterpieces!

Photo examples of weaving from newspaper tubes


