The symbol of the coming year is a cockerel, and today it will be a cock made of felt, sewn by hand. In this master class you will find both an author's pattern and step-by-step instructions that will allow you to make a toy or a holiday pendant.
To sew a felt rooster with your own hands, you will need:
cardboard or paper for patterns;
thin felt in 4 colors;
beads for eyes;
sewing threads to match each felt color;
some wire for beads;
red floss;
a cut of 20 cm of a red satin narrow ribbon (0.5-1 cm);
a little syntapon or silicone as a filler;
matches or lighter;
round nose pliers and pliers (optional).

If you are going to sew only one figure, you can simply print or transfer the pattern of a felt rooster from the monitor to paper from the monitor, first cut it along the contour, cut out two parts of the rooster from it, and then cut into small pieces. If your plans include two or more birds that will be cut out at different times, we advise you to make a silhouette of the bird and separately - details for it.
So, here is our rooster.

Felt rooster: a master class in step-by-step photos
Open the toys
We decided to use white felt as the main color: all other colors look advantageous on it. Three colors were chosen for the sewn parts: red (to traditionally make a comb and a goatee out of it) and two matching red - yellow and blue.
They decided to make the smallest feather of the tail from red, from blue - the plumage, wing and large tail feather, and from yellow, in addition to the beak, the upper part of the wing and the middle feather in the tail. The rooster turned out to be very elegant!
So, for each part of the pattern, we cut out two parts in a mirror image.
On light felt, it is convenient to outline parts of the pattern with a simple pencil on the side that goes to the wrong side, on dark felt it is better to use white or silver gel pen, remnant or tailor's chalk.


Small parts.

And we arrange the parts according to the pattern so as not to get confused how to sew them.

Patching elements and forming paws
We started the design of felt roosters with red. For sewing, ordinary sewing threads were used.
Because the figurine itself is bright, elegant, we decided that additional accents in the form of decorative seams would only overload the impression of finished work, so we limited ourselves to modest seams.
The seam for sewing and assembling is looped. For sewing toys out of felt, a needle-forward seam is often used, but this is usually the case when the thread is contrasting with the color of the felt. Those. - not our case.


Then they took up the yellow one. Sewed a feather onto the wing; a beak and another tail feather.


And finally, blue elements and blue sewing thread.

Repeat the same for the second part of the cock, if you did not sew both parts at the same time.

The peephole is missing. They can be embroidered, or you can use "live" beady eyes.

The paws could be cut out of felt (in one layer, without sewing), crocheted with air loops, or simply hung with strings with knots at the ends instead.
We have chosen a different method, more laborious, but, in our opinion, quite nice. Namely: they made the paws of thin wire (although one could have taken a thicker one), and then wrapped them with red floss threads, to match the felt on the comb.


A ring was made in the upper part of the wire paw using round-nose pliers: when the paw is sewn into the body, it can be securely fixed through the ring.

Fold the piece of tape in half, face side outward, and we singe the combined cuts with a flame of matches or a lighter so that the cut melts. Let us hold it with a canopy so that the singed part cools down and does not stick to the table surface.

You can sew both parts of the felt rooster from anywhere. We chose the place under the tail as the most inconspicuous, in our opinion. The sewing method is the same - looped, but given that it is cut, the work is much faster than when we sewed on the feathers.

We reached the peak of the first leg - put the ring of the wire leg into it - and continued to sew with a buttonhole stitch.

The same is for the second paw.

In this toy, we put a loop of ribbon into the last top of the comb: this is necessary for stability, so that when suspended, the felt cock takes a vertical position and does not fall to either side.

Sewed in a loop - and we proceed to stuffing the already sewn part of the cockerel: paws, tummy, head. You do not need to stuff too much, otherwise creases will appear on the felt. A little to give the bird a pleasant volume.

We move on to the tail, and when a small hole remains, we fill the tail through it too.

A do-it-yourself felt rooster is ready!


If you are interested, you will find detailed master class from the link provided.
Eva Casio specially for the site Handicraft workshops
In the coming year, a toy cockerel will be on almost every New Year's. Such christmas tree toy it is not necessary to buy it - you can sew it yourself from felt.
So, our master class is dedicated to sewing a New Year's felt cockerel on a Christmas tree.
Christmas tree toy - felt cockerel
To make a toy cockerel we need:
- felt yellow, red, green and orange;
- black beads;
- orange beads;
- synthetic winterizer;
- threads;
- white lace;
- scissors;
- needle
- green ribbon.
Progress:
- Let's draw and cut out of paper parts of the pattern of the future felt cockerel on the Christmas tree. We will need:
- torso;
- two parts of the tail;
- two parts of the wings;
- crest;
- feathers on the neck;
- beak;
- beard.

Orange felt - two parts of the body.
Green felt - two parts of the wing, two parts of the tail and two parts of the feathers on the neck.
From yellow felt - two small parts of the wing and two details of feathers on the neck.
From red felt - one large part of the tail, two small hearts and two parts of the comb, beak and beard.


The cockerel for the Christmas tree is ready. Such cockerels are suitable not only for decorating a Christmas tree, they complement well new Year gifts... The cockerel can be put in a gift box, or can be used to decorate gift wrapping.
New Year's felt crafts are always neat and beautiful handmade souvenirs for the holiday.
According to the Eastern calendar, 2017 will be the year of the Rooster, so it will be nice to put such a small present.
Today we will offer you a photo of ideas for felt crafts in the form of a Rooster or Chicken, which are easy to make at home.
Such handmade gifts will turn out to be special, original, memorable and very beautiful, because felt is easy to process.
New Year's craft Chicken made of felt hearts
Do you want to make souvenirs for the Year of the Rooster with your own hands? Try felt chicken. All parts can be cut in the shape of hearts and glued.
You will need:
Felt different colors
synthetic winterizer or cotton wool
thread and needle
small bead for the eye
beautiful ribbon
scissors
stencils of large and small hearts, they can be made from cardboard
fabric adhesive

How to sew a felt chicken:
1. Cut out two large hearts out of light colored felt. Fold together and sew along the perimeter. Without finishing a little to the end, stuff the hearts with padding polyester or cotton wool. Then sew to the end and cut the thread.
2. Cut out four small red hearts of different sizes for the wing, scallop and beard, and several colored hearts for the tail.
3. Glue the two red pieces of the comb and sew to the body.
4. Fold the third red heart in half and sew in the middle of the body so that one half is not sewn on and gives the garment a three-dimensional look. This will be the wing.
5. Fold the fourth heart in half and sew like a rooster's beard.
6. Fold the yellow heart and sew on the beak.
7. Make a bead eye.
8. Glue the remaining colored hearts one after another at the top of the heart, like a rooster's tail.
It remains to sew beautiful ribbon so that the Rooster can be hung like a Christmas toy.
Such a felt souvenir will definitely bring good luck in the New Year!
Fridge magnet Rooster made of felt
With your own hands, you can make an original fridge magnet, for example, from felt fabric. This is a developmental craft, making one is not difficult.
It is pleasant to make such a gift yourself and give it to someone as a small present. For example, it will delight people born in the year of the Rooster, or on New Year Rooster to close people, friends.
Materials you need:
- white and red felt
- sequins flowers
- beads made of wood
- ribbons
- shifting eye
- thread floss iris
- universal glue
- magnet
How to make a magnet Rooster out of felt:
1. Cut out all the necessary parts from the fabric: beak, comb, wings.

2. Sew a wing to one of the parts of the body.

3. Insert the comb, beak and ribbons between the main parts.

4. Connect together with a chain stitch, stitching from both sides at the joints with the red elements.


5. Put the beads on the ribbons and tie the ends with a knot. Fix with glue.
6. Glue the eye and sequins onto the wing.

7. On reverse side glue the magnet. If the magnet is large, you can hide it inside. Before doing this, check if it will stick through the felt.

The felt cockerel magnet is ready!
And here are some more options for fridge magnets in the form of a Rooster:


Felt chicken on a skewer for the New Year of the Rooster
A skewer with a Cockerel, this craft is also called "felt candy", can be placed in a flower pot, as well as decorate Easter cakes.

You will need:
- yellow, orange and green felt
- threads
- sintepon
- beads
- skewer

How to make a chicken skewer:
1. Make patterns out of paper and cut out 2 parts of the body, a beak, a comb and circles for decoration, as in the photo.

2. Place a padding polyester inside for volume and sew the parts with a double orange thread, stringing small beads on each stitch.

3. Decorate the chicken with green circles, on one of which you need to sew black beads on both sides - eyes.
Rooster crafts made of felt are also good because they can be left until Easter, and they will not lose their relevance for many years, and not only for the New Year 2017 of the Rooster.
Enjoy your creativity!

Do-it-yourself felt rooster. Step-by-step instructions with a photo
We suggest that you sew a Rooster toy without using a sewing machine.
To do this, you need to prepare
White, red blue and green felt;
Scissors;
Sewing needle;
Filler for toys;
Threads (we used floss threads Brown for embroidery)
.jpg)
Step-by-step workflow
1. Print and cut out patterns.
Rooster Patterns
.jpg)
.jpg)
.jpg)
2. We cut out the details from felt according to the patterns without allowances for seams.
.jpg)
3. Fold the rooster's beak and beard in half and fix this position with a few stitches.
.jpg)
4. Fold with the wrong side inside the white felt parts A and A1. We sew these parts with a simple connecting seam in 1 thread.
Do not forget to sew in the comb, beak and beard.
.jpg)
5. Apply breast detail B, starting from serif b, aligning it with detail A and sew it on.
.jpg)
6. We fill the body of the Rooster with filler and sew everything to the end, while we do not sew the place for the tail of the ace.
.jpg)
.jpg)
7. Fold the colored tail pieces as you like and fix the folded position with a few stitches of thread.
.jpg)
8. Place the base of the tail in the unstitched hole ac. Sew on the tail with a needle-forward seam.
.jpg)
9. Cut the tail feathers with scissors in several places, give them a nice shape.
.jpg)
10. We glue the eyes or you can embroider the eyes with a French knot in 3 threads.
.jpg)
11. Sew on the wings.
.jpg)
12. We make legs from threads
To do this, fold 12 threads of floss (in our case, the thread size is about 60 cm). We thread these threads into the needle. We move the needle to the middle of the bundle of threads, twist the ends tightly in opposite directions, pull on the needle, connecting the ends of the threads. In this case, twisting occurs.
.jpg)
We tie the ends of the threads with a knot.
Using a needle, pull the rope through the side seams of the cock. Cut the needle and knot the other end of the threads.
.jpg)
Our Cockerel is ready!
.jpg)
It can be presented for the New Year with good wishes.
.jpg)
The New Year will come soon!
Snow is shining outside the window
A painted sleigh is coming,
Rooster rules them.
He carries with him as a gift
Happiness, joy and success
To make this year bright
The best and most wonderful of all!
.jpg)
The year of the Rooster will come very soon, and many will want to decorate their tree with the symbol of the coming year. In this workshop I will share my pattern and show you how to sew a cute felt cockerel.
For work you will need:
- Felt.
- Beads.
- Gold threads.
- Lace.
- Gold contour on the fabric.
- Glue (if you are concerned about the issue of toxicity, you can do without it).
- Threads to match.
- Disappearing marker, scissors, needle, filler.
Transfer the pattern to felt and cut it out.

Here's how many details came out:

We glue all the feathers of the tail and wings.
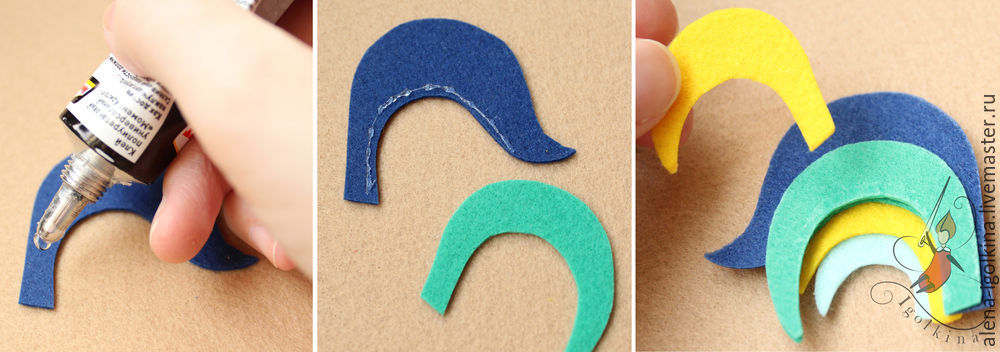
I do this so that it is more convenient to sew and the details do not fall apart in my hands. You can use a different glue, sew the feathers together, or leave them separate.

We sew the details of the body and sew on the beads with golden threads in this way:

We also sew wings. Circle the upper part on the felt and cut it out.

We connect the parts of the wings with an overcast seam and stuff them.

Sew the torso, starting from the neck, sewing in all parts of the head. After the head is stitched, we mark the place of the eye and stick in the thread from the inside.

We fill the head completely, make a couple of ties through and through and sew on the eyes. At the scallop, we withdraw the thread, making a knot, hide it back.

We make a knot on the lace and sew it into the neck. If the lace is like mine, it is important not to hit it with the needle (the golden winding will break and the lace will be damaged). So that the cock hangs straight and does not lean forward, we pull it to the head with a few stitches, as in the photo.

We finish the body along the edge, sewing in the tail and legs. We fill the torso and sew on the wings.

We paint the cuts of the beak and paws with a golden outline, otherwise all the tips will fluff.

It remains to wait for the contour to dry, and you can decorate the Christmas tree with a cockerel :)
Here are my color options.


I congratulate everyone on the coming New Year and wish you creative success!


